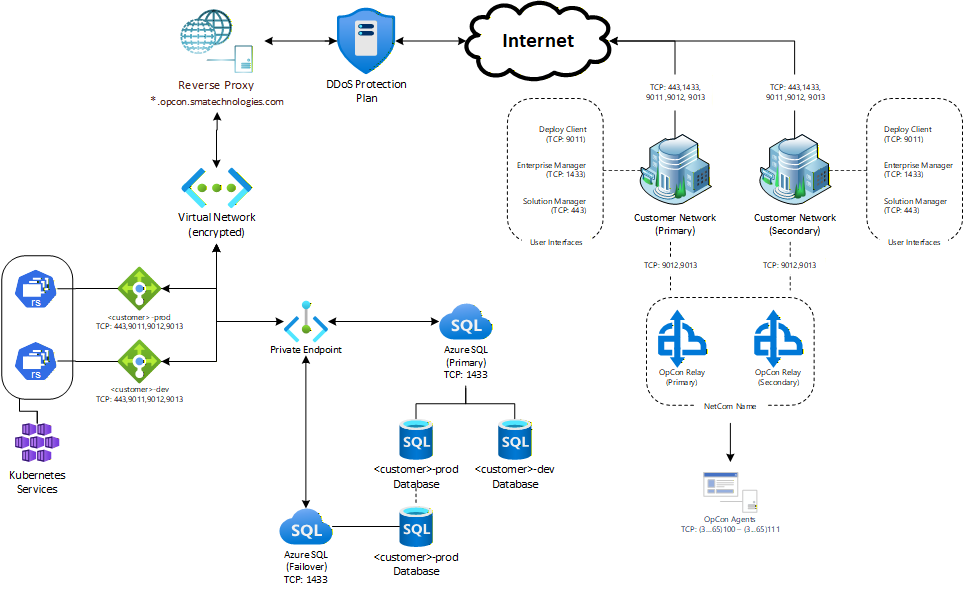
Relay (NetComApi)
The Relay (NetComApi) utility provides communication for our OpCon Relay cloud offering.
This is accomplished by relaying traffic from/to the Agents internal to a customer network with the customer's cloud instance(s).
Diagram
Download
You can download the latest version of the Relay install package using the OpCon Web Installer located at: https://github.com/smatechnologies/opcon-web-installer/releases/latest
or directly from our SFTP server at: https://files.smatechnologies.com/files/OpCon%20Releases/Relay.
Supported Versions
The current version is the supported release. The previous version remains available during the upgrade window.
FAQs
Q: What versions of Windows OS are supported?
A: All versions of Windows Server currently supported by Microsoft.
Q: What specifications should the machine have that is running Relay?
A: We suggest 2-4 vcpu, 8-16GB of RAM, and at least 64GB of storage (OS & Logs).
Q: What ports need to be open?
A: Typically, none, but if you are blocking outbound traffic to the Internet then TCP:9012 and TCP:9013. If you choose to install Relay within a DMZ, then you will also need to open inbound traffic for all ports used by Agents (default: 3100-3111).
Q: How do I update the Relay software?
A: Currently you must manually stop the service, overwrite the executable with the new version, and restart the service. In a future release, automatic updating will be implemented.
Known Issues
- Currently will only install and run on a Windows OS
- Requires a Relay per OpCon instance. For example, if you have a production and development instance of OpCon, then you would need to install two (2) relays. As of the Relay 24.3.2 release, multiple instances of Relay can be installed on the same Windows OS. Please see instructions below.
- When configuring the Agent in OpCon to use Relay (NetComName) and the Relay and Agent are on the same Windows Server machine, you SHOULD NOT use
127.0.0.1as the IP Address. Instead you should use the actual name of the server or the actual IP Address of the server.
Enabling TLS Communication For OpCon Agents Using Relay
To set up TLS communication for OpCon agents using Relay, follow the existing documentation for the agent (https://help.smatechnologies.com/integrations/) but import the certificates to the Relay server in place of the on-prem OpCon server.
Install Primary Relay Instance
- Choose a compatible server within the primary data center.
- Download the install file SMANetComRelay.exe.
- Create a folder for the SMANetComRelay.exe that describes the instance, for example:
"C:\Program Files\OpConxps\Relay-Prod"or"C:\Program Files\OpConxps\Relay-Test". - Copy "SMANetComRelay.exe" from the download folder to the folder created in Step 3.
- Right-click the file SMANetComRelay.exe and choose to Run as administrator.
- You will be presented with a text menu, choose the first option labeled Register & Install Netcom Relay Service.
- Next, you will be prompted to Enter Client Name. The default is the fully qualified domain name of the machine; we recommend using the company name from the prefix of the URL to your OpCon instance.
- Next, you will be prompted to Enter Relay Name. The default is the name of the machine, we recommend the prefix of the URL to your OpCon instance. For example,
company-prod, where company would be your company identifier and prod would be the instance identifier. These are usually found in the provided URI beforeopcon.smatechnologies.com. - Next, you will be prompted to Enter Machine ID. Press Enter to accept the default (short hostname of this primary machine).
- Next, you will be prompted to Enter your OpCon URI. This will be the URI provided by Continuous that identifies your cloud instance. (E.g.- https://company-prod.opcon.smatechnologies.com)
- Finally, you will be prompted to Enter External Token for a User with Super Admin privilege like ocadm.
You can generate this token by logging into Solution Manager as a user like ocadm and navigating to LIBRARY → ACCESS MANAGEMENT → USERS → “+” to add a new user
* First Name: Relay
* Last Name: Install
* Username: relayInstall
* Password: (Set to unique value and remember for later)

Click on the button labeled “Save”

Click on the ROLES tab and check the box for Role_ocadm and click on the button labeled “Save”

Click on the SETTINGS tab and check the box for Enable external tokens and click on the button labeled “Save”

Log out of Solution Manager and log back in as relayInstall and navigate to RELAYINSTALL → EXTERNAL TOKEN. Here you will select the radio button labeled API Token and then click the button labeled Generate. Make sure to copy and paste the generated token to the install dialog that is currently open.
11. You will see the install dialogue confirm authentication to the URI entered in Step 9 with the token entered in Step 10 and then register to relay with the names given in Steps 7 & 8.
12. You can now choose to Exit the install dialog or just close the window.
13. Log into Solution Manager as ocadm or user with equivalent rights.
14. Navigate to Library -> Agents
15. For each Agent that will use the installed Relay:
* Stop the agent
* Modify the agent and add the name of the Relay from Step 6 to the NetComName field under General Settings
* Save the changes
* Start the agent
16. If all Agents show Communicating, then you have successfully installed and configured Relay. If not, please open a case with support so our team can help you troubleshoot the issue.
17. If you are installing a second instance of Relay on the same Windows OS, you may skip this step until you are finished with that installation. Log back into Solution Manager as a user like ocadm and navigate to LIBRARY → ACCESS MANAGEMENT → USERS. Select the user relayInstall, created in Step #8, by clicking on it. Click on the vertical ellipsis to Delete the selected user.
Install Standby Relay Instance
-
Choose a compatible server within the secondary data center.
-
Download the install file SMANetComRelay.exe.
-
Create a folder for the SMANetComRelay.exe that matches the folder created for the Primary Relay instance.
-
Copy "SMANetComRelay.exe" from the download folder to the folder created in Step 3.
-
Right-click the file SMANetComRelay.exe and choose to Run as administrator.
-
You will be presented with a text menu, choose the first option labeled Register & Install Netcom Relay Service.
-
Next, you will be prompted to Enter Client Name. Use the same Client Name that was used when installing the Primary Relay instance.
-
Next, you will be prompted to Enter Relay Name. Use the same Relay Name that was used when installing the Primary Relay instance.
-
Next, you will be prompted to Enter Machine ID. Press Enter to accept the default (short hostname of this standby machine). This value must differ from the primary/secondary relay's Machine ID(s) used earlier
-
Next, you will be prompted to Enter your OpCon URI. Use the same OpCon URI that was used when installing the Primary Relay instance.
-
Finally, you will be prompted to Enter External Token for a User with Super Admin privilege like ocadm.
For this step, you may use the token for the relayInstall user that was created while installing the first Relay. If that user no longer exists, please follow the instructions under Step 10 in the Install Primary Relay Instance section above.
-
You will see the install dialogue confirm authentication to the URI entered in Step 9 with the token entered in Step 10 and then register to relay with the names given in Steps 7 & 8.
-
You can now choose to Exit the install dialog or just close the window.
-
Log into Solution Manager as
ocadmor user with equivalent rights. -
Navigate to Library -> Agents
-
For each Agent that will use the installed Relay:
- Stop the agent
- Modify the agent and add the name of the Relay from Step 6 to the NetComName field under General Settings
- Save the changes
- Start the agent
-
If all Agents show Communicating, then you have successfully installed and configured Relay. If not, please open a case with support so our team can help you troubleshoot the issue.
-
Log back into Solution Manager as a user like ocadm and navigate to LIBRARY → ACCESS MANAGEMENT → USERS. Select the user relayInstall, created in Step #8, by clicking on it. Click on the vertical ellipsis to Delete the selected user.
Uninstall
- Open File Explorer in Windows and navigate to
"C:\Program Files\OpConxps\Relay-[[Instance Name]]"or the path you installed to. - Right-click the file SMANetComRelay.exe and choose to Run as administrator.
- You will be presented with a text menu, choose the second option labeled Uninstall Netcom Relay Service.
- You will see the install dialogue confirm successful remove of the Relay services.
- You can now choose to Exit the install dialog or just close the window.
Upgrade Primary/Standby Relay Instance
- Download the new release file SMANetComRelay.exe.
- Click on Start and type "Services" to launch the service manager window.
- Scroll down the list of services, right-click on "OpCon Relay" and "Stop" the service.
- Copy SMANetComRelay.exe from the download folder and overwrite the file by the same name at
"C:\Program Files\OpConxps\Relay-[[Instance Name]]"or wherever you chose to install the application. - Navigate back to the service manager window opened in Step 2 and right-click on "SMA OpCon Relay" and "Start" the service.
- Confirm the service is "Running".
- Open a web browser and navigate to the Solution Manager UI for the instance using the Relay service that was just updated.
- Confirm all machines are communicating.
Upgrade existing Primary/Standby Failover (v25.1.1 and earlier)
This section applies to environments where two relay instances were installed on separate machines. If the current Standby instance uses a different Relay Name, there will be a few additional steps to follow. These steps will be identified with an "**" prefixing the instruction.
After completing these steps, both relay services will run simultaneously. The active relay continues processing without interruption and failover is managed through Solution Manager — manual service stop/start is no longer required.
Step 1 — Upgrade the Primary Relay ** This Relay Name is the canonical Relay Name and will be shared by both relay instances after the upgrade. Please record the Relay Name to be used when installing the Standby Relay later.
Download the new release file SMANetComRelay.exe.
Click on Start and type Services to launch the service manager window.
Scroll down the list of services, right-click on SMA OpCon Relay and select Stop.
Overwrite SMANetComRelay.exe with the new file in the relay install folder (e.g., C:\Program Files\OpConxps\Relay).
Right-click on SMA OpCon Relay in the service manager and select Start.
Confirm the service is Running.
On startup, the new executable detects that no Machine ID is set, uses the machine's hostname, writes it to SMANetComRelay.ini, and connects to NetCommApi. The existing registration entry is automatically updated in-place with the new Machine ID. This relay continues as the primary (Priority 0).
Step 2 — Uninstall the Old Standby Relay Note: The second relay cannot be upgraded with a simple executable replacement. Because the primary relay has already claimed the single shared registration entry, the standby machine has no registration of its own and would fail to connect. A fresh installation is required.
On the standby machine, navigate to its relay install folder (e.g., C:\Program Files\OpConxps\Relay). Right-click SMANetComRelay.exe and choose Run as administrator. Select Uninstall Netcom Relay Service and press Enter. Confirm the service is removed successfully. You can now choose to Exit the install dialog or just close the window. Delete SMANetcomRelay.ini file from relay's ProgramData folder (e.g. C:\ProgramData\Opconxps\Relay)
Step 3 — Install the New Standby Relay on the Standby Machine Copy SMANetComRelay.exe from the download folder to the relay install folder on the standby machine (e.g., C:\Program Files\OpConxps\Relay).
Right-click SMANetComRelay.exe and choose Run as administrator.
Select Register & Install Netcom Relay Service and press Enter.
Next, you will be prompted to Enter Client Name. The default is the fully qualified domain name of the machine, we recommend using same client name that you used for registering the primary relay.
Next, you will be prompted to Enter Relay Name. Enter the exact same Relay Name used by the primary relay (** The canonical Relay Name recorded earlier in Step 1). This links both machines together as a failover pair.
Next, you will be prompted to Enter Machine ID. Press Enter to accept the default (short hostname of this standby machine). This value must differ from the primary/secondary relay's Machine ID(s) used earlier.
Next, you will be prompted to Enter your OpCon URI (e.g., https://company-prod.opcon.smatechnologies.com).
Finally, you will be prompted to Enter External Token for a User with Super Admin privilege like ocadm.
For this step, generate an external token by logging into Solution Manager as a user like ocadm and navigating to LIBRARY → ACCESS MANAGEMENT → USERS → "+" to add a new user:
First Name: Relay Last Name: Install Username: relayInstall Password: (Set to unique value and remember for later) Click on the button labeled Save.
Click on the ROLES tab and check the box for Role_ocadm and click Save.
Click on the SETTINGS tab and check the box for Enable external tokens and click Save.
Log out of Solution Manager and log back in as relayInstall and navigate to RELAYINSTALL → EXTERNAL TOKEN. Select the radio button labeled API Token and click Generate. Copy and paste the generated token to the install dialog.
You will see the install dialog confirm successful registration. The standby relay is automatically assigned Priority 1 because Priority 0 is already held by the primary.
You can now choose to Exit the install dialog or just close the window.
** Step 3a — Remove the Old Standby Registration The registration entry for the old standby Relay Name (e.g., company-prod-2) is now unused and should be removed. Ask OpCon Support to delete the unused Relay name registration entry that was previously used as the standby from database.
Step 4 — Verify Log into Solution Manager as ocadm or a user with equivalent rights. Navigate to the relay management view and confirm: The primary relay shows Connected/Active. The standby relay shows Connected/Standby. Confirm all agents continue to show Communicating. No agent changes are required. Navigate to LIBRARY → ACCESS MANAGEMENT → USERS, select relayInstall, click the vertical ellipsis, and Delete the user.