Informatica Operation
Theme: Configure | Audience: Automation Engineer
What is it?
Once the Informatica On-Prem ACS connector has been registered with the OpCon system, it is possible to perform agent and job definitions. All definitions can only be performed using Solution Manager.
- Use this when defining a new Informatica connection in OpCon to enable workflow submission and monitoring.
- Use this when creating batch user credentials to provide secure repository access without embedding credentials in job definitions.
- Use this when configuring run tasks that reference specific folders and workflows in the Informatica environment.
Defining Informatica batch users
The Informatica implementation requires an Informatica batch user to provide the user name and password for connection to the Informatica database. The database user must have the required privileges to access the following tables:
- Folder names:
opb_subject—select SUBJ_NAME from opb_subject - Workflow names:
REP_WORKFLOWS—select WORKFLOW_NAME from REP_WORKFLOWS where SUBJECT_AREA = 'folder name'
Before creating the Informatica connection or tasks, ensure that an appropriate batch user is created that will be used to access the repository (Oracle connection).
To define an Informatica batch user, complete the following steps:
- Open Solution Manager.
- From the Home page, select Library.
- From the Security menu, select Batch Users.
- Select +Add to add a new batch user.
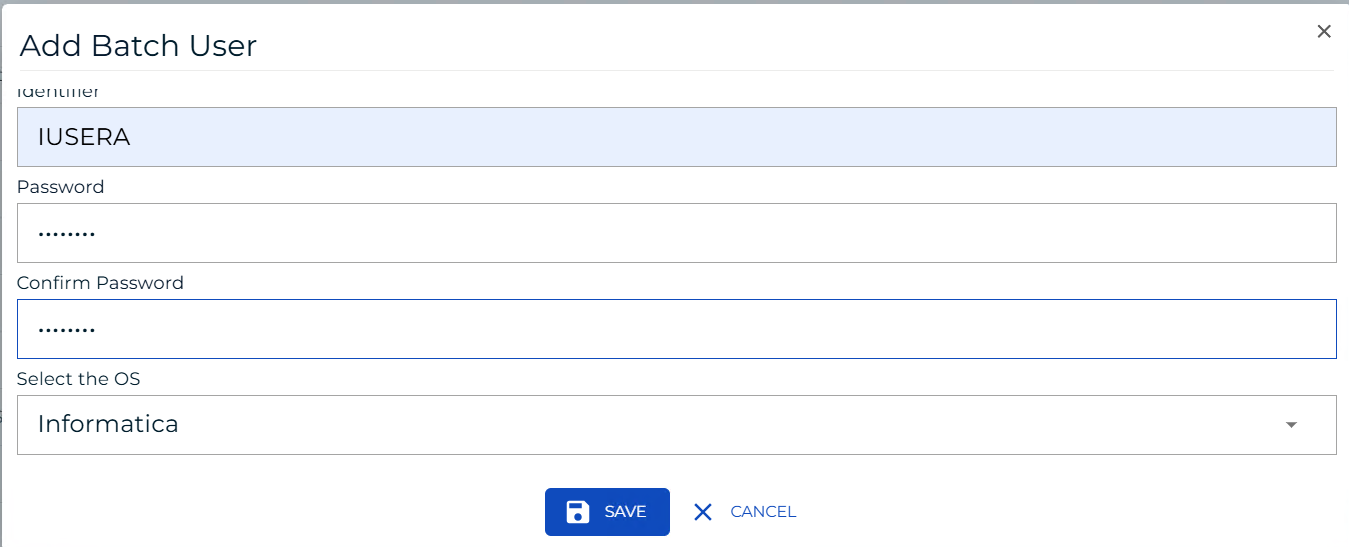
- Select Informatica from the Select the target OS list.
- In the Identifier field, enter the user name that will be used to connect to the Informatica database.
- In the Password and Confirm fields, enter the password of the user.
- Select Save. The batch user is saved.
Defining an Informatica connection
Add a new Informatica agent definition using Solution Manager. Items marked in red are required values.
To define an Informatica connection, complete the following steps:
- Open Solution Manager.
- From the Home page, select Library.
- From the Administration menu, select Agents.
- Select +Add to add a new agent definition.
- Enter the agent details:
a. Enter a unique name for the connection.
b. Select Informatica from the Type list.
c. If the software is installed within a SmaRelay environment:
- Select General Settings.
- In the NetCom Name field, enter the name of the SmaRelay environment.
d. Select Informatica Settings.
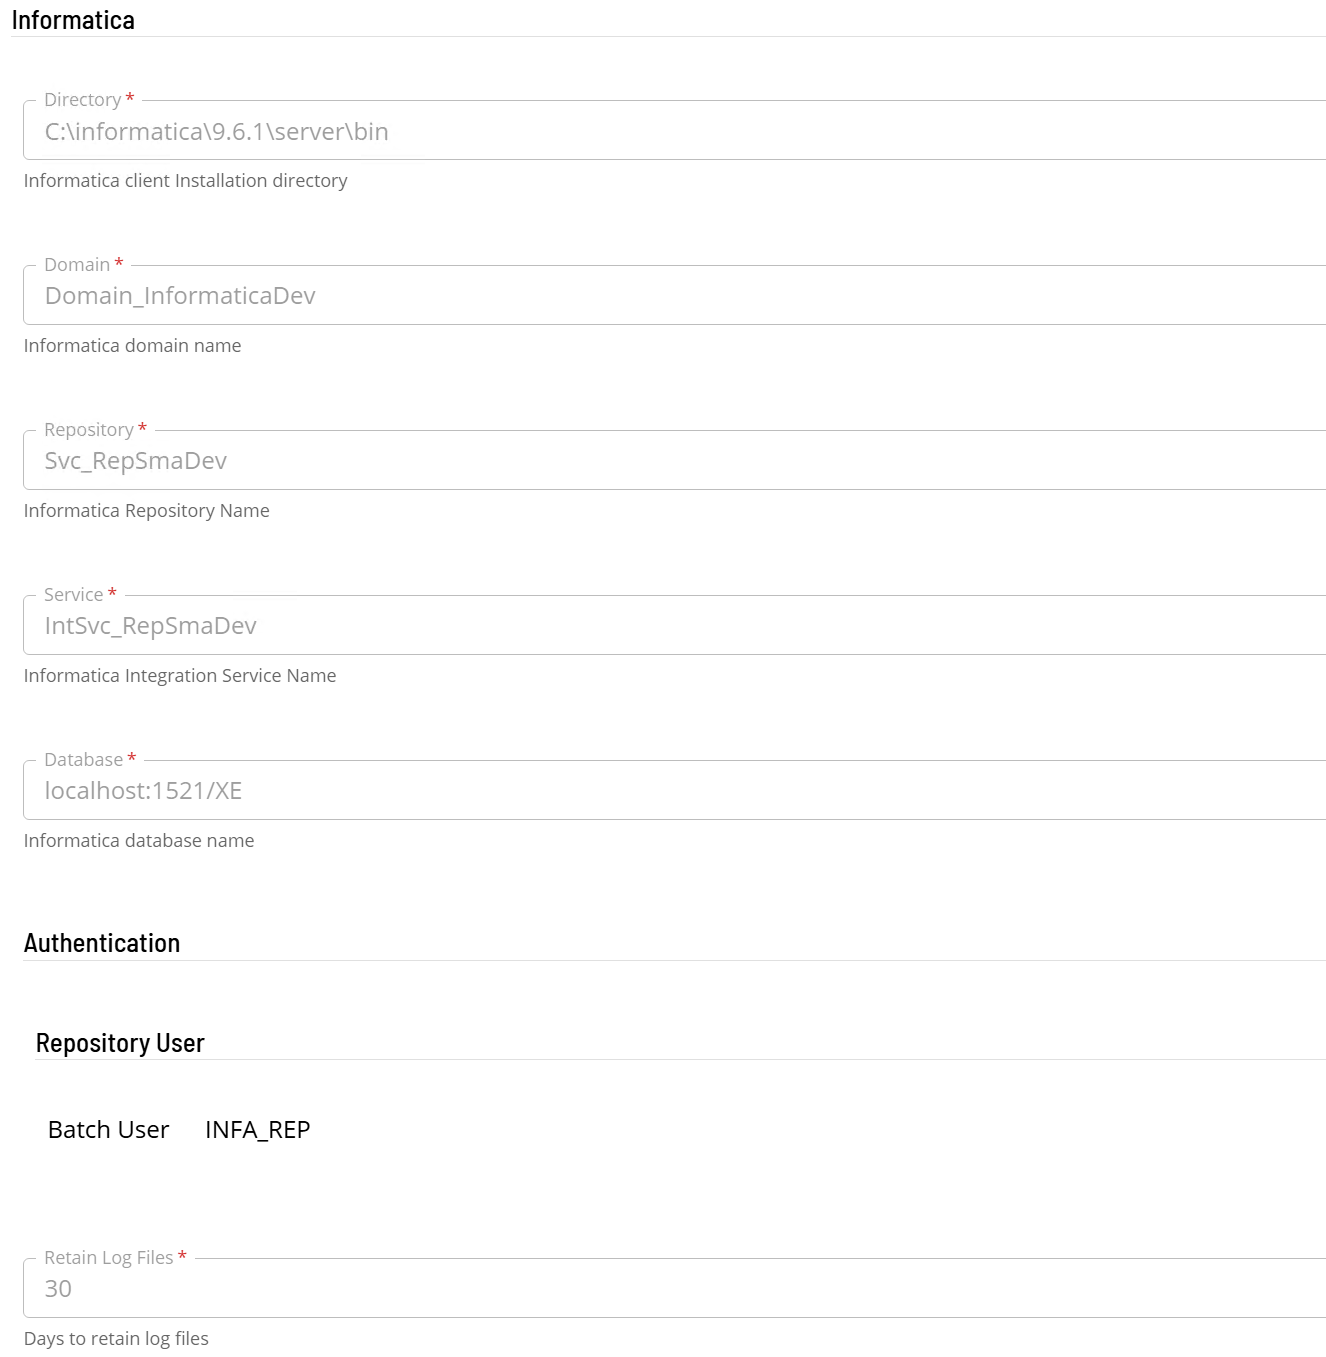
e. In the Directory field, enter the full path of the directory where the Informatica client binaries are installed.
f. In the Domain field, enter the domain name of the associated Informatica installation.
g. In the Repository field, enter the repository name of the associated Informatica installation.
h. In the Service field, enter the name of the associated Informatica Service Instance.
i. In the Database field, enter the address, port number, and database name of the associated Informatica database (
address:port/database). j. In the Authentication section, select a batch user from the list. k. In the Retain Log Files field, enter the number of days to retain Informatica ACS log files (default: 30 days).
- Select Save to save the definition changes.
- Select Communication Settings. Verify that the Requires XML Escape Sequences: User-Defined field is set to True. If not, update the field and select Save.
- Select the Change Communication Status button and select Enable Full Comm. to start the connection. The agent comes online.
Defining tasks
The Informatica On-Prem connection supports the following task types:
| Task type | Description |
|---|---|
| RUN | Create a workflow task. |
During task creation, a list of available folders is retrieved from the Informatica database and added to the Folder Name list. Once a folder name is selected from the list, a list of available workflows within the folder is retrieved from the Informatica database and added to the Workflow Name list.
To define an Informatica task, complete the following steps:
- Open Solution Manager.
- From the Home page, select Library.
- From the Administration menu, select Master Jobs.
- Select +Add to add a new master job definition.
- Enter the task details: a. Select the schedule name from the Schedule list. b. In the Name field, enter a unique name for the task within the schedule. c. Select Informatica from the Job Type list. d. Select Run from the Task Type list.
To enter details for the Run task type, complete the following steps:
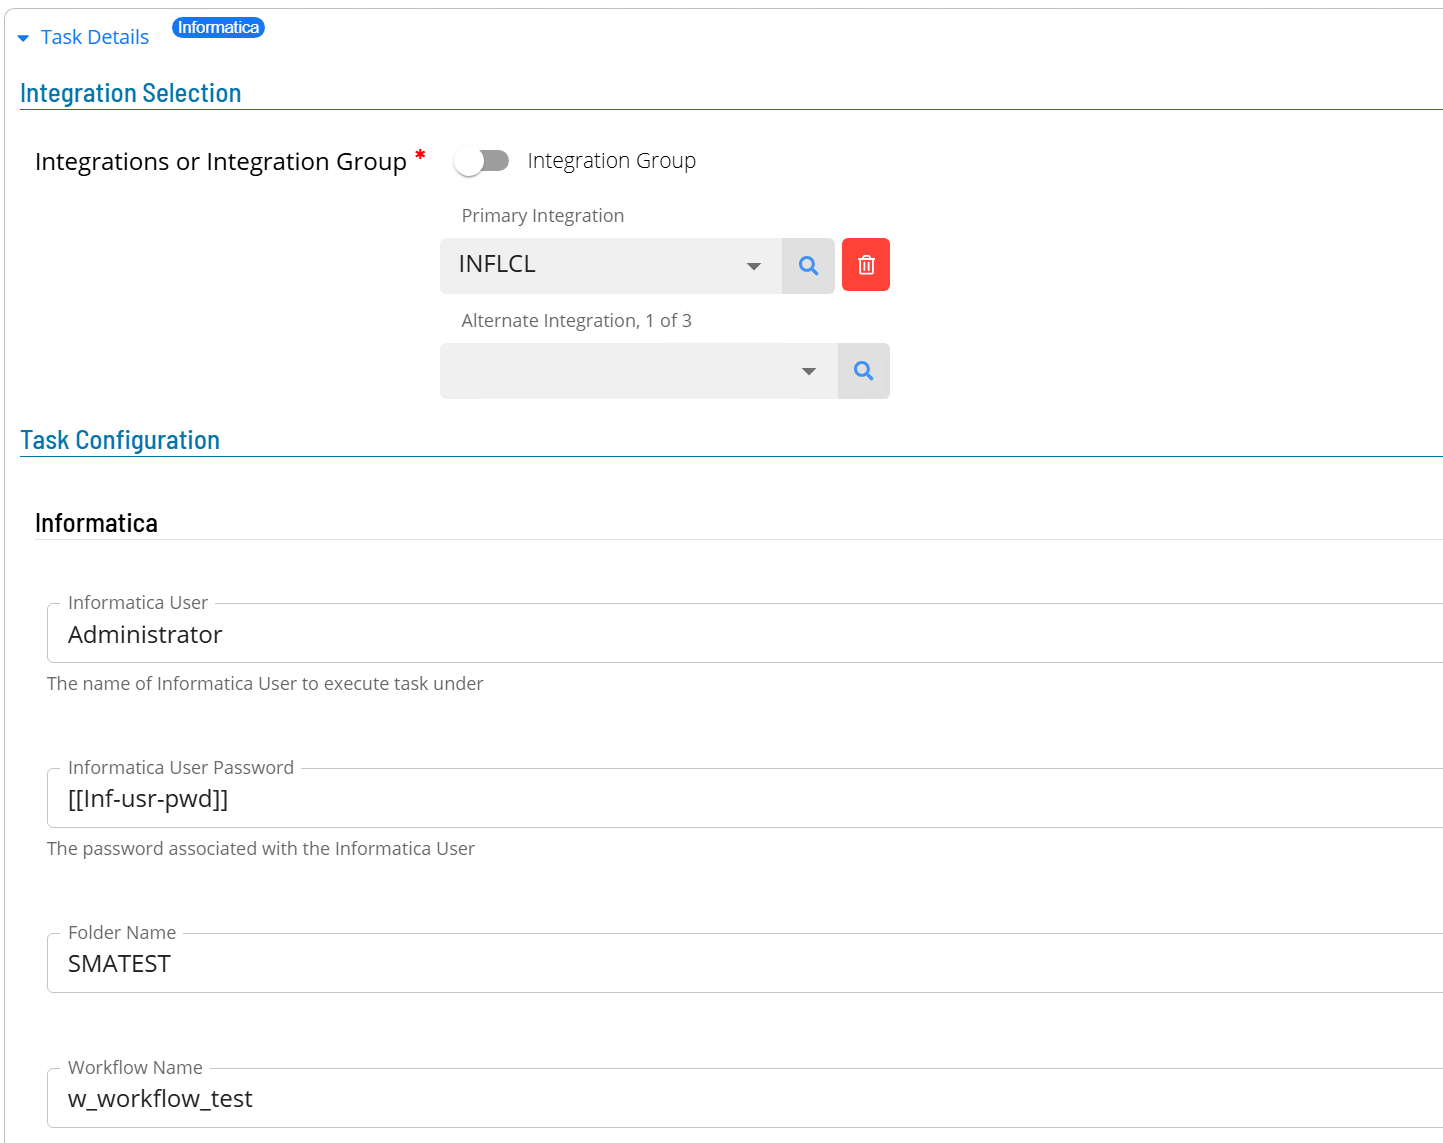
- Select the Task Details button.
- In the Integration Selection section, select the primary integration, which is an ACSInformatica connection previously defined.
- In the Task Configuration section, enter the required task fields: a. In the Informatica User field, enter the user name that will be used to start the task on the Informatica environment. b. In the Informatica User Password field, enter the password of the user. It is suggested that an encrypted global property is used to contain the password value. c. From the Folder Name list, select the folder where the workflow is defined. Once a folder is selected, a list of available workflows is added to the Workflow Name list. d. From the Workflow Name list, select the required workflow name.
- Select Save to save the definition changes. The task is saved.
Working with parameters
There are two types of possibilities when working with parameters. It is possible to use a parameter file defined on the Informatica system, or it is possible to create a local parameter file and pass these values when processing the request.
To configure task parameters, complete the following steps:
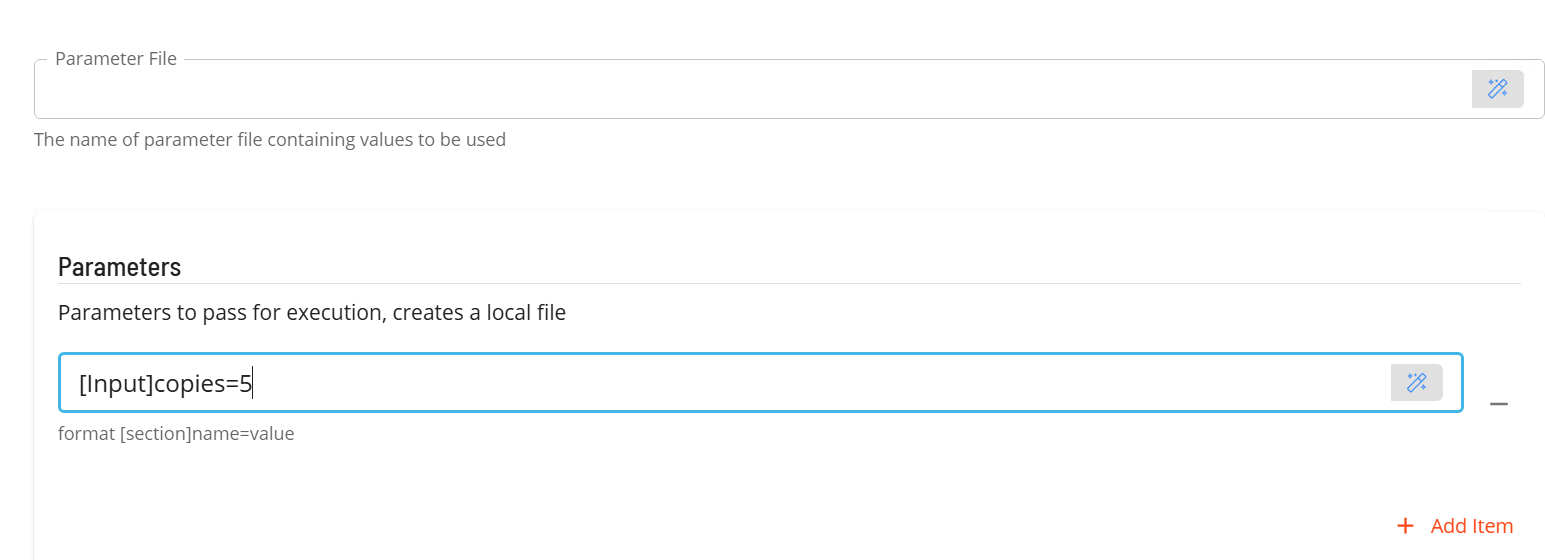
- In the Parameter File field, enter the full name of the parameter file on the Informatica system to be used by the task.
- In the Parameters section, select the +Add Item button.
- Enter the parameter value using the following format:
[section]name=valuesectionis the name of the header in the parameter filenameis the name of the parametervalueis the value of the parameter
Configuration options
Connection settings
| Setting | What It Does | Default | Notes |
|---|---|---|---|
| Name | Unique identifier for the connection in OpCon | None | Required |
| NetCom Name | Name of the SmaRelay environment | None | Required only for SmaRelay installations |
| Directory | Full path to the Informatica client binaries directory | None | Required |
| Domain | Informatica domain name | None | Required |
| Repository | Informatica repository name | None | Required |
| Service | Informatica Service Instance name | None | Required |
| Database | Address, port, and name of the Informatica database | None | Format: address:port/database |
| Authentication (Batch User) | Oracle database credentials used for repository access | None | Batch user must be defined before creating the connection |
| Retain Log Files | Number of days to retain Informatica ACS log files | 30 | |
| Requires XML Escape Sequences | Enables XML escape sequence handling for the connection | False | Must be set to True |
Task settings
| Setting | What It Does | Default | Notes |
|---|---|---|---|
| Informatica User | User name used to start the workflow on the Informatica environment | None | Required |
| Informatica User Password | Password for the Informatica user | None | Use an encrypted global property |
| Folder Name | Folder on the Informatica system that contains the target workflow | None | Retrieved from the Informatica database; required |
| Workflow Name | Workflow to execute | None | Retrieved after a folder is selected; required |
| Parameter File | Full path to a parameter file on the Informatica system | None | Optional |
| Parameters | Local parameter values passed to the workflow at runtime | None | Format: [section]name=value; optional |
Security considerations
Authentication: Two sets of credentials are required. A batch user (Oracle database credentials) authenticates against the Informatica repository to retrieve folder and workflow metadata. A separate Informatica user account authenticates to the Informatica environment to execute workflows.
Authorization: The Oracle batch user must have SELECT privileges on the opb_subject and REP_WORKFLOWS tables. The Informatica user must have privileges to run the defined workflows in the Informatica environment.
Data security: Batch user credentials are stored as OpCon batch user definitions and are not exposed in job or agent configurations.
Sensitive data: The Informatica User Password is used at job runtime. Store this value as an encrypted global property rather than entering a plaintext password in the task definition.
FAQs
Why is the Folder Name list empty when defining a task?
The folder list is retrieved from the Informatica database at task creation time. If the list is empty, verify that the Informatica connection is online and that the batch user has SELECT privileges on the opb_subject table.
Do I need a batch user for every Informatica connection? Yes. Each Informatica connection requires a batch user defined with Oracle database credentials. The batch user must be created in Solution Manager before the connection can be saved.
Can I use both a parameter file and local parameters in the same task? Yes. You can specify a parameter file stored on the Informatica system and also add individual parameter entries in the Parameters section. Local parameter entries supplement or override values in the parameter file.
How do I stop a running workflow?
Use the OpCon Kill function on the running job. The connector sends a stopworkflow command to the Informatica environment to stop the workflow.
Glossary
Batch user — An OpCon credential definition that stores a user name and password for a target system. For Informatica, this provides the Oracle database credentials used to retrieve folder and workflow metadata from the repository.
Folder — An organizational unit in the Informatica repository that groups related workflows. Folder names are retrieved from the opb_subject table.
NetCom Name — The identifier for the SmaRelay environment. Required only when the connector is deployed in a cloud configuration.
Parameter file — A file stored on the Informatica system that contains variable values passed to a workflow at runtime. Specified by full path in the task definition.
Related topics: