VMWare Connector installation
What is it?
This page walks you through installing the VMWare Connector and registering it with either Enterprise Manager or Solution Manager. After you finish the steps on this page, OpCon jobs can run VMWare operations such as backup, clone, power operations, reconfiguration, and snapshots. For the full list of supported operations, refer to Installation overview.
At a glance
| Step | What you do | Where |
|---|---|---|
| 1 | Confirm system requirements | This page |
| 2 | Install the connector | This page |
| 3 | Set up the connector in either Enterprise Manager or Solution Manager | This page |
| 4 | Update connector settings | Configuration |
| 5 | Define your first VMWare job | Enterprise Manager job definition or Solution Manager job definition |
Requirements
Before you begin, ensure that the target machine meets the following requirements:
- A supported version of Windows with .NET Framework 4.5 installed.
- Java version 8.
- A supported version of the Windows Agent (MSLSAM) installed on the machine.
The VMWare Connector must have the address of the host supporting VMWare web services in the configuration file. You set this address after installation, in Configuration.
The Oracle JRE prerequisite has been removed from the installation package. You must have a functional Java Runtime Environment (Java 8) installed before you install the connector.
New installation
A new installation has two phases:
- Install the connector on the target Windows machine. This step is the same for everyone.
- Set up the connector in OpCon using either of the following paths. These paths are alternatives — choose the one that matches how you define jobs:
- Enterprise Manager path — for sites that define jobs in Enterprise Manager.
- Solution Manager path — for sites running OpCon 25.0.3 or greater that define jobs in Solution Manager.
Install the connector
To install the connector, complete the following steps:
- Log in to the machine as a Local Administrator.
- Go to https://files.smatechnologies.com to download the files.
- Enter your username and password and select the Login button.
- Go to Root Folder > Connectors and Add-ons > Connectors > VMWare.
- Open the SMA OpCon VMWare Connector Install.exe file. The Select Language screen is displayed.
- Select the language for the installation screens and select the OK button. The Welcome screen is displayed.
- Select the Next button.
- Complete the remaining wizard screens.
- On the last wizard screen, select the Done button. The connector is installed.
After the installation completes, the installation directory contains:
- The connector executable.
- A single jar file containing the required libraries.
- A
Connector.configfile (which you update in Configuration).
Enterprise Manager path
Use this path if you define VMWare jobs in Enterprise Manager. It involves two procedures:
- Configure the VMWarePath global property — tells OpCon where the connector is installed.
- Install the Enterprise Manager sub-type — adds the VMWare job sub-type to Enterprise Manager.
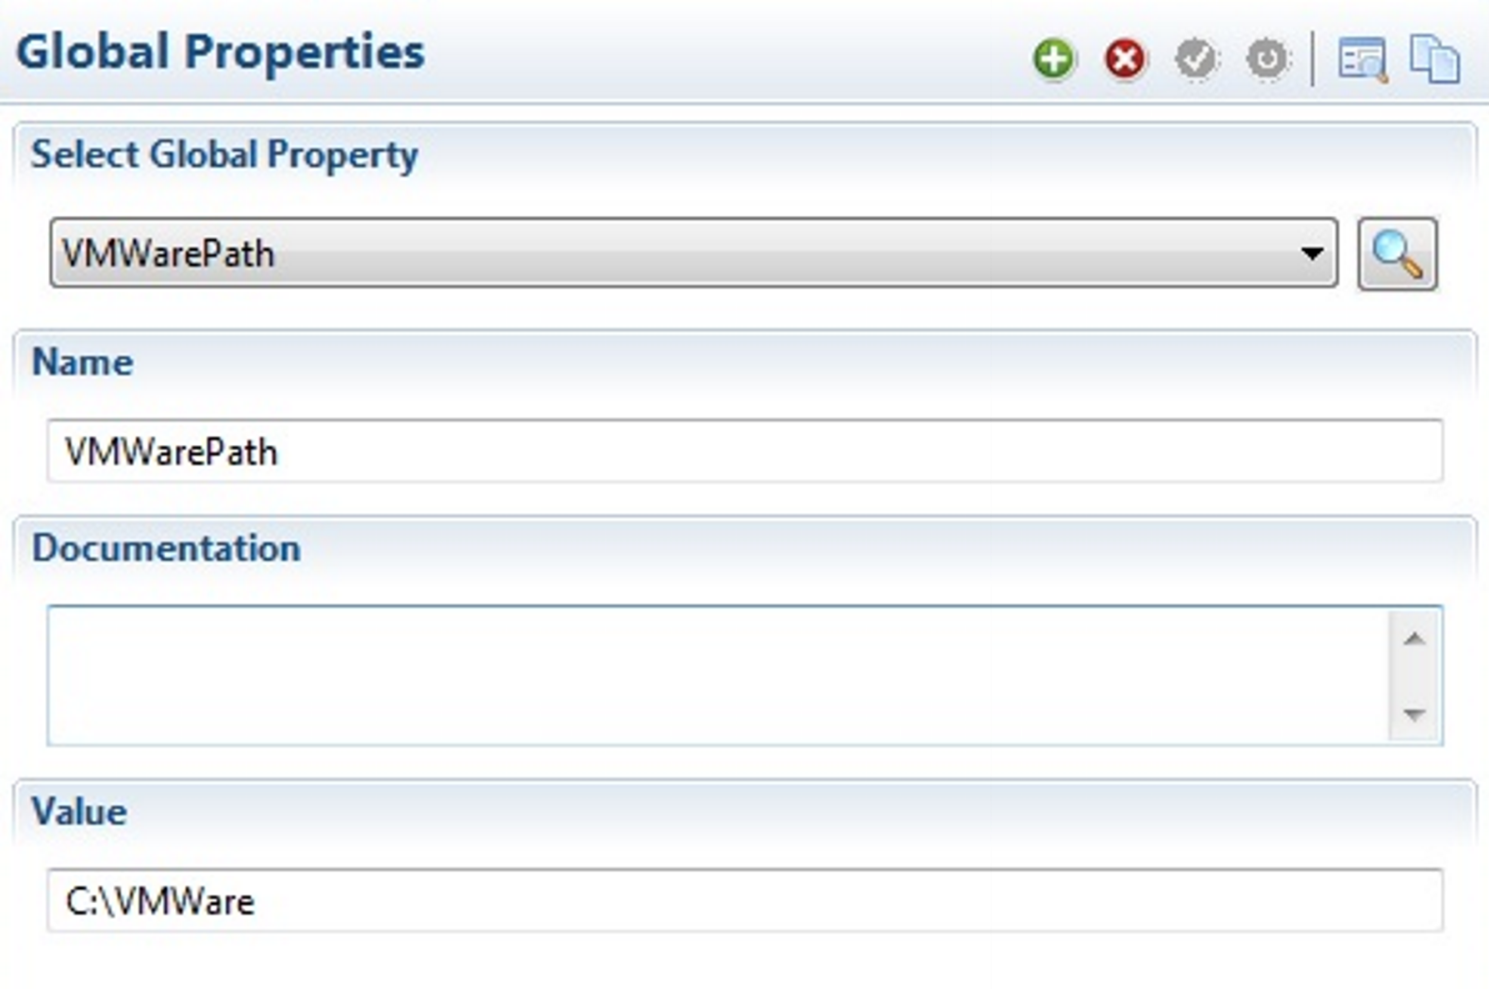
Configure the VMWarePath global property
The VMWarePath global property tells Enterprise Manager where the VMWare Connector is installed.
If you have the VMWare Connector installed on multiple machines, define a unique global property for each connector.
To configure the VMWarePath global property in Enterprise Manager, complete the following steps:
-
Log in to Enterprise Manager on the Windows machine where Enterprise Manager is installed.
-
In the Navigation Panel, under the Administration topic, open Global Properties. The Global Properties screen is displayed.
-
Select the Add button on the Global Properties toolbar.
-
In the Name field, enter
VMWarePath. -
In the Documentation field, enter the documentation for the property.
-
In the Value field, enter the path to
SMAVMWare.exeon the Windows machine. Do not include the trailing backslash in the path.ExampleC:\Program Files\OpConxps\VMWare x64 -
Select the Save button on the Global Properties toolbar. The global property is saved.
Install the Enterprise Manager sub-type
The Enterprise Manager sub-type is a plug-in package that adds a VMWare job definition screen to Enterprise Manager. Install it on every Enterprise Manager machine where you define VMWare jobs.
To install the Enterprise Manager sub-type, complete the following steps:
-
Log in to the machine where Enterprise Manager is installed.
-
In Windows Explorer, go to the EnterpriseManager folder.
ExampleC:\Program Files\OpConxps\EnterpriseManager x64 -
Confirm that the dropins folder exists. If it does not exist, right-click in the EnterpriseManager folder, select New > Folder, and name the folder
dropins. -
Go to the location where you installed the VMWare Connector.
ExampleC:\Program Files\OpConxps\VMWare x64 -
Open the EMPlugins folder and copy the jar file.
Examplecom.sma.ui.core.jobdetails.vmware_1.0.0.yyyymmddhhss.jar -
Paste the jar file into the EnterpriseManager\dropins folder on the Enterprise Manager machine.
ExampleC:\Program Files\OpConxps\EnterpriseManager x64\dropins\com.sma.ui.core.jobdetails.vmware_1.0.0.yyyymmddhhss.jar
To verify that the sub-type is installed, complete the following steps:
- Log in to Enterprise Manager.
- In the Navigation Panel, under the Administration topic, open Job Master. The Job Master screen is displayed.
- In the Schedule list, select a schedule.
- Select the Add button on the Job Master toolbar.
- Under Job Properties in the Job Details frame, in the Job Type list, select Windows.
- In the Job Sub-Type list, confirm that VMWare is available, and select it.
Next: Update connector settings in Configuration, then define your first job in Enterprise Manager job definition.
Solution Manager path
Use this path if you define VMWare jobs in Solution Manager. It is available with OpCon 25.0.3 or greater through the ACS framework.
The Solution Manager path involves four procedures, in this order:
- Install the Solution Manager sub-type — copies the ACS plug-in into your OpCon and Relay installations.
- Create the script type and runner — registers the ACSVMWare script type and a script runner in Solution Manager.
- Create the Connector.config script — stores your connector configuration centrally in OpCon.
- Create the VMWare agent definition — creates the agent that ties the configuration script to the connector.
All interactions with the Solution Manager sub-type are completed in Solution Manager.
Install the Solution Manager sub-type
To install the Solution Manager sub-type, complete the following steps:
-
Download the
ACSVMWarezip file from the FTP site under OpCon Releases > Integrations > VMWARE. -
Extract the
ACSVMWaredirectory and copy it into the\SAM\pluginsdirectory for the OpCon and Relay installations. -
Restart the affected services:
Installation Action OpCon Stop and restart the SMA OpCon RestAPI and SMA OpCon Service Manager services. Relay Stop and restart the Relay Service.
Create the script type and runner
When you use the Solution Manager sub-type, you must register an ACSVMWare script type and a matching script runner. These let Solution Manager identify and execute the connector configuration script.
Create the script type
To create the script type, complete the following steps:
- In Solution Manager, select Library.
- Select Scripts.
- In the upper-right corner, select Script Types.
- Select the +Add button.
- In the Name field, enter
ACSVMWare. - In the File Extension field, enter
txt. - In the Description field, enter
Used for ACSVMWare Integration. - Select the Save button. The script type is saved.
Create the script runner
To create the script runner, complete the following steps:
- In Solution Manager, select Library.
- Select Scripts.
- In the upper-right corner, select Script Runners.
- Select the +Add button.
- In the Name field, enter
ACSVMWare. - In the OS field, select VMWare from the list.
- In the Type field, select ACSVMWare from the list.
- In the Command field, enter
cmd.exe /c. - Select the Save button. The script runner is saved.
Create the Connector.config script
The Connector.config script holds the connector configuration centrally in OpCon, so you do not need to maintain a per-machine file.
Before you create the script, prepare the contents of your Connector.config file. For the field reference, refer to Configuration.
To create the Connector.config script, complete the following steps:
- In Solution Manager, select Library.
- Select Scripts.
- In the upper-right corner, select Scripts.
- Select the +Add button.
- In the Name field, enter a name for the script. Continuous suggests using the proposed agent name with
_configappended. - In the Type field, select ACSVMWare from the list.
- Assign the required roles.
- In the Script field, paste the contents of the
Connector.configfile you prepared. - Select the Save button. The script is saved.
Create the VMWare agent definition
The agent definition ties together the connector, the configuration script, and the VMWare host that the connector talks to.
To create the VMWare agent definition in Solution Manager, complete the following steps:
- In Solution Manager, select Library.
- Select Agents.
- Select the +Add button.
- In the Name field, enter the name of the agent.
- In the Type field, select VMWare from the list.
- Configure the General Settings:
- Select General Settings.
- In the NetCom field, enter
<Default>or a NetCom or Relay name.
- In the VMWare Settings section, enter the required information.
- In the Client Information section, complete the following fields:
- In the Directory field, enter the installation directory of the VMWare Connector.
- In the Name field, enter
vmware.exe(the default value). - In the Config File Name field, enter
Connector.config(the default value).
- In the Config Script section, complete the following fields:
- In the Script Runner field, select ACSVMWare from the list.
- In the Script field, select the configuration script you previously created from the list.
- Select the Save button. The agent is saved.
- Select Communication Settings and verify that the Requires XML Escape Sequences: User-Defined field is set to
True. If it is not, change the field and save the definition.
Next: Define your first job in Solution Manager job definition.
Upgrade installation
To upgrade the VMWare Connector, install the new package to the same directory as the previous installation. The installation package preserves your configuration files automatically. For installation steps, refer to New installation.
Silent mode
To install the VMWare Connector in silent mode, refer to the Silent Mode section in the OpCon Installation online help.
FAQs
Do I need to install Java separately?
Yes. The Oracle JRE prerequisite has been removed from the installation package, so you must install a functional Java Runtime Environment (Java 8) before you install the connector.
What's in the installation directory after install?
The connector executable, a single jar file with the required libraries, and a Connector.config file.
Do I need to set up both the Enterprise Manager sub-type and the Solution Manager sub-type?
No. The two sub-types are alternative paths. Set up the one that matches how your team defines jobs. If you define jobs in Enterprise Manager, follow the Enterprise Manager path. If you define jobs in Solution Manager and you run OpCon 25.0.3 or greater, follow the Solution Manager path.
Will an upgrade overwrite my configuration?
No. When you install the new package to the same directory as the previous installation, the installation package preserves your configuration files automatically.
Why does my Windows path get rejected?
Some systems do not allow long file names. Use the 8.3 file name format (for example, C:\Progra~1\OpConxps\) instead of the long path.
Glossary
| Term | Definition |
|---|---|
| VMWare Connector | An OpCon connector that submits job requests to VMWare web services from an OpCon schedule. |
| Windows Agent (MSLSAM) | The OpCon agent installed on a Windows machine. The connector requires a supported Windows Agent on the host machine. |
| Connector.config | The VMWare Connector configuration file delivered with the connector installation. |
| ACS | The framework included in OpCon 25.0.3 or greater that provides the sub-type mechanism supporting the VMWare Connector in Solution Manager. |
| vCenter | The VMWare server providing the VMWare web services interface. The connector supports vCenter or ESXi 5.5. |
| ESXi | The VMWare hypervisor providing the VMWare web services interface. The connector supports vCenter or ESXi 5.5. |
| Enterprise Manager | The legacy Windows desktop client for OpCon. Hosts the VMWare job sub-type plug-in. |
| Solution Manager | The browser-based interface for OpCon. Hosts the VMWare job type through the ACS framework. |