Verifying the installation
What is it?
A set of procedures you run after installing the z/OS Agent to confirm the install succeeded. You start the agent task, verify storage, add the machine to OpCon, import the IVP schedules, and run the IVP jobs to confirm scheduling, tracking, and notification all work end to end.
Do not attempt to start XPS390 until all prior Customization Processes are complete. Refer to the Installation checklist, and ensure all procedures are complete.
Agent verification
Start the OpCon/xps agent task with the following command:
- S lsamproc[.lsamname][,SUB=JESx]
- E.g.,
S OPCON01
The following (or similar) messages should be received on the MVS SYSLOG and/or Operations Console:
System console messages of start of agent:
XPR105I - FILTER TABLE UPDATED
XPS075I - Trigger Table Expire Date: 21.232
XPS077I - XPSU83   found in STEPLIB
XPS077I - XPSU83   File Trigger Exit Established
XPS077I - XPSU84   found in STEPLIB
XPS077I - XPSU84   Job Tracking Exit Established
XPS077I - XPSUJV   found in STEPLIB
XPS077I - XPSUJV   Job Init Exit Established
XPS077I - XPSWTOEX found in STEPLIB
XPS079I - XPSWTOEX Msg Trigger Exit Established
XPS028I - Agent Ready on Port: 3101 - JES2
XPS075I - Trigger Table Expire Date: 21.232
XPS001I - OpCon/xps 21.00.0301 STARTED - ZOS1
XPS005I - TCP/IP - IP Open  Port:  3100
XPS015A - XPS390 Awaiting Connection to SAM Server
When SYSPLEX=Y is coded in XPSPRMxx, start messages should also be received for XPSPLEX. If any other results are observed - contact OpCon Support.
IMPORTANT: The "machine" displayed on the XPS001I message should be the same "Machine ID" used on the SAM machine definition for this agent. If the SAM Machine ID value is not the same value, any job scheduled and sent to this agent may be rejected. The XPS028I message should indicate the JES subsystem JESA, JES2 or JES3.
If the XPS005I message does not appear or is not formatted with a proper IP address, the IP network interface is not valid for this system. Since this value is retrieved directly from TCPIP under MVS, it is not under the control of the agent. Contact the Networking Systems Programmer for assistance. The Port assignment, however (e.g., 3100, 3101), is under agent control.
If any conflicts occur with reserved assignments in the system, TCPIP should respond with error messages stating the conflict. It is possible to change the port assignment as often as necessary. But once the unused assignment is identified, it should be reserved for OpCon/xps on all systems in the z/OS complex.
Storage verification
Next, ensure that storage allocations and XPSPRMxx are properly installed.
Enter the command: F lsamname**,DISP=ALL** on the operations console to view the display on the MVS Console or SYSLOG that resembles the figure below.
XPSAUDIT: XPCB Located at 11949038:8000 Analyzing LSAM: XPS14.03 On SYSID: machine
-------------------------------------------
XPSU83=82344908: Len=000046F8 Key=11949038
XPSU84=821E3620: Len=000069E0 Key=11949038
XPSUJV=821C2E58: Len=000041A8 Key=11949038
XPRUSI=821BA628: Len=00004AE8 Key=11949038
XPSWTO=821FDD10: Len=000052F0 Key=11949038
-------------------------------------------
XPSAUDIT: JOBQ Located at 1012AC00;I=11955200
Last Entry: 10148C00 Queue Size: 121K
Free=00121, Used=00000, Term=00001, Total=00121
-------------------------------------------
XPSAUDIT: MSGQ Located at 100E7200
Last Entry: 10122300 Queue Size: 267K
Free=01920, Used=00000, Term=00000, Total=01920
-------------------------------------------
XPSAUDIT: DSNT Located at 100D8340
Last Entry: 100E6F80 Queue Size: 59K
Free=00480, Used=00001, Term=00002, Total=00481
-------------------------------------------
XPSAUDIT: WTOT Located at 100C6DA8
Last Entry: 100D7F68 Queue Size: 68K
Free=00480, Used=00001, Term=00002, Total=00481
-------------------------------------------
XPSAUDIT: EVTQ Located at 100C1870
Last Entry: 100C5FB0 Queue Size: 17K
Free=00241, Used=00000, Term=00001, Total=00241
-------------------------------------------
XPSAUDIT: DSNF Located at 11841140
Last Entry: 11841350 Queue Size: 592B
Free=00010, Used=00002, Term=00003, Total=00012
-------------------------------------------
XPSAUDIT: PARMS Located at 11949B58
-------------------------------------------
XPS021I - CURRENT STORED PARMS FOR ADCD113 882
MACHINEID=machine	OPCON/XPS MACHINE NAME
PROCESS=30	PROCESS COUNT
INTV=00.00.10	WAKE UP INTERVAL
JCLDD=XPSJCL	DEFAULT JCL LIBRARY
OVERRIDE_DD=	DEFAULT OVERRIDE LIBRARY
XPSDYNAM=IEESYSAS	Dynamic task proc
LSAM=ADCD113	PRIMARY LSAM?
ADOPT=N	LSAM Adoption?
SYSPLEX=N	Exploit SYSPLEX?
PLEXGRP=	SYSPLEX Group Name
TCPIP=	TCP/IP Task Name
PORT=3100	LSAM PORT
JORSPORT=+1 (3101)	JORS PORT
RECOVERY=PROMPT	Recovery Option
SMF15=DELETE	SMF Type 15 Disposition
SMF64=DELETE	SMF Type 64 Disposition
SPFAUDIT=N	Log ISPF User Chgs
JOBRC=MAXRC	RC for failure check
SPINOFF=Y	Spin Log Each Night
SUBSYS=JES2	JES Subsystem
TRACLASS=TQ	Dynamic Tracking Classes
TRACMASK=	Dynamic Tracking Mask
TRACSCHD=	Dynamic Tracking Schedule
USERID=	Default USER
MSGCLASS=A	REXX SYSOUT CLASS
USEJMR=YES	JMR USER FIELD
MLWTO=Y	Multi-line WTO Triggers
RESTART=Y	Step restart active?
GDGOPT=A	GDG option
DUPDSNACT=S	Dup Dataset Action
RESDSNACT=S	Dup Dataset Action on restart
XPRLIST=DV	Dataset exclude list
AUTOSTEP=Y	Automatic step selection
JOB_CARD_RESTART=Y	Restart from job card?
TRACE=N	Trace Status
FORCE_SYS_AFF=N	Force System affinity
SETQUES=(JOB=120;MSG=1920;DSN=480;WTO=480;EVT=240)
-------------------------------------------
Current JOBQ: JOBQ - All Entries Displayed(0000)
-------------------------------------------
DSN Trigger Table Entries:
------------------------ --------------------------------------------
DSNT - All Entries Displayed(0000)
-------------------------------------------
WTO Trigger Table Entries:------------------------
WTOT - All Entries Displayed(0000)Prepare IVP Jobs
At this point, the IVP jobs loaded to the OpCon/xps INSTLIB should be reviewed for JCL syntax and standards conformity. Each of the examples in this topic uses the IVP jobs and their characteristics as training aids.
Most of the supplied IVP jobs run the XPSTIMER utility. This utility is supplied for IVP purposes only. There is no warranty as to the applicability of this program to any given task. The XPSTIMER step has four possible uses, to delay the run of the next step by a specific time limit (HHMMSSTT), to return a predefined step Cond code, to supply an ABEND at a specific step or to generate an Operator Reply Message (WTOR). All these functions are designed to test the functionality of OpCon.
Schedule testing using the IVP jobs
For the purposes of this exercise, we establish the following assumptions:
- The installer has experience with the OpCon Schedule Activity Monitor or has a trained OpCon/xps scheduler to assist in setting up the z/OS Installation Verification Procedure (IVP) jobs.
- The Setup and Configuration steps in the Installation and Customization topics are complete.
Logging in to the Enterprise Manager
An administrator (e.g., ocadm) must be logged in to the Enterprise Manager to perform OpCon administrative setup. Setup can be performed from any machine with a Enterprise Manager.
Log in to the Enterprise Manager
- Use menu path: Start > Programs > OpConxps > Enterprise Manager.
- In the Username text box, enter a case-sensitive User Login ID (e.g., ocadm).
- In the Password text box, enter the case-sensitive password for the user.
- In the Profile list, select the Database Profile.
- Select the Login button to log in to the Enterprise Manager.
Adding a machine to OpCon/xps
The machine with the z/OS Agent must be defined in the OpCon database in order for the SAM and supporting services to be able to communicate with the agent.
Licenses
Before testing the installation, verify with the OpCon administrator that there is an available license for the machine with the newly installed agent. If a license is unavailable, contact SMA Technical Support.
Name resolution
For the SAM and supporting services to communicate with the z/OS Agent, the Machine name in the database (entered in the Enterprise Manager) must resolve to a TCP/IP address. The following list provides different methods for associating a TCP/IP address with the OpCon Machine name.
- For any release of OpCon, the administrator can associate an alias with the TCP/IP address of the machine in one of two places:
- Refer to Configure the hosts file on the SAM application server.
- For information on configuring a DNS server, contact the network administrator.
- To confirm name resolution for DNS or hosts file configuration, ping the machine by name from the SAM application server.
- In OpCon release 3.30 and above, the administrator can assign the TCP/IP address to the machine in the Communication Settings tab located in the Advanced Settings Panel in the Enterprise Manager>Operation> Machines screen.
If the administrator assigns the TCP/IP address to the machine through the Advanced Machine Properties in the OpCon EM Machines screen, the TCP/IP address must be static. If for any reason the TCP/IP address of the machine changes, SMANetCom is not able to communicate with the agent until the administrator updates the database.
Configure the hosts file on the SAM application server
- Right-select the Start button.
- Select Explore from the menu.
- Browse to the <Windows Directory>\System32\Drivers\etc\ directory.
- Find the hosts file.
- Right-select the file and select Open With.
- Select an ASCII text editor (e.g., Notepad) from the Choose the program you want use list box.
- In the text editor, insert a new line below the last line containing a TCP/IP address.
- Type the TCP/IP address for the z/OS Agent machine.
- Press the Tab key.
- Type the machine name as it is entered in the Enterprise Manager.
- Use menu path: File > Save.
- Close ☒ the text editor.
Adding the machine
After verifying licensing and name resolution between the OpCon server and the agent machine, add the machine definition in the Enterprise Manager.
Create the machine in OpCon/xps
When a z/OS Agent is installed, create a machine record with a unique Machine name and Socket number in OpCon:
- Use menu path: Start > Programs > OpConxps > Enterprise Manager.
- In the Username text box, enter a case-sensitive User Login ID (e.g., ocadm) on the OpCon login screen.
- In the Password text box, enter the case-sensitive password for the user.
- In the Profile list, select the Profile.
- Select the Login button to log in to the Enterprise Manager.
- Double-select Machines in the Navigation panel under Administration. The Machines screen displays.
- Select the Add button on the Machines toolbar.
- In the Name text box, enter the official host name or alias based on the agent machine.
- In the Documentation text box, enter any relevant documentation for this agent machine.
- In the Machine Type list, select z/OS.
- In the Socket Number box, set the value to a unique number (e.g., 3100).
- (Optional) In the IP Address field, enter the IPv4 or IPv6 address.
- (Optional) In the Fully Qualified Domain Name field, enter the name.
- Select Save on the Machines toolbar.
- Select Open Advanced Settings Panel in the Advanced Settings frame.
- Select the Communication Settings tab in the Advanced Machine Properties window.
- Verify the communications protocol: a. Select SMA Communications Protocol parameter. b. In the frame below the advanced machine properties, the value for this setting must be "Contemporary, XML". If this is not the value, contact SMA for support.
- Select JORS Port Number parameter in the Communication Settings tab. a. In the frame below the advanced machine properties, define the JORS socket number with the next sequential socket from the Socket Number defined in step 11 (e.g.,if the agent is using port 3100, JORS will use port 3101). b. Select the Update button.
- Select the Save button to save and close the Advanced Settings Panel.
- (Optional) Start communication with the machine by: a. Right-selecting over the graphic to enable the menu in the Communication Status frame. b. Selecting Start Communication from the menu.
- Select the x to the right of the Machines tab to close the Machines screen.
Importing IVP Schedule job definitions
The <Target Directory>\Opconxps\Utilities directory created by the SAM install process contains a file named "IVPMVS.mdb". This file is an SQL Export of a predefined IVP Schedules. Import this file to the OpCon/xps master schedule using the Schedule Import Export utility.
Import the IVP schedules
- Double-select Import Export in the EM Navigation Panel under External Tools.
- Select the ODBC button if the Login to Schedule Import Export screen or the Access Database DSN screen appears.
- Select the System DSN tab in the ODBC Data Source Administrator window.
- Select the Add button.
- In the list in the Create New Data Source window, select Microsoft Access Driver (*.mdb).
- Select the Finish button.
- In the Data Source Name text box, enter IVPMVS in the ODBC Microsoft Access Setup window.
- (Optional) In the Description text box, enter a description.
- Select the Select button.
- Go to the Directories frame in the Select Database window. Browse to the IVPMVS.MDB file (e.g., C:\Program Files\OpConxps\Utilities\IVPMVS.MDB).
- Select the .mdb file and then select the OK button.
- Select OK.
- Select the OK button in the ODBC Microsoft Access Setup window.
- Select the OK button in the ODBC Data Source Administrator window.
- In the User Login ID field, enter ocadm in the Login to Schedule Import/Export screen.
- In the Password field, enter the valid password for ocadm.
- In the Data Source field, select the OpCon/xps database.
- Select the OK button.
- Select IVPMVS1 and IVPMVS2 in the IVPMVS list.
- Drag the schedules from the top pane to the bottom pane of the screen to import the schedules to the OpCon/xps database.
- Select the OK button on the warning message about Batch User IDs.
- Select the OK button on the termination message.
- Close the Schedule Import Export utility.
In the EM Navigation under Administration, select Job Master. Select the IVPMVS1schedule, select IVPJOB13, then choose the Task/Resource tab and change the Task/Job name TSOUSER to the TSO USERID on the test machine. Also, do this for IVPMVS2 job - IVPJOB23.
Job dependencies are set as follows:
- IVPJOB11 Runs immediately as schedule is released.
- IVPJOB12 runs After IVPJOB11.
- IVPJOB13 runs After IVPJOB12.
- IVPCommand1 runs After IVPJOB13.
- IVPJOB14 runs After IVPCommand1 and IVPPROC1.
- IVPPROC1 Runs After IVPJOB13.
- IVPJOB15 runs After IVPJOB14.
- IVPREXX1 runs After IVPJOB15.
- IVPJOB16 runs After IVPJOB15.
- IVPJOB17 is dynamically scheduled by an XPSCOMM step in IVPJOB16 no dependency is preset for this job.
- IVPJOB18 runs After IVPJOB16.
- IVPJOB19 runs After IVPJOB18.
At this point, ensure that the USERID used on IVPJOB16 has authority to schedule jobs. In the Enterprise Manager's (EM) Administration screen, give batch User ID "TSOUSER" permission to update IVPMVS1 and IVPMVS2.
Creating a notifying event
In the upcoming IVP job stream, job IVPJOB12 attempts to send a notify message. This may be a text message, email, beeper call, and so forth. The type of notification depends on the ENS interface tool that is being used. If a personal notification Event Number for receiving automated notifications has not been received, consult the local OpCon/xps Administrator. The MSGIN event that triggers the notification is defined in the agent ISPF Event Table Display.
In any ISPF screen, enter the command "TSO XPSPF001". If the OpCon/xps Automation Table Admin display is not received, there is something missing from the TSO setup. More information on the ISPF Table Admin feature can be found in the agent online help. Set up a notification MSGIN event in the Event Table by selecting the table with an 'A)dd' command.
Building a test notification event in the Event Table:
┌─────────────────────────────────────────────────────────────────┐
│       OpCon ISPF - Active Action Trigger Definition             │
│                                                                 │
│  Token Name :  TESTEVT1                                         │
│  Action Type:  $NOTIFY     $JOB, $SCHEDULE, $MACHINE,...        │
│  Action     :  ACTION       ADD, DELETE, HOLD, RELEASE,...      │
│  Element    :  00100        Job Name, Mach-Id, Action,...       │
│  Set Type   :  I            UP, DOWN, GOOD, BAD, Sev Num,...    │
│  Schd Date  :               Blank, Date Keyword or Token        │
│  Schd Name  :               Schedule Name or Token Value        │
│  Frequency  :               Frequency for $JOB:ADD              │
│  Security   :  USERID       Sec Id for OpCon Function           │
│  Message    :  IVPJOB12 Ended                                   │
│                                                                 │
│   U A=Add new action, U=Update current action.                  │
│                                                                 │
│  Press ENTER to add or change action                            │
│  Press CANCEL or EXIT to cancel update.                         │
└─────────────────────────────────────────────────────────────────┘
For the IVP test, the Event Token must be "TESTEVT1". The event type and action are required ($NOTIFY and ACTION). The "Element" is the user personal notification ID number (usually 5 digits). This identifies the user to the Event Notification System (ENS) and it identifies the method of notification (phone #, email address, etc) that is received. The "Set Type" is I (Informational message) and the Security Id should be the OpCon ID with permissions for receiving MSGIN events. The "Message" is any 40-character text (used in text messaging or emails, only).
Building and running the IVP schedule
Enter the "Daily Schedule Maintenance" display on the OpCon/xps User Interface. Build schedule IVPMVS1. Go to the Schedule Operations Display to view the IVPMVS1 status. The IVPMVS1 result should look similar to this:
Example of IVPMVS1
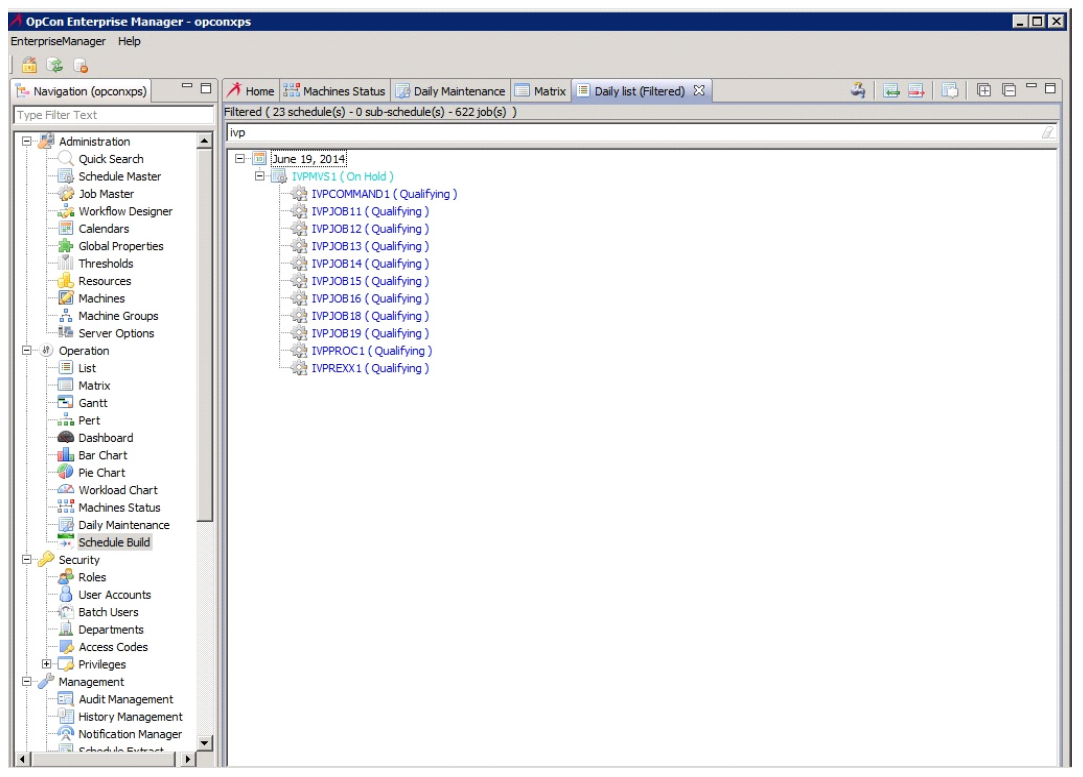
Before releasing the schedule, become familiar with exactly what an IVP process is designed to do. It is designed to ensure all features and functions are operating as designed. Thus, most of the jobs on the IVP schedule are designed to capture failures and exceptions to processing. Most jobs end in error or display exceptional conditions. This is by design. Once the IVP schedule is completed, 90% of all commonly used functions in the z/OS environment have been tested for accuracy and function. It is strongly suggested that the IVP Schedule(s) be retained for use as functional verification after any future upgrade or major maintenance release installation.
Release IVPMVS1 (right-select and "Release Schedule") and run the IVP jobs at any time. A 3270 TSO session on the z/OS system designated as IVP1 is needed to confirm several messages and activate a DSN trigger. Once the IVP schedule begins, the following flow of activities should take place:
IVPJOB11 runs three XPSTIMER steps each 15 seconds long. The first step shows a "Mount Pending" message for about 15 seconds. The job should complete normally.
IVPJOB12 runs three XPSTIMER steps each 15 seconds long and completes after the operator answers a test WTOR ("Wait Opr Reply" status). The job should complete with a message that Step 2 had a condition code of four. Since our MAXCC for the job was set at Zero, this condition should cause the schedule to pause ("Failed -- J9999 CC=0004"). This expected result indicates that step condition code controls are working.
To continue with the next job (IVPJOB13), right-select IVPJOB12 and select "Mark Good". The rest of the jobs in the IVP, use Post Process actions to mark their self "Good" if they fail.
IVPJOB13 runs under the job name of "TESTJOB3" -- IF -- the STARTED TASK defined in the Job/Task Resource tab is active. Three XPSTIMER steps run, each 15 seconds long. Take this opportunity to check the MVS console log and see the operator messages displayed. The IVPJOB13 submitted TESTJOB3 and the two condition code tests ran. This tests the ability of OpCon/xps to submit and track MVS job names other than scheduled job names.
As soon as IVPJOB13 is marked "Good" by the automatic Post Process $Event, the IVPCommand job starts and the IVPPROC1 started task has its "Pre-run" condition checked.
IVPPROC1 waits for a WTO trigger message (from IVPJOB15). IVPCommand runs an MVS Display All (D A,L) command.
IVPJOB14 should start after IVPCommand completes. IVPJOB14 should fail with the message "Failed - Terminated IVPSTEP2". This message will also be received on the MVS operator console: "XPS104I - Job TERMINATED Due to Step Cond Code". This job was forcibly terminated and flushed after step 2. Step 3 did not run.
Check the console log. Notice that a REXX procedure [IVPREXX] ran as a "pre-run" to IVPJOB14. A message should be seen on the MVS console indicating the pre-run REXX had a completion code of "0000" so the associated job was submitted: "XPS089I - REXX:IVPJOB14 RCD=0000, ID=IVPJOB14". The post process $Event "Mark(s) Good" IVPJOB14.
IVPJOB15 is now released. The DSN table entry for the File pre-run is set up immediately. When the status of IVPJOB15 becomes "Wait Start Time -- File(s) Not Avail", edit and SAVE any member in the OpCon/xps INSTLIB using the TSO USERID. It may take a minute but IVPJOB15 is submitted shortly. It should ABEND with a User 101 ["Failed -- J9999 Abended-U0101"]. The ABEND is an expected condition meant to test trapping of system abends in scheduled jobs. The message issued by the DSN trigger of IVPJOB15 releases IVPPROC1.
When IVPJOB15 is marked "Good", IVPJOB16 and IVPREXX1 run. IVPJOB17 is dynamically added by an XPSCOMM step in IVPJOB16. The step is a forced DSN ENQ lock in IVPJOB16 that is intended to hold the OpCon/xps OBJLIB until IVPJOB17 starts.
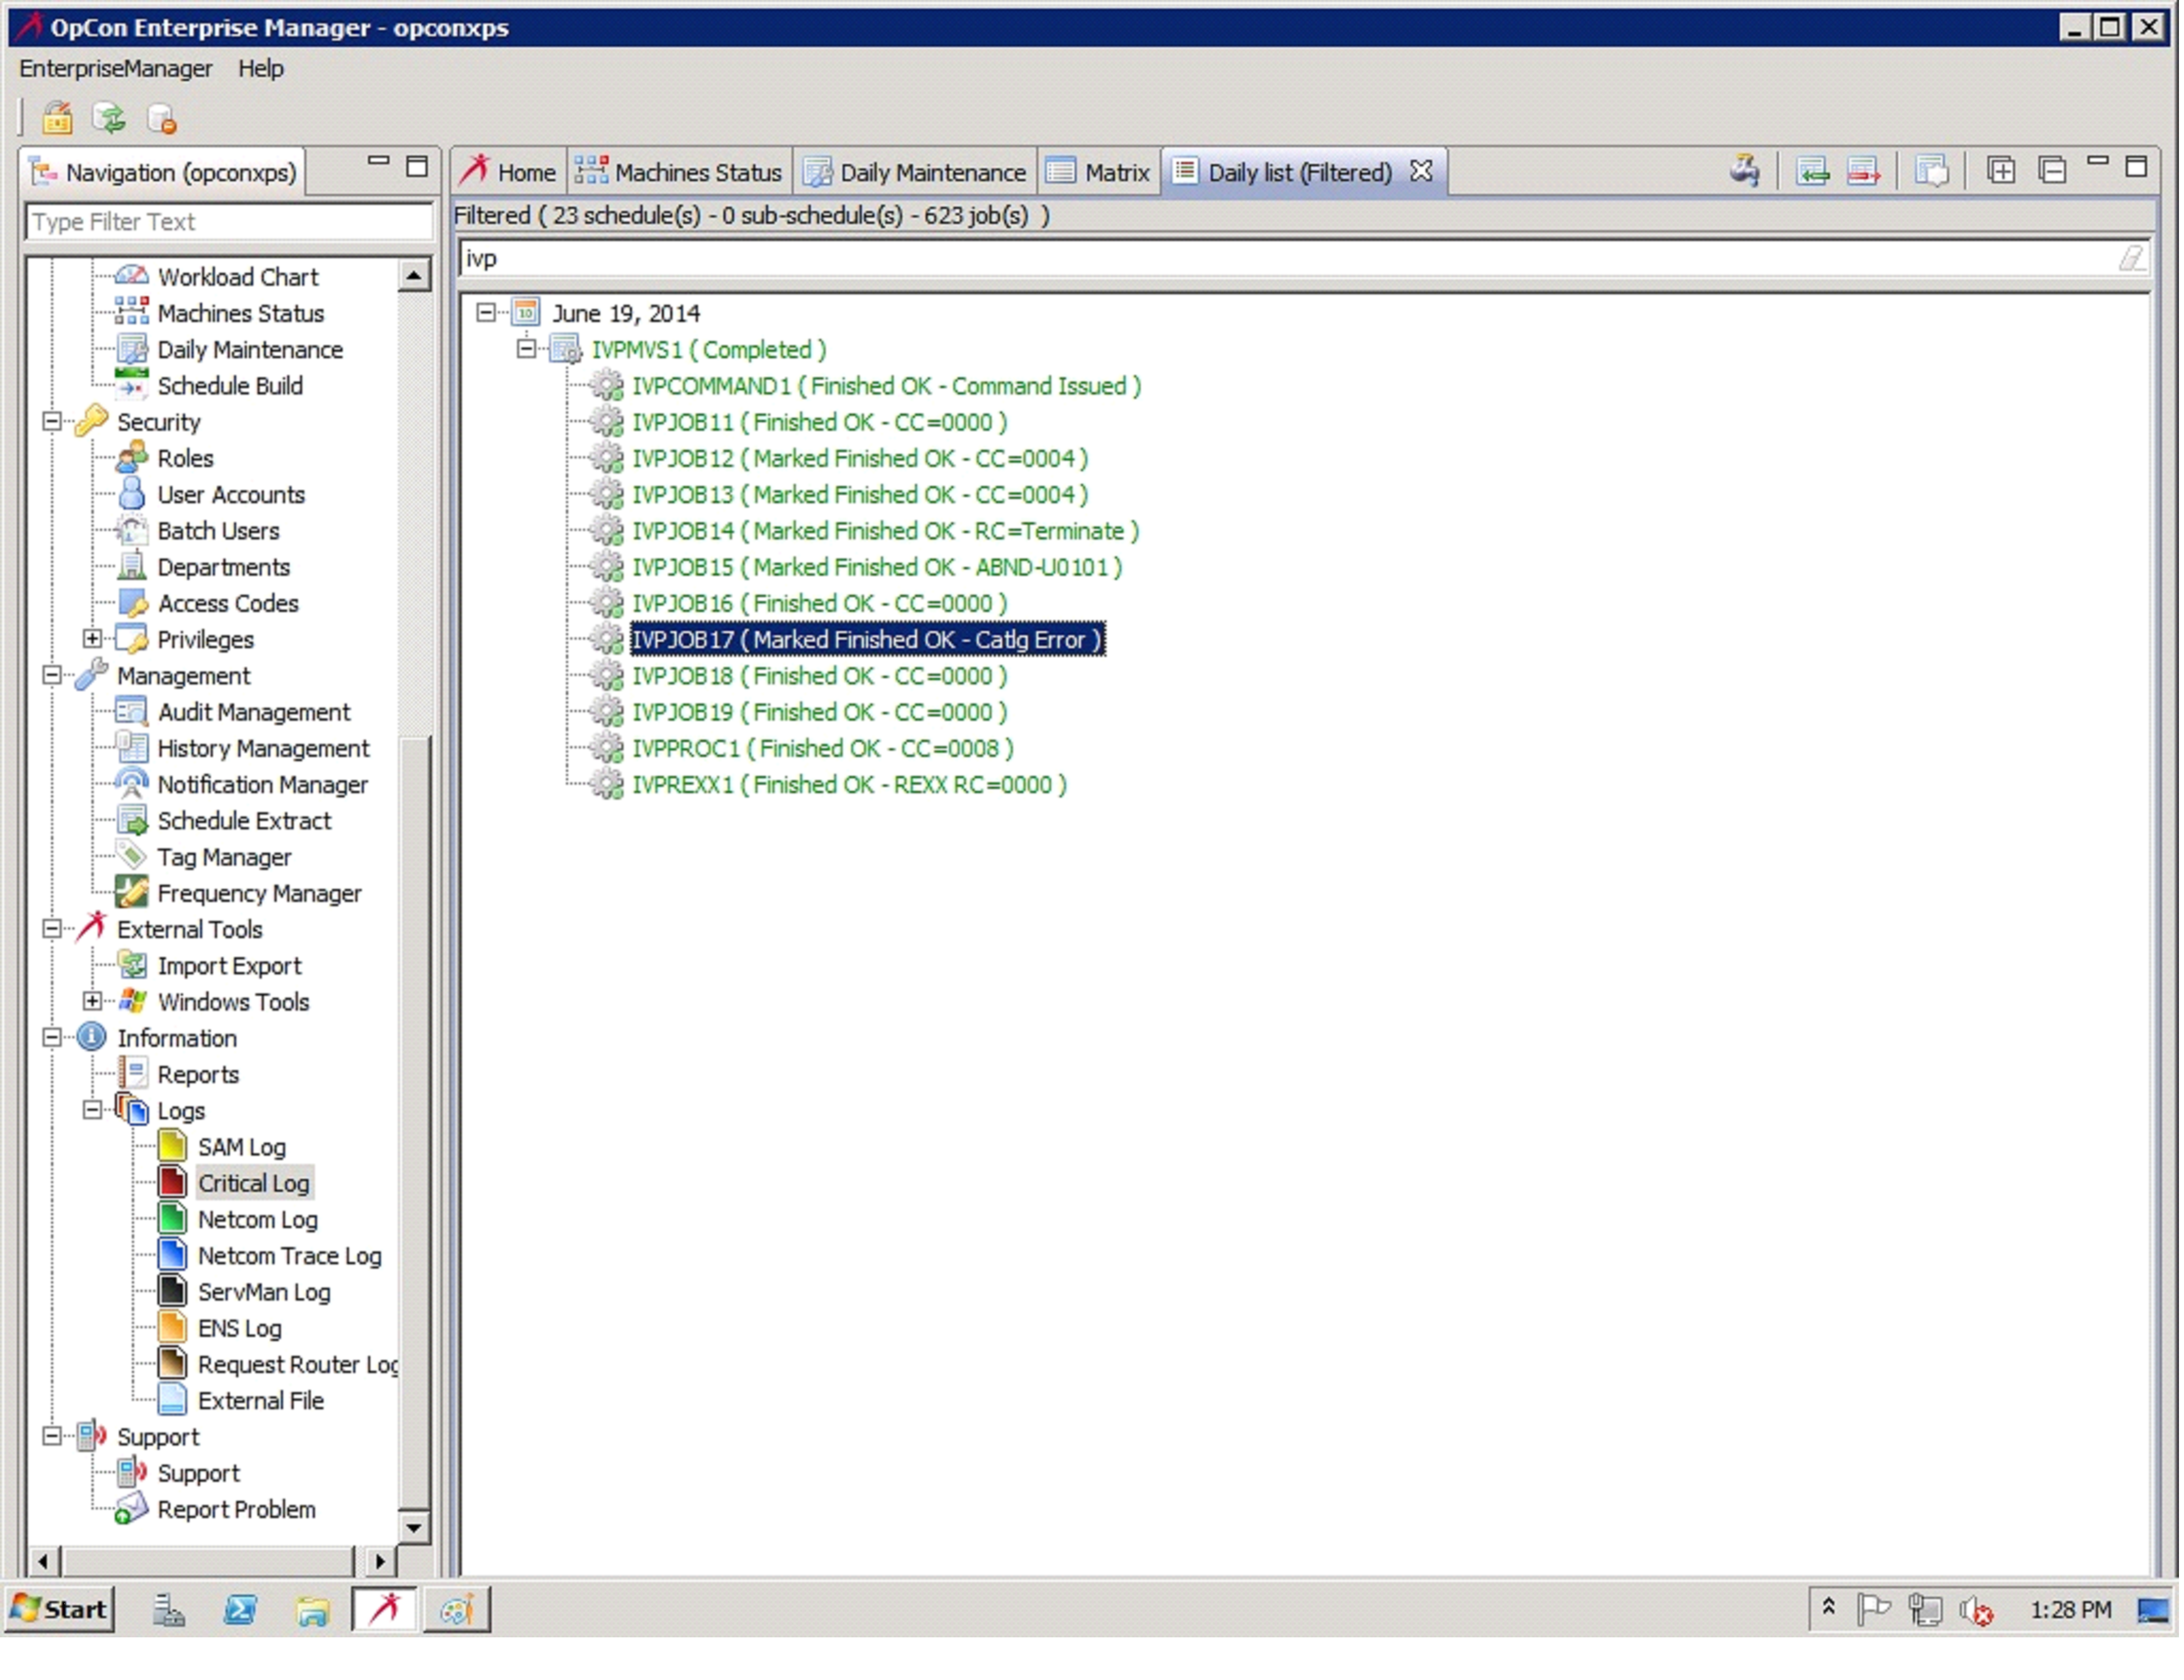
When IVPJOB17 attempts to start, a "DSN ENQ Wait" condition should be discovered due to the DISP=OLD use of OpCon/xps OBJLIB by IVPJOB16. As soon as IVPJOB16 releases this dataset (about 25 seconds), IVPJOB17 continues. Subsequently, IVPJOB17 should detect a catalog error in step one. Even though the job runs to completion, the job is marked "failed" to prevent dependent job submission until the catalog error is researched.
In order to create the NOT CATLG 2 condition, IVPJOB17 allocates a new dataset with the same name as an existing dataset. If the dataset is directed to SMS storage, the allocation fails and the job ends with a JCL error.
IVPJOB18: This job has four steps and creates datasets to be used for restart testing in IVPJOB19. The test record for each dataset contains the override variable @DATE. This override variable is set by OpCon/xps with the token value of [[$NOW]], which resolves to the current date and time when the job is started. It is not necessary to verify the test record contents; IVPJOB19 creates the same datasets with different text.
The first time this job is run, all steps should end with CC=0000. If the GDG base has not been deleted, subsequent runs produce a CC=0012 in the first step. This is acceptable:
-
BUILDGDG defines a GDG base.
-
STEP1 creates the next dataset in the GDG defined in the previous step. It contains the following record:
THIS IS A TEST RECORD CREATED BY IVPJOB18 AT @DATE
-
STEP2 creates a PDS, with a member containing the following record:
THIS IS A TEST RECORD CREATED BY IVPJOB18 AT @DATE
-
STEP3 creates the sequential dataset, containing the following record:
THIS IS A TEST RECORD CREATED BY IVPJOB18 AT @DATE
IVPJOB19 relies on the OpCon restart functions for all tests. If the restart function is not enabled, this job ends with Catalog Errors.
IVPJOB19: This job has five steps. The first three steps create the same datasets as IVPJOB18; the last two are XPSTIMER steps. All steps should complete with CC=0000. The restart settings for this job are set to scratch duplicate datasets on a normal run, to scratch duplicate datasets on a restart, and to use Absolute generations for GDG regression.
The job is designed test all restart capabilities. The first run tests the clean up of the duplicate datasets in step2 and step3. After the job completes, the JESMSGLG should be checked to verify that the duplicate data sets encountered in step2 and step3 have been deleted and replaced. This also can be further verified by checking the contents of the datasets. The test records contains the job name IVPJOB19 and the date and time when IVPJOB19 was started. To test GDG regression, first note the date and time from the test record in the dataset from step1, then restart the job from the first step. For information on restarting a job from a step, refer to z/OS Job Details in the Concepts online help.
Verify that the generation was not incremented and the test record has a new date and time. For additional testing, submit this job outside of OpCon/xps 2 times, and then restart the job. The original generation should be replaced, but the new generations remains intact.
Next, verify that step4 is flagged as non-restartable. In Job Configuration, under the General Category, the Step field for STEP4 should display 004*STEP4 0000. Now try to select this step for restart. An informational popup window should display the message, "This is a non-restartable step. Confirm selection". This warns the user that changes may be necessary to the job in order to start in this step. In most cases, it indicates that temporary datasets, created in a previous step, are not available during the restart.
OpCon allows the restart, after user confirmation, but problems may occur if the reasons that the step is not restartable are ignored.
Next, select STEP2 as the restart step, then select STEP4 and press the Restart button. A prompt appears asking if you are trying to set an ending step. Confirm it by selecting 'Yes.' Restart the job and review the output to verify that it started and ended in the selected steps. STEP5 should not run.
-
STEP1 creates the next dataset in the GDG defined in IVPJOB18, containing the following record:
THIS IS A TEST RECORD CREATED BY IVPJOB19 AT @DATE
-
STEP2 creates a PDS with a member, containing the following record:
THIS IS A TEST RECORD CREATED BY IVPJOB19 AT @DATE
-
STEP3 creates a sequential file, containing the following record:
THIS IS A TEST RECORD CREATED BY IVPJOB19 AT @DATE
-
STEP4 runs XPSTIMER and has the XPRNR DD DUMMY statement to mark it as a non-restartable step.
-
STEP5 runs XPSTIMER.
The final OpCon/xps IVPMVS1 status (alphabetically) should resemble the following:
If any errors are received or results that are significantly different from those above, and the cause cannot be determined, contact SMA z/OS support. Have a copy of the MVS system log for the IVP period handy when making the call.