ACS AzureWebservices operation
Theme: Configure Who is it for? Automation Engineer, System Administrator
What is it?
The ACS AzureWebservices connector enables OpCon jobs to interact with Microsoft Azure services as part of automated schedules. Once the connector is registered with OpCon, you can define an agent connection and create jobs that run Azure DevOps pipelines, run Data Factory pipelines, retrieve values from Azure Key Vault, and upload or download files from Azure Blob Storage.
- Use this connector when you need to integrate OpCon with Azure services such as Azure DevOps, Azure Data Factory, Azure Key Vault, or Azure Blob Storage
- Use the GetOAuth2Token job type to obtain OAuth2 tokens for Data Factory, Key Vault, and Blob Storage operations
- Use the GetPatToken job type to obtain a PAT token for Azure DevOps pipeline operations
Defining the ACS AzureWebservices connection
The agent definition is created by adding a new ACS AzureWebservices agent in Solution Manager. Required fields are shown in red.
To define the ACS AzureWebservices connection, complete the following steps:
- Open Solution Manager.
- From the Home page, select Library.
- From the Administration menu, select Agents.
- Select +Add.
- Enter the agent details:
- Enter a unique name for the connection.
- Select ACS AzureWebservices from the Type list.
- Select General Settings.
- In the NetCom field, enter
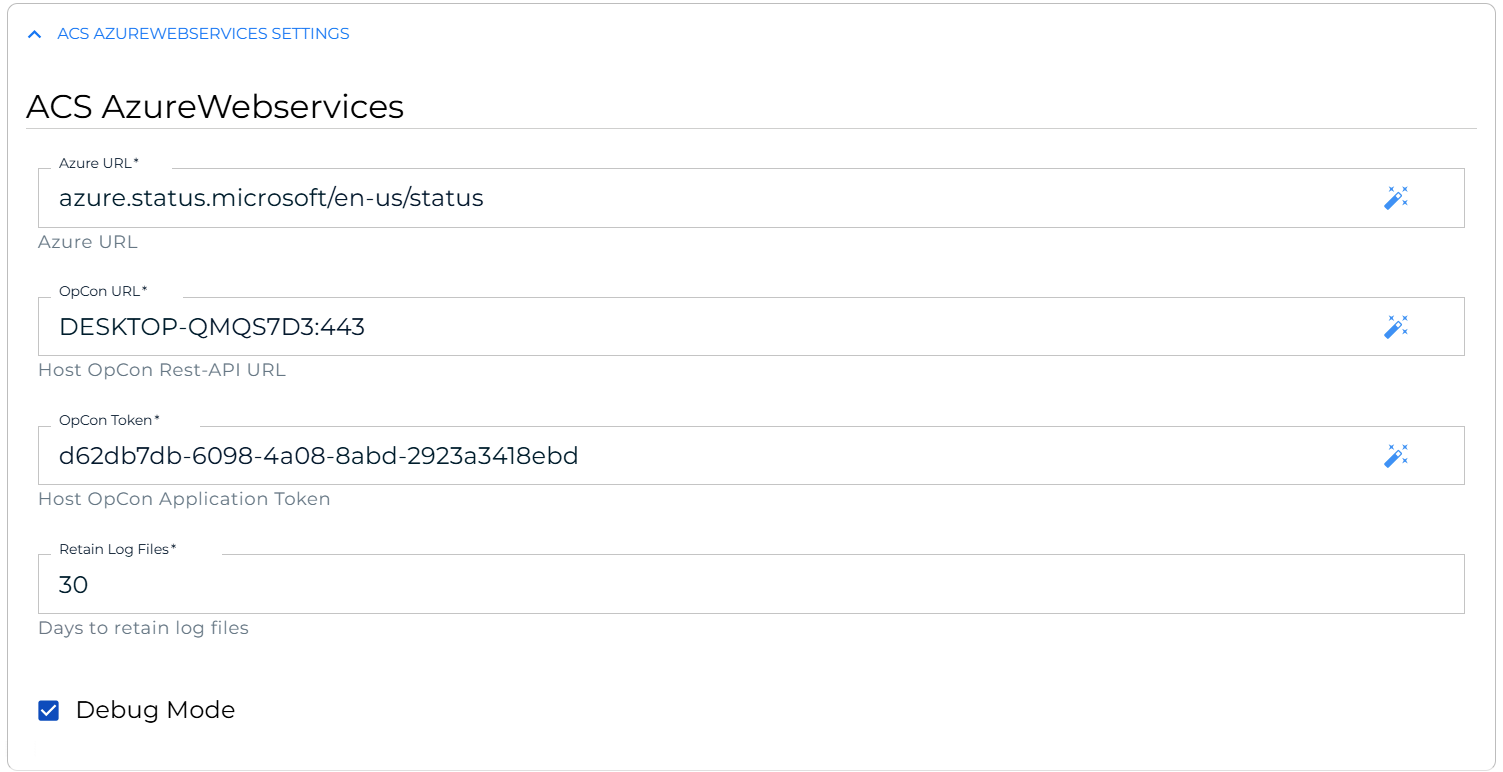
<Default>or a Netcom or Relay name. - Select ACS AzureWebservices Settings.
- The Azure URL field defaults to
azure.status.microsoft/en-us/status, used as a heartbeat to check Azure availability. - In the OpCon URL field, enter the address and port of the host OpCon system.
- In the OpCon Token field, enter a token for authenticating to the host OpCon system via the OpCon REST API.
- In the Retain Log files field, enter the number of days to retain log files (default is 30).
- (Optional) Select the Debug Mode option to enable debug logging.
- Select Save.
- Select Communications Settings, set Requires XML Escape Sequences:User-Defined to True, then select Save.
- Select the Change Communication Status button and select Enable Full Comm.
Defining jobs
The ACS AzureWebservices connection supports the following job types:
| Job type | Description |
|---|---|
| GetOAuth2Token | Retrieve an OAuth2 token for Azure services |
| GetPatToken | Create an Azure DevOps authentication token using a Personal Access Token |
| GetKeyVaultValue | Retrieve a secret, key, or certificate from Azure Key Vault |
| RunDevOpsPipeline | Start an Azure DevOps pipeline and monitor for completion |
| RunDataFactoryPipeline | Start a Microsoft Data Factory pipeline and monitor for completion |
| DownloadBlobStorage | Download a file from Azure Blob Storage |
| UploadBlobStorage | Upload a file to Azure Blob Storage |
Authentication dependencies: Define a GetPatToken job before RunDevOpsPipeline. Define a GetOAuth2Token job before GetKeyVaultValue, RunDataFactoryPipeline, DownloadBlobStorage, or UploadBlobStorage. Set job dependencies so the authentication job runs first. The generated tokens are stored as schedule instance properties or OpCon properties and passed automatically to subsequent jobs.
Prerequisite steps for all job definitions
Every job type in this connector follows the same steps to open the job definition form. Complete the following steps before configuring the job-type-specific fields described in each section below.
To open the master job definition form, complete the following steps:
- Open Solution Manager.
- From the Home page, select Library.
- From the Administration menu, select Master Jobs.
- Select +Add.
- In the Schedule list, select the schedule.
- In the Name field, enter a unique name for the job.
- In the Job Type list, select ACS AzureWebservices.
- In the Task Type list, select the job type you want to configure.
- Select the Task Details button.
Continue with the job-type-specific steps in the section below.
GetOAuth2Token job
The GetOAuth2Token job retrieves an OAuth2 token and stores it as a schedule instance property or OpCon property for use by subsequent jobs that interact with Azure Data Factory, Key Vault, or Blob Storage.
After completing the prerequisite steps and selecting GetOAuth2Token as the task type:
-
In the Integration section, confirm required fields (shown in red).
-
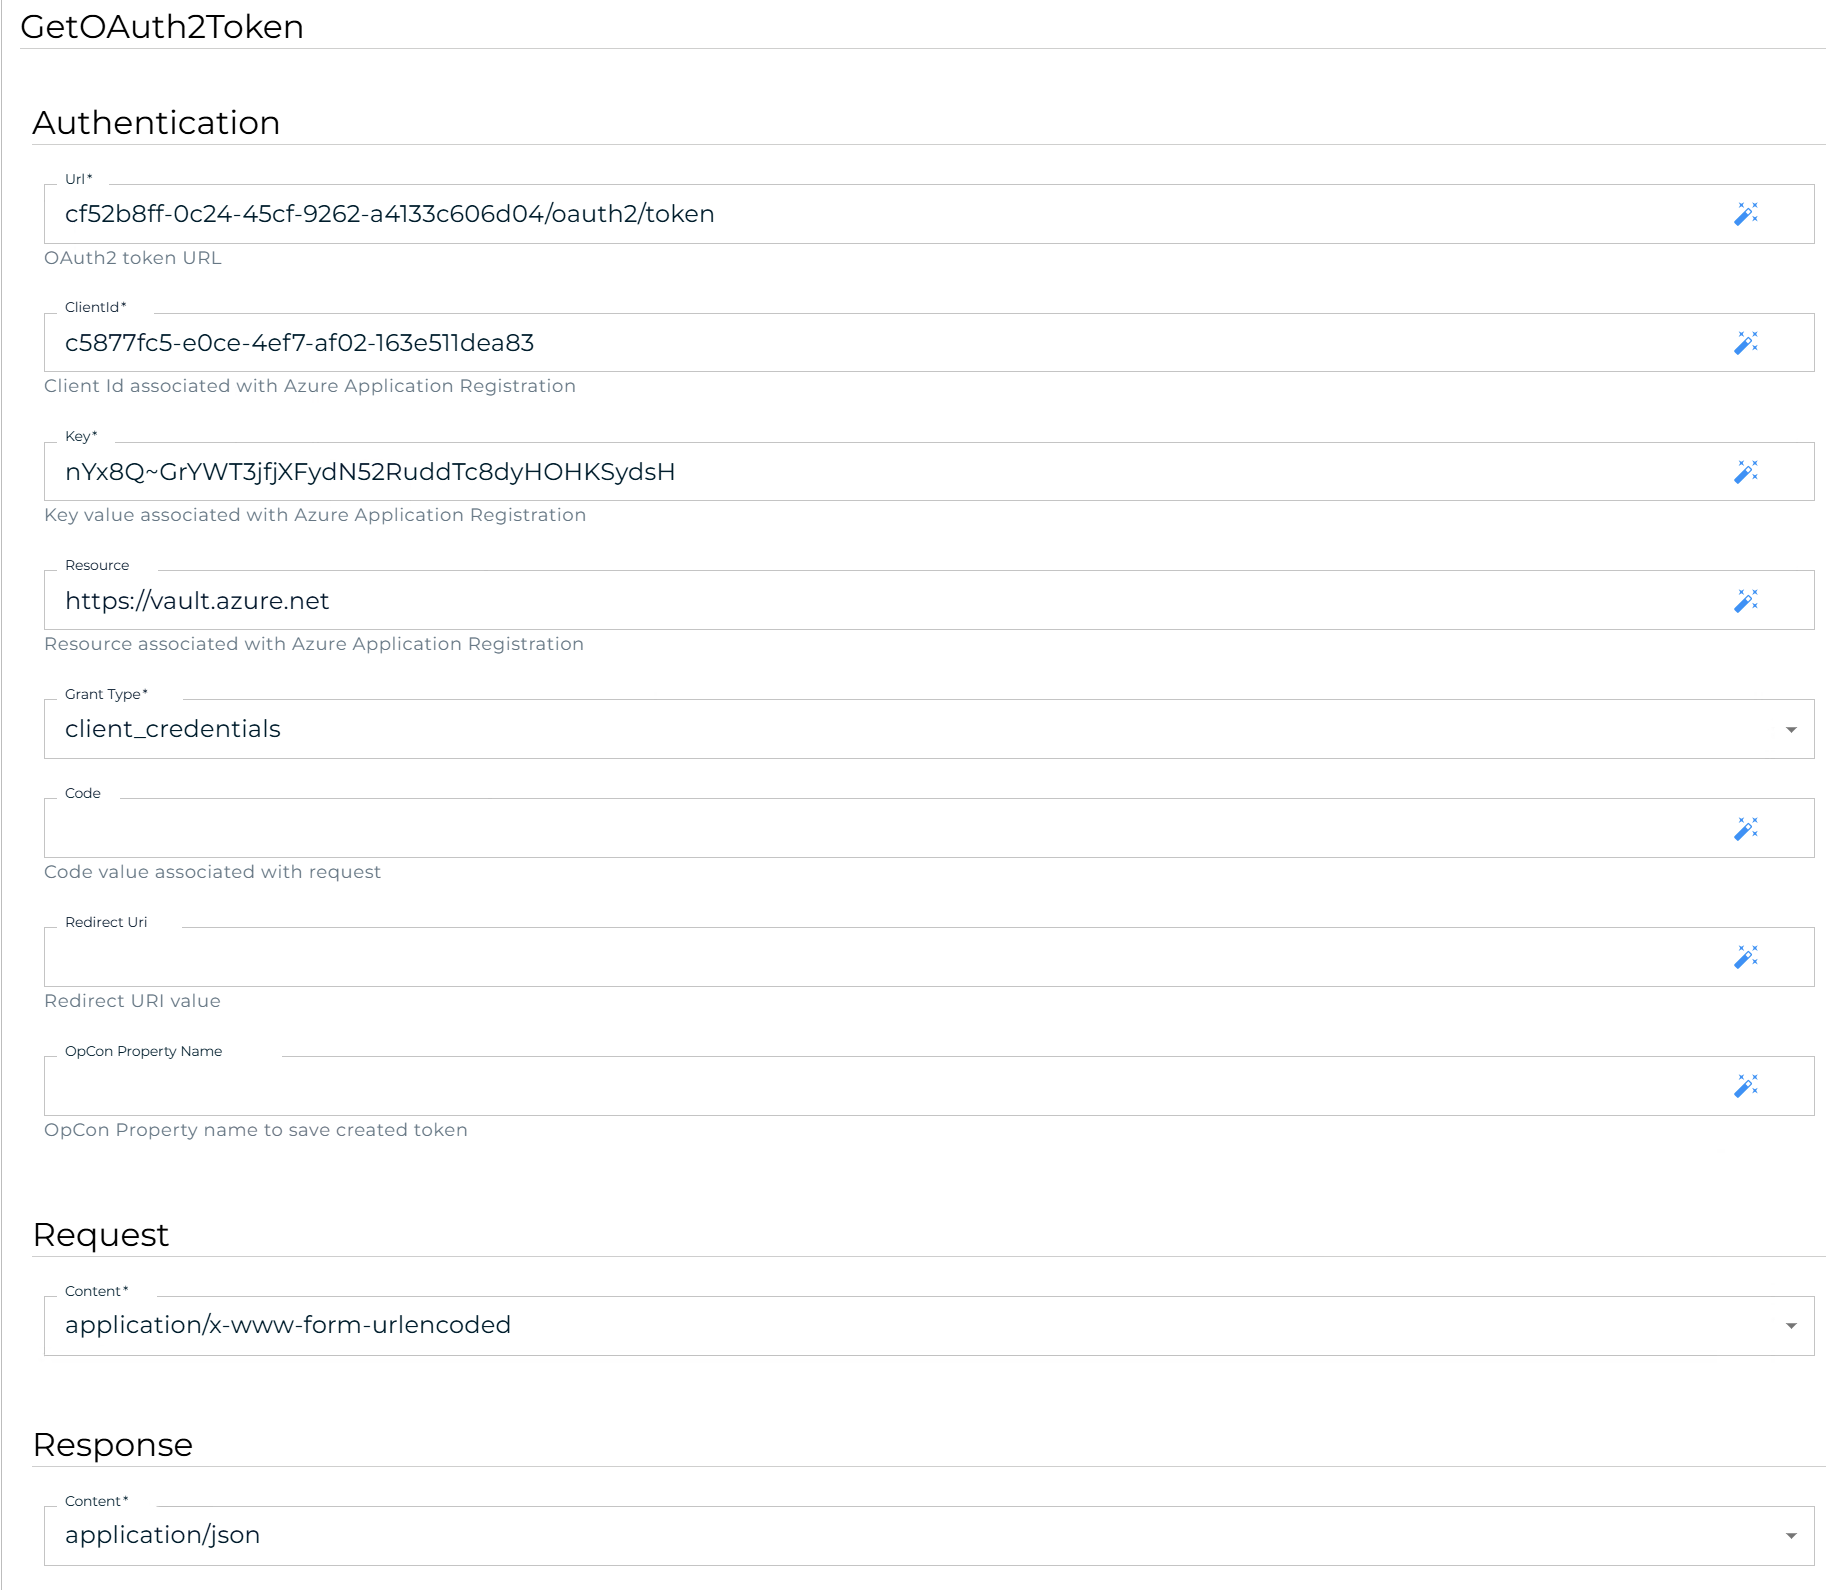
In the Authentication section:
- In the Url field, enter the token endpoint URL including the tenant ID (for example,
tenant-id/oauth2/token). - In the Clientid field, enter the client ID from the Azure Application registration.
- In the Key field, enter the key from the Azure Application registration.
- In the Resource field, enter the storage resource (for example,
https://storage-account.blob.core.windows.net). - Select client_credentials from the Grant Type list.
- In the OpCon Property field, enter the property name where the token will be stored. You can use instance properties if the full path is provided.
- In the Url field, enter the token endpoint URL including the tenant ID (for example,
-
In the Request section, select application/x-www-form-urlencoded from the Content list.
-
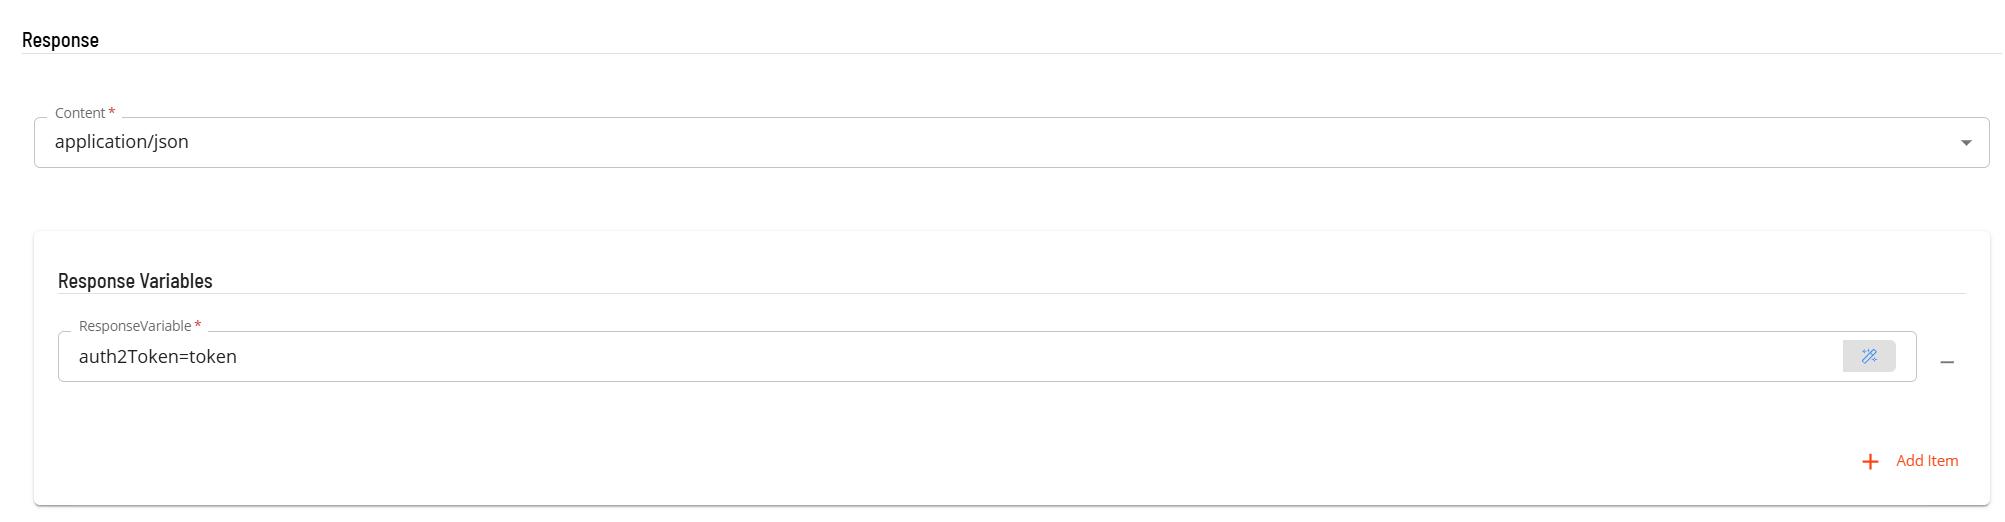
(Optional) If not using OpCon properties, in the Response section:
- Select application/json from the Content list.
- In Response Variable, enter the variable in the format
name=valuewherenameis the schedule instance property name (the value is ignored).
-
Select Save. The GetOAuth2Token job is added to the schedule.
GetPatToken job
The GetPatToken job encodes a Personal Access Token (PAT) from Azure DevOps and stores it for use by a subsequent RunDevOpsPipeline job.
After completing the prerequisite steps and selecting GetPatToken as the task type:
- In the Integration Selection section, select the ACS AzureWebservices connection.
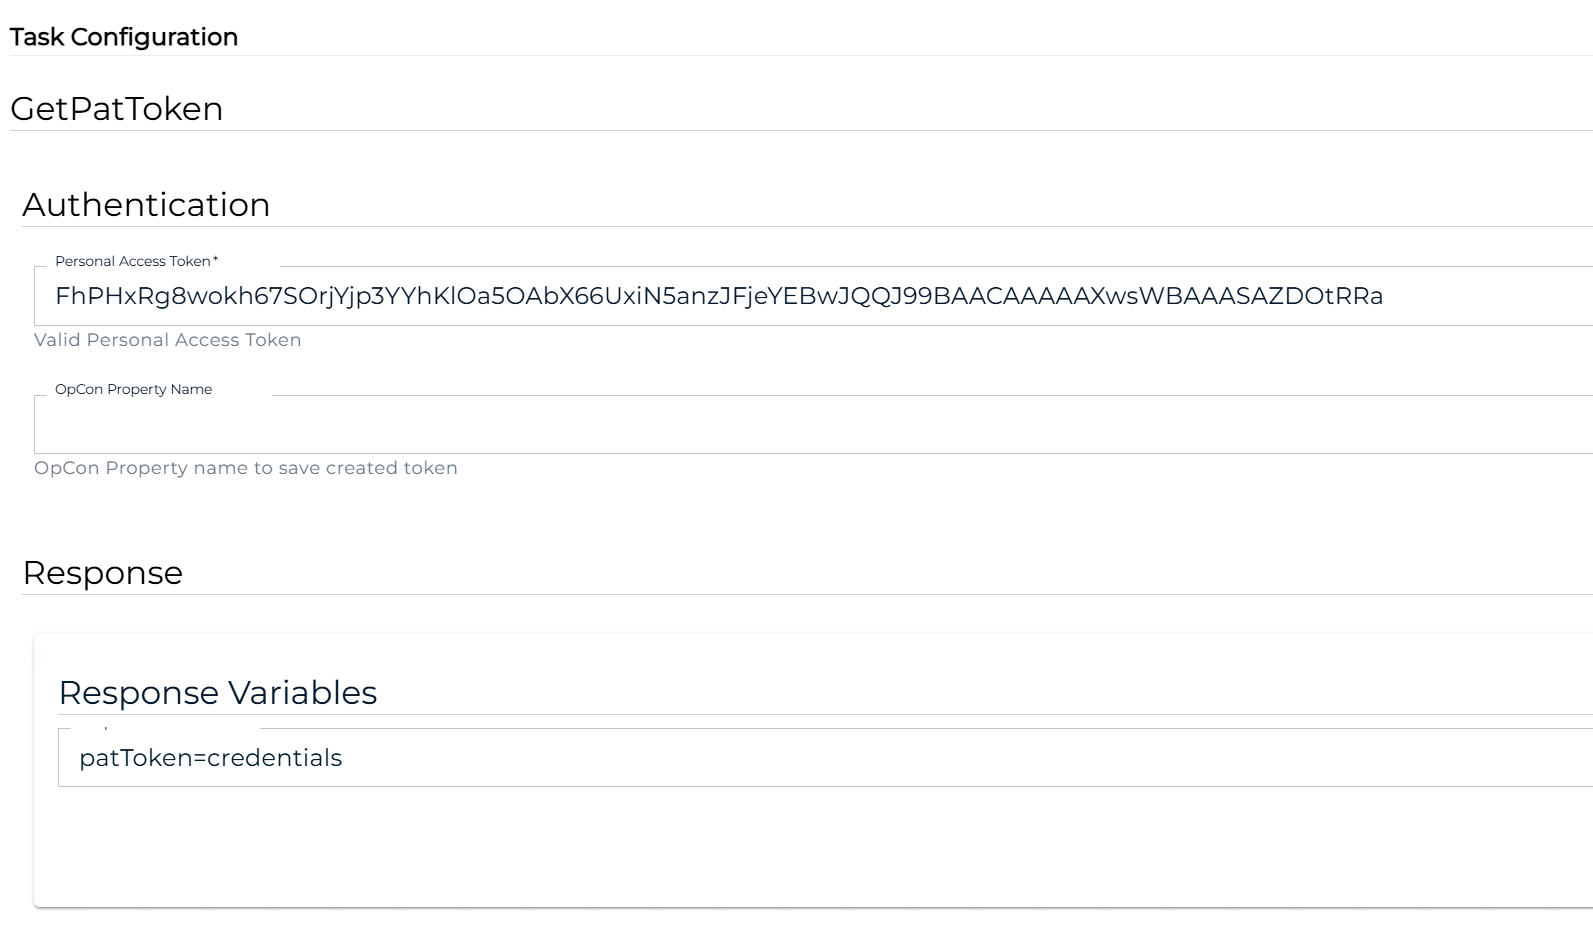
- In the Authentication section:
- Enter the PAT retrieved from Azure DevOps. For instructions on creating a PAT, see the Microsoft documentation.
- In the OpCon Property field, enter the property name where the token will be stored. You can use instance properties if the full path is provided.
- (Optional) If not using OpCon properties, in the Response Variable section, enter the variable in the format
name=valuewherenameis the schedule instance property name. - Select Save. The GetPatToken job is added to the schedule.
GetKeyVaultValue job
The GetKeyVaultValue job retrieves a secret, key, or certificate from Azure Key Vault and stores the result in an OpCon property.
Prerequisite: A GetOAuth2Token job must run before this job and the OAuth2 token must be available.

After completing the prerequisite steps and selecting GetKeyVaultValue as the task type:
- In the Integration Selection section, select the ACS AzureWebservices connection.
- In the Job Configuration section:
- In the Vault Url field, enter the address of the Azure Key Vault.
- In the Type field, select secret, key, or certificate from the list.
- In the Name field, enter the name of the key vault item.
- In the version field, enter the version to retrieve. Leave empty to retrieve the latest version.
- If the type is key or certificate, select the attribute to return from the Attribute field:
- Key attributes:
Key.kid,Key.kty,Key.D,Key.Dp,Key.Dq,Key.E,Key.K,Key.N,Key.P,Key.Q,Key.Qi,Key.X,Key.Y - Certificate attributes:
Cert.kid,Cert.sid,Cert.x5t,Cert.cer
- Key attributes:
- In the OpCon Property field, enter the property name where the retrieved value will be stored.
- In Header Attributes, enter
Authorization=namewherenameis the OpCon property name or response variable name that contains the OAuth2 token.
- Select Save. The GetKeyVaultValue job is added to the schedule.
RunDevOpsPipeline job
The RunDevOpsPipeline job starts an Azure DevOps pipeline and monitors it until it completes.
Prerequisite: A GetPatToken job must run before this job and set a job dependency from RunDevOpsPipeline to GetPatToken.
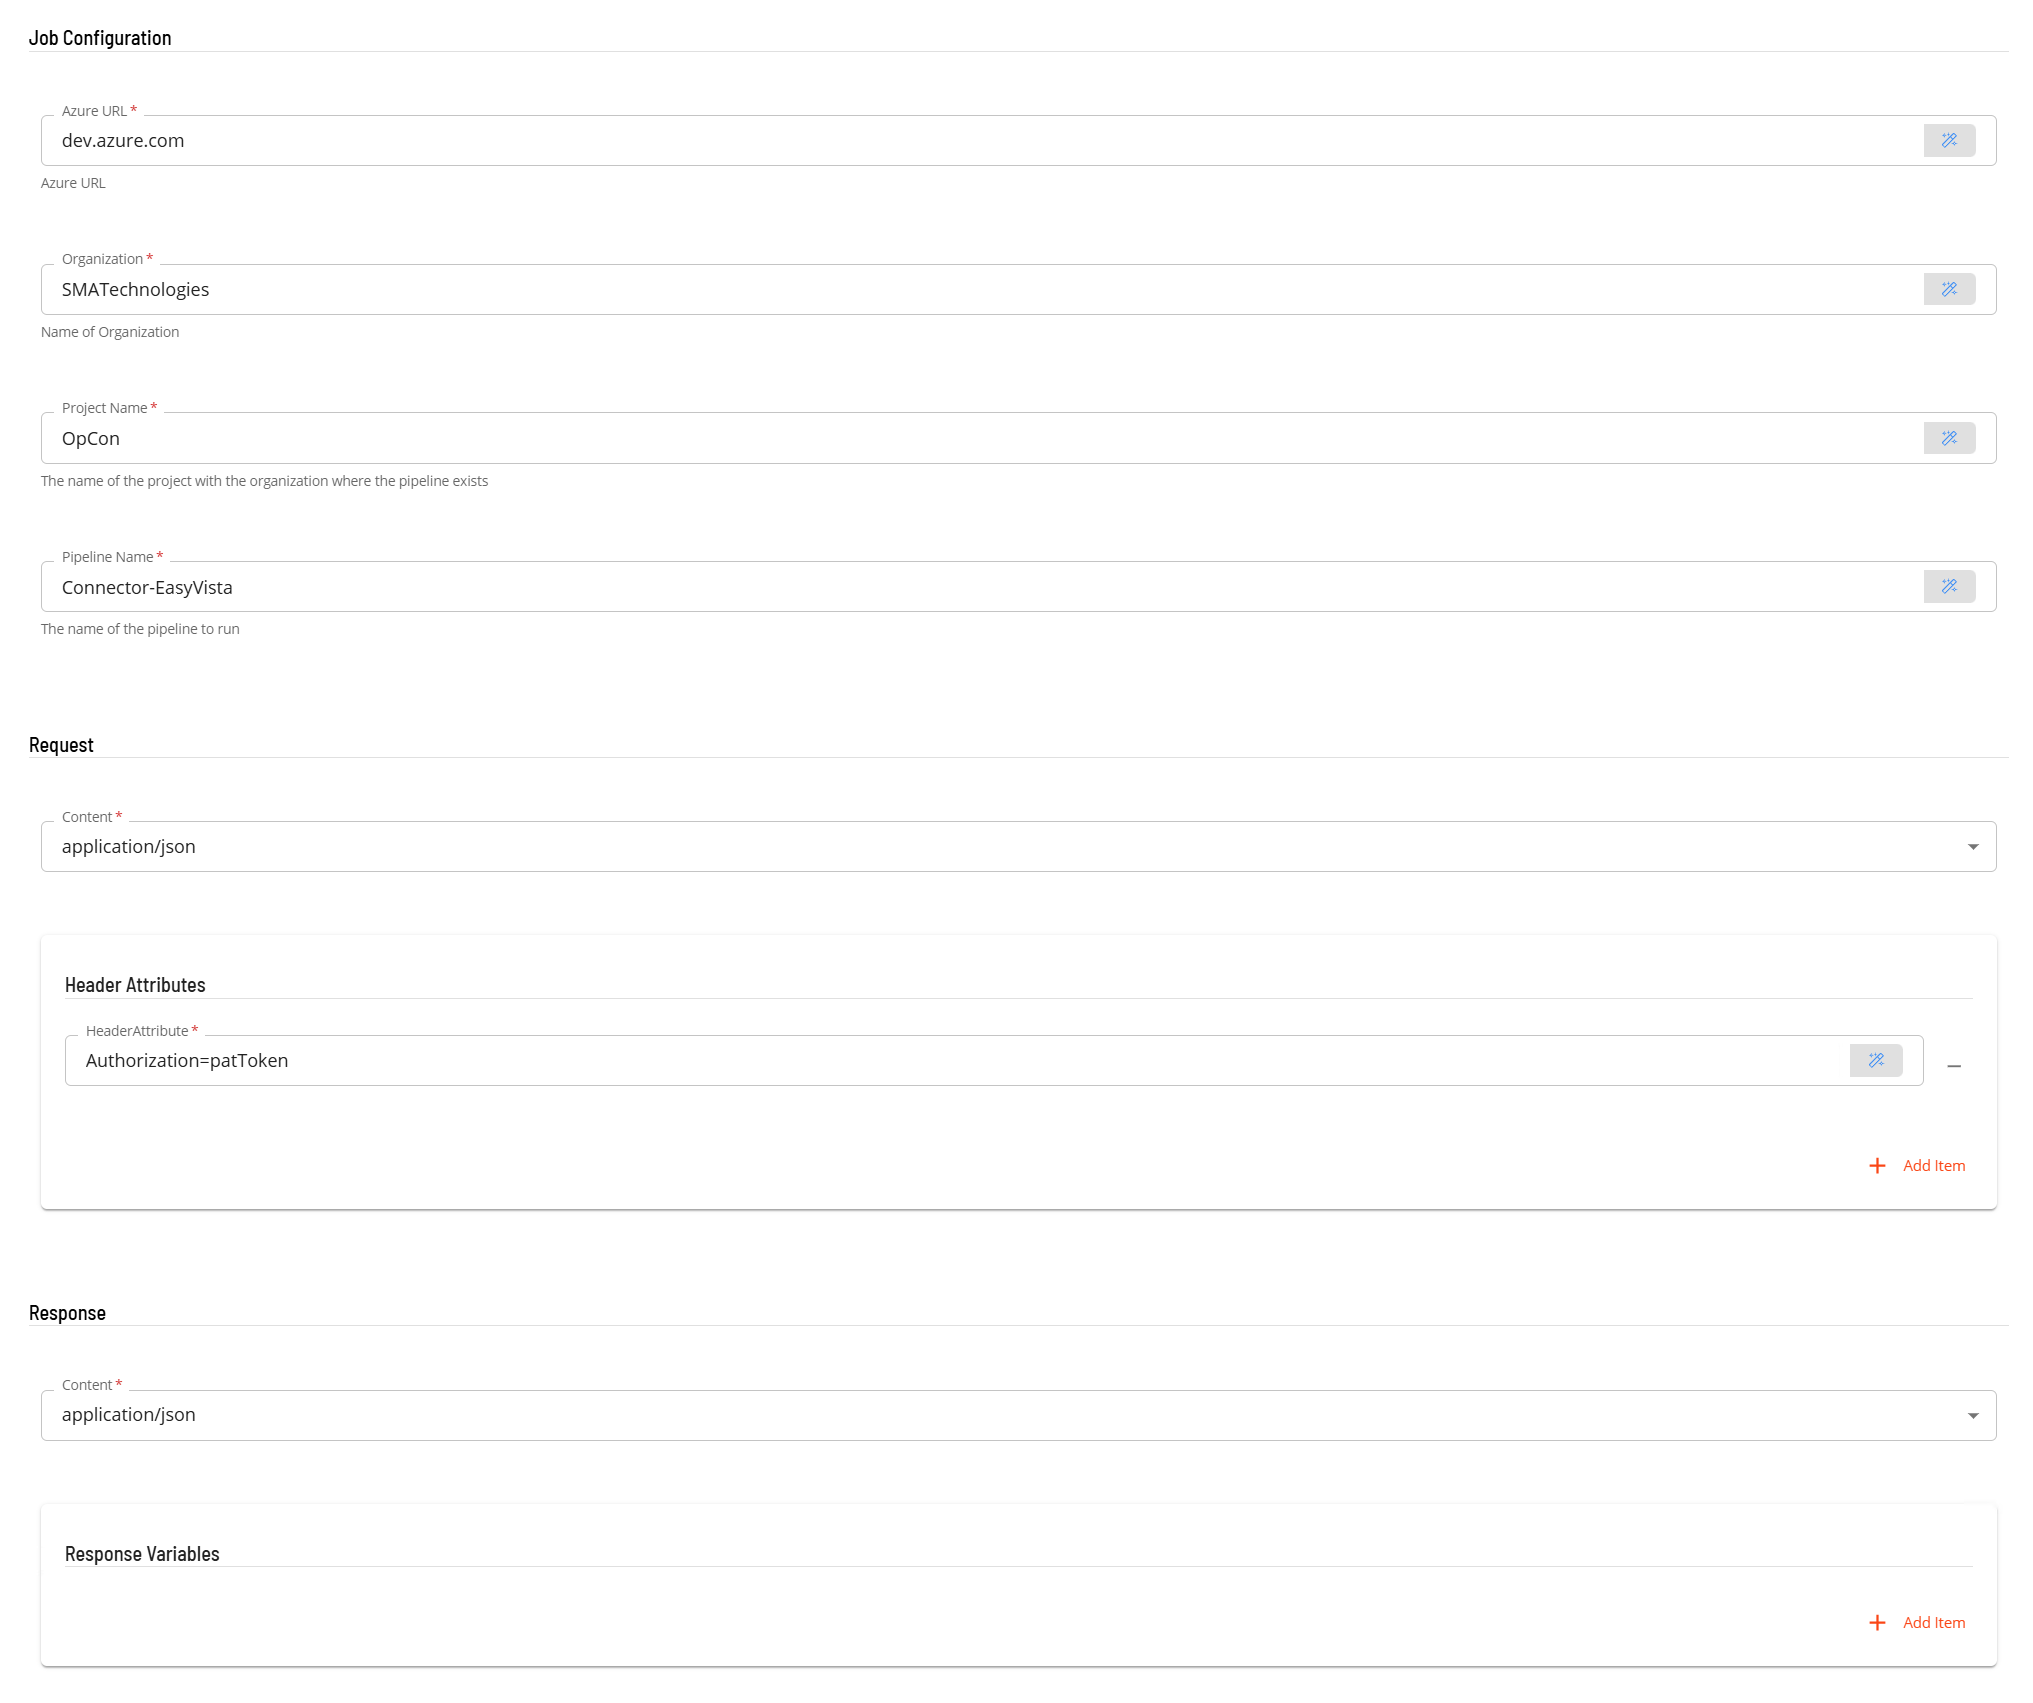
After completing the prerequisite steps and selecting RunDevOpsPipeline as the task type:
- In the Integration Selection section, select the ACS AzureWebservices connection.
- In the Job Configuration section (required fields shown in red):
- In the Azure Url field, enter
dev.azure.com. - In the Organization field, enter the DevOps organization name.
- In the Project field, enter the DevOps project name.
- In the Pipeline Name field, enter the DevOps pipeline name to run.
- In the Azure Url field, enter
- In the Request section:
- Select the content type from the Content list.
- In Header Attributes, enter
Authorization=namewherenameis the OpCon property name or response variable name that contains the PAT token.
- In the Response section:
- Select the content type from the Content list.
- (Optional) In Response Variables, enter a variable in the format
variable-name=jsonpathto extract a value from the response and store it as a schedule instance property. For example,$.idextracts the firstidattribute;$.[0].idextracts the firstidfrom the first record in a JSON array.
- Select Save. The RunDevOpsPipeline job is added to the schedule.
RunDataFactoryPipeline job
The RunDataFactoryPipeline job starts a Microsoft Data Factory pipeline and monitors it until it completes.
Prerequisite: A GetOAuth2Token job must run before this job and set a job dependency from RunDataFactoryPipeline to GetOAuth2Token.
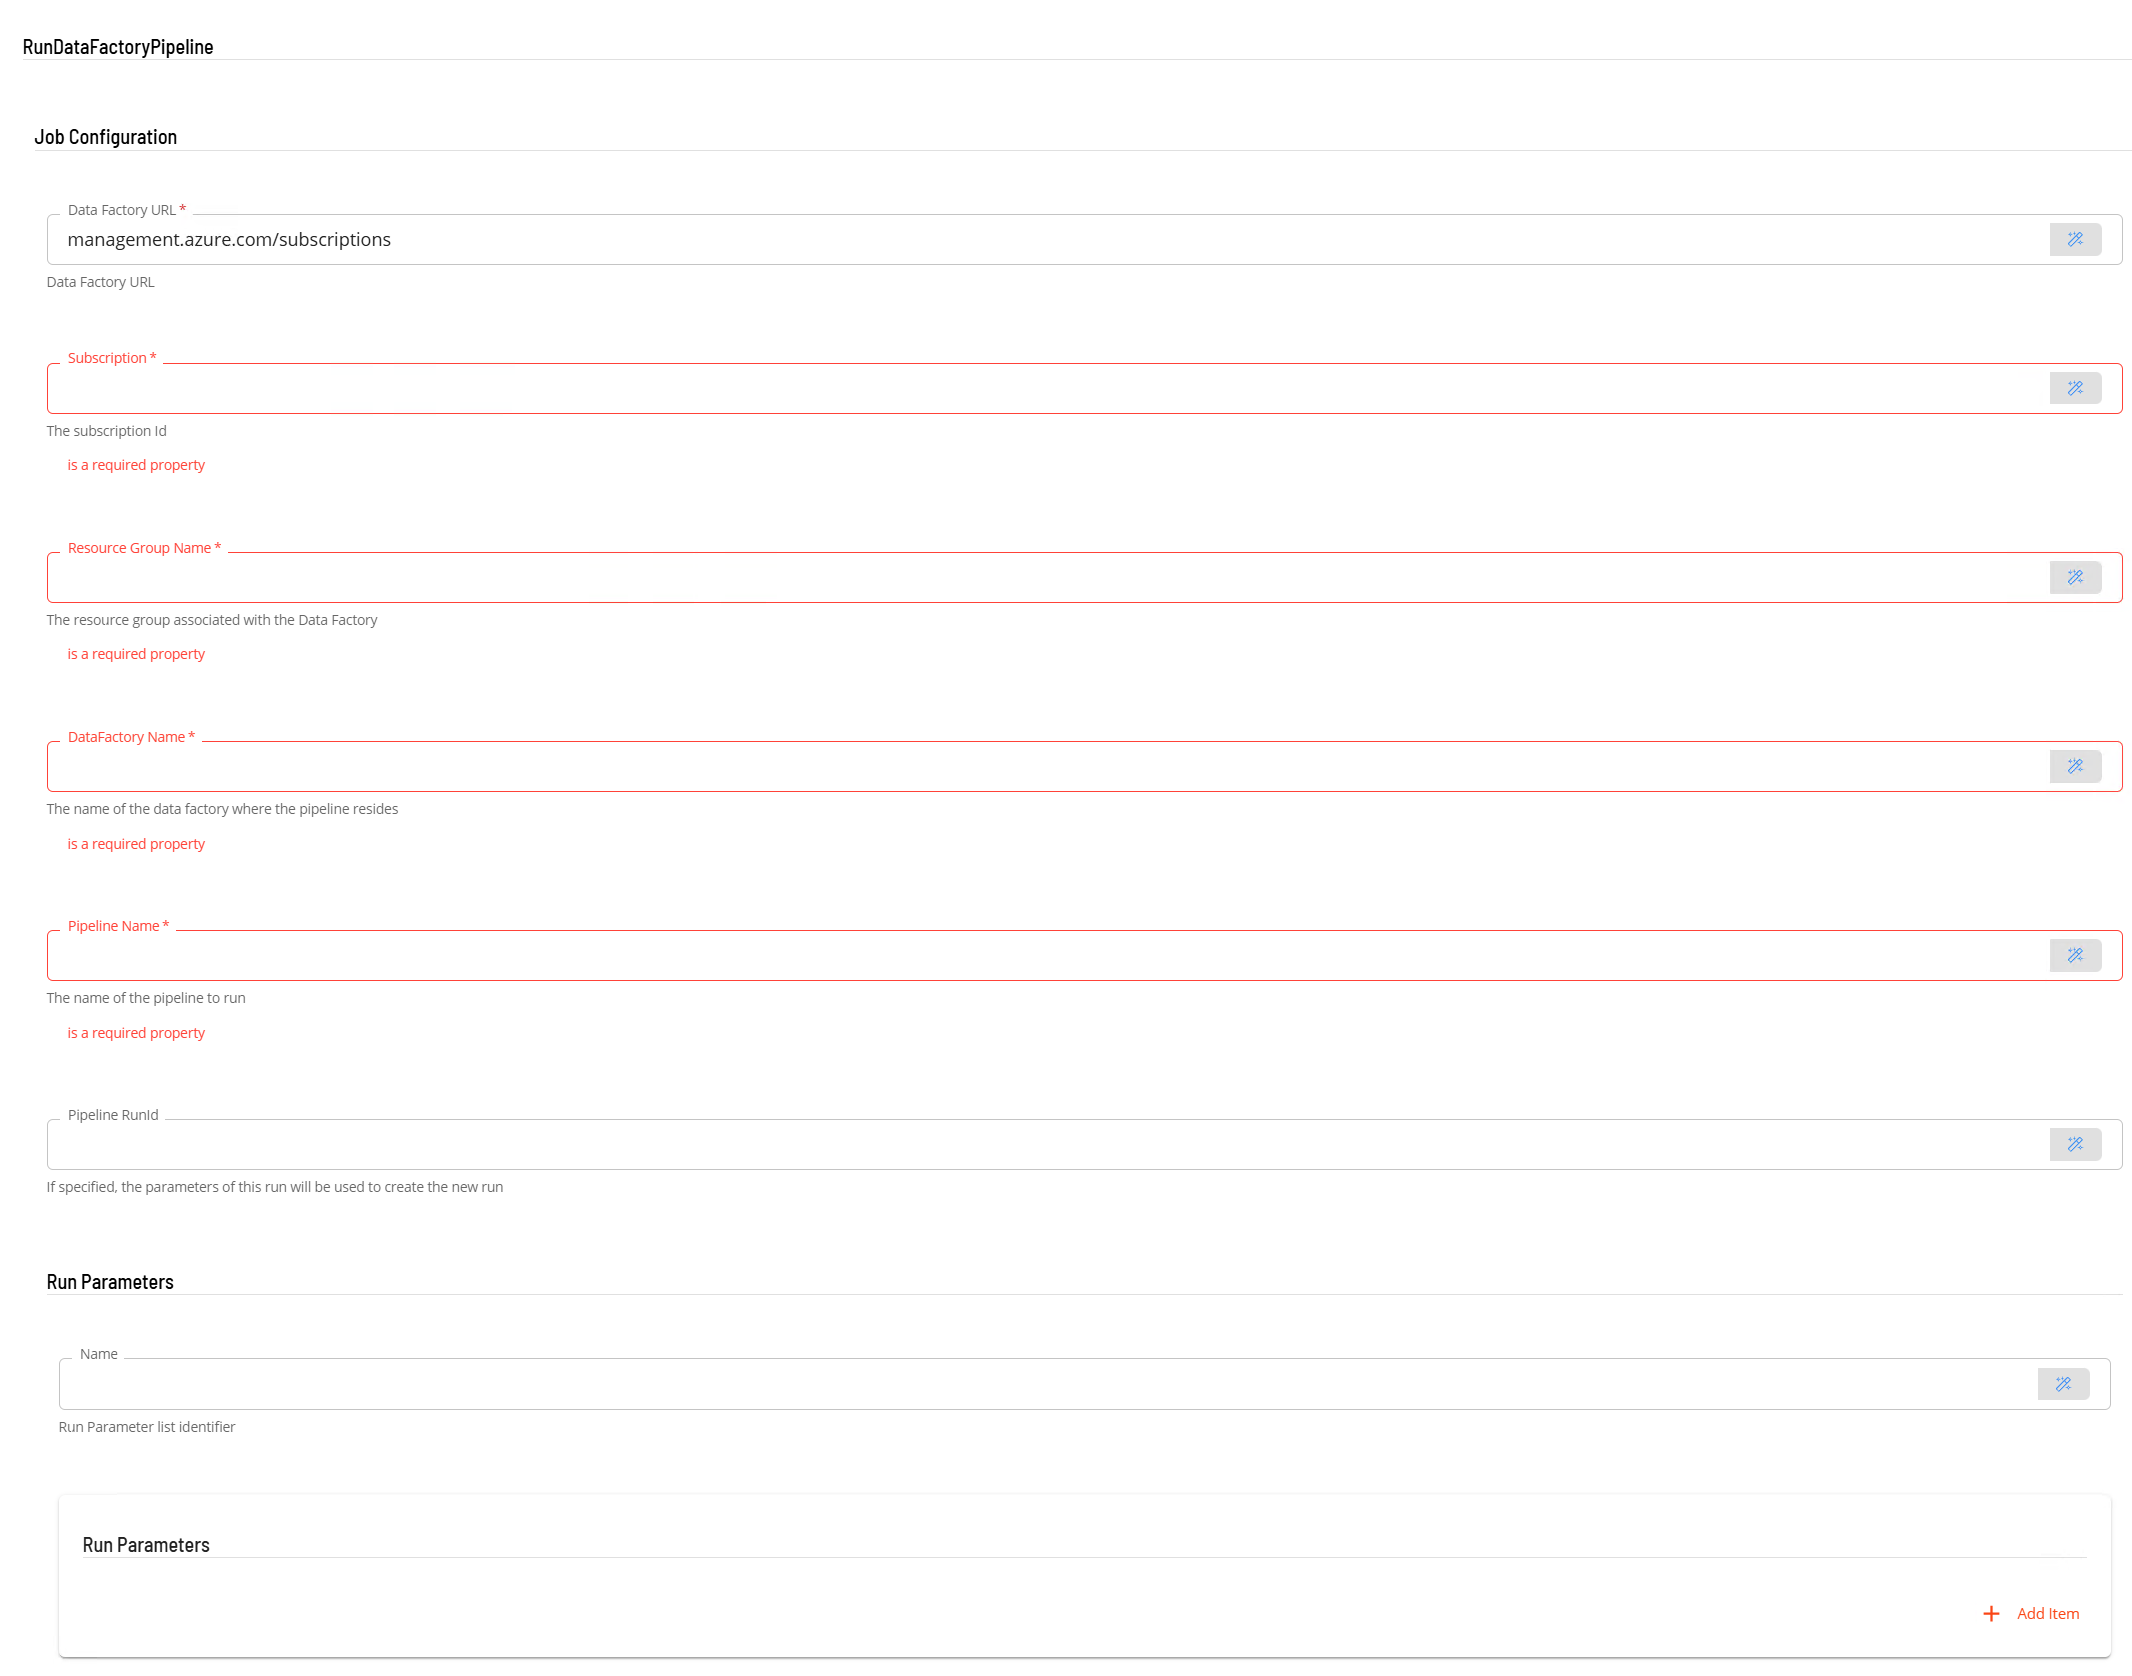
After completing the prerequisite steps and selecting RunDataFactoryPipeline as the task type:
- In the Integration Selection section, select the ACS AzureWebservices connection.
- In the Job Configuration section (required fields shown in red):
- In the Data Factory Url field, enter
management.azure.com/subscription. - In the Subscription field, enter the Azure subscription ID.
- In the Resource Group Name field, enter the resource group where the Data Factory is defined.
- In the Data Factory Name field, enter the Data Factory name.
- In the Pipeline Name field, enter the pipeline name to run.
- (Optional) In Pipeline Runid, enter a run ID to re-run a specific previous execution.
- (Optional) In the Run Parameters section, enter a name and values to pass as run parameters. Select +Add Item to add additional parameters.
- In the Data Factory Url field, enter
- In the Request section:
- Select application/json from the Content list.
- In Header Attributes, enter
Authorization=namewherenameis the OpCon property name or response variable name that contains the OAuth2 token.
- (Optional) In the Pipeline Recovery section, configure restart behavior:
- Select the Recovery option to enable recovery.
- To restart from a specific activity, enter the activity name in Start Activity Name.
- To restart from the beginning, leave Start Activity Name empty and do not select Start From Failure.
- To restart from the failed activity, select the Start From Failure option.
- Select Save. The RunDataFactoryPipeline job is added to the schedule.
DownloadBlobStorage job
The DownloadBlobStorage job downloads a file from Azure Blob Storage to the system where the connector is installed.
Prerequisite: A GetOAuth2Token job must run before this job and set a job dependency from DownloadBlobStorage to GetOAuth2Token.
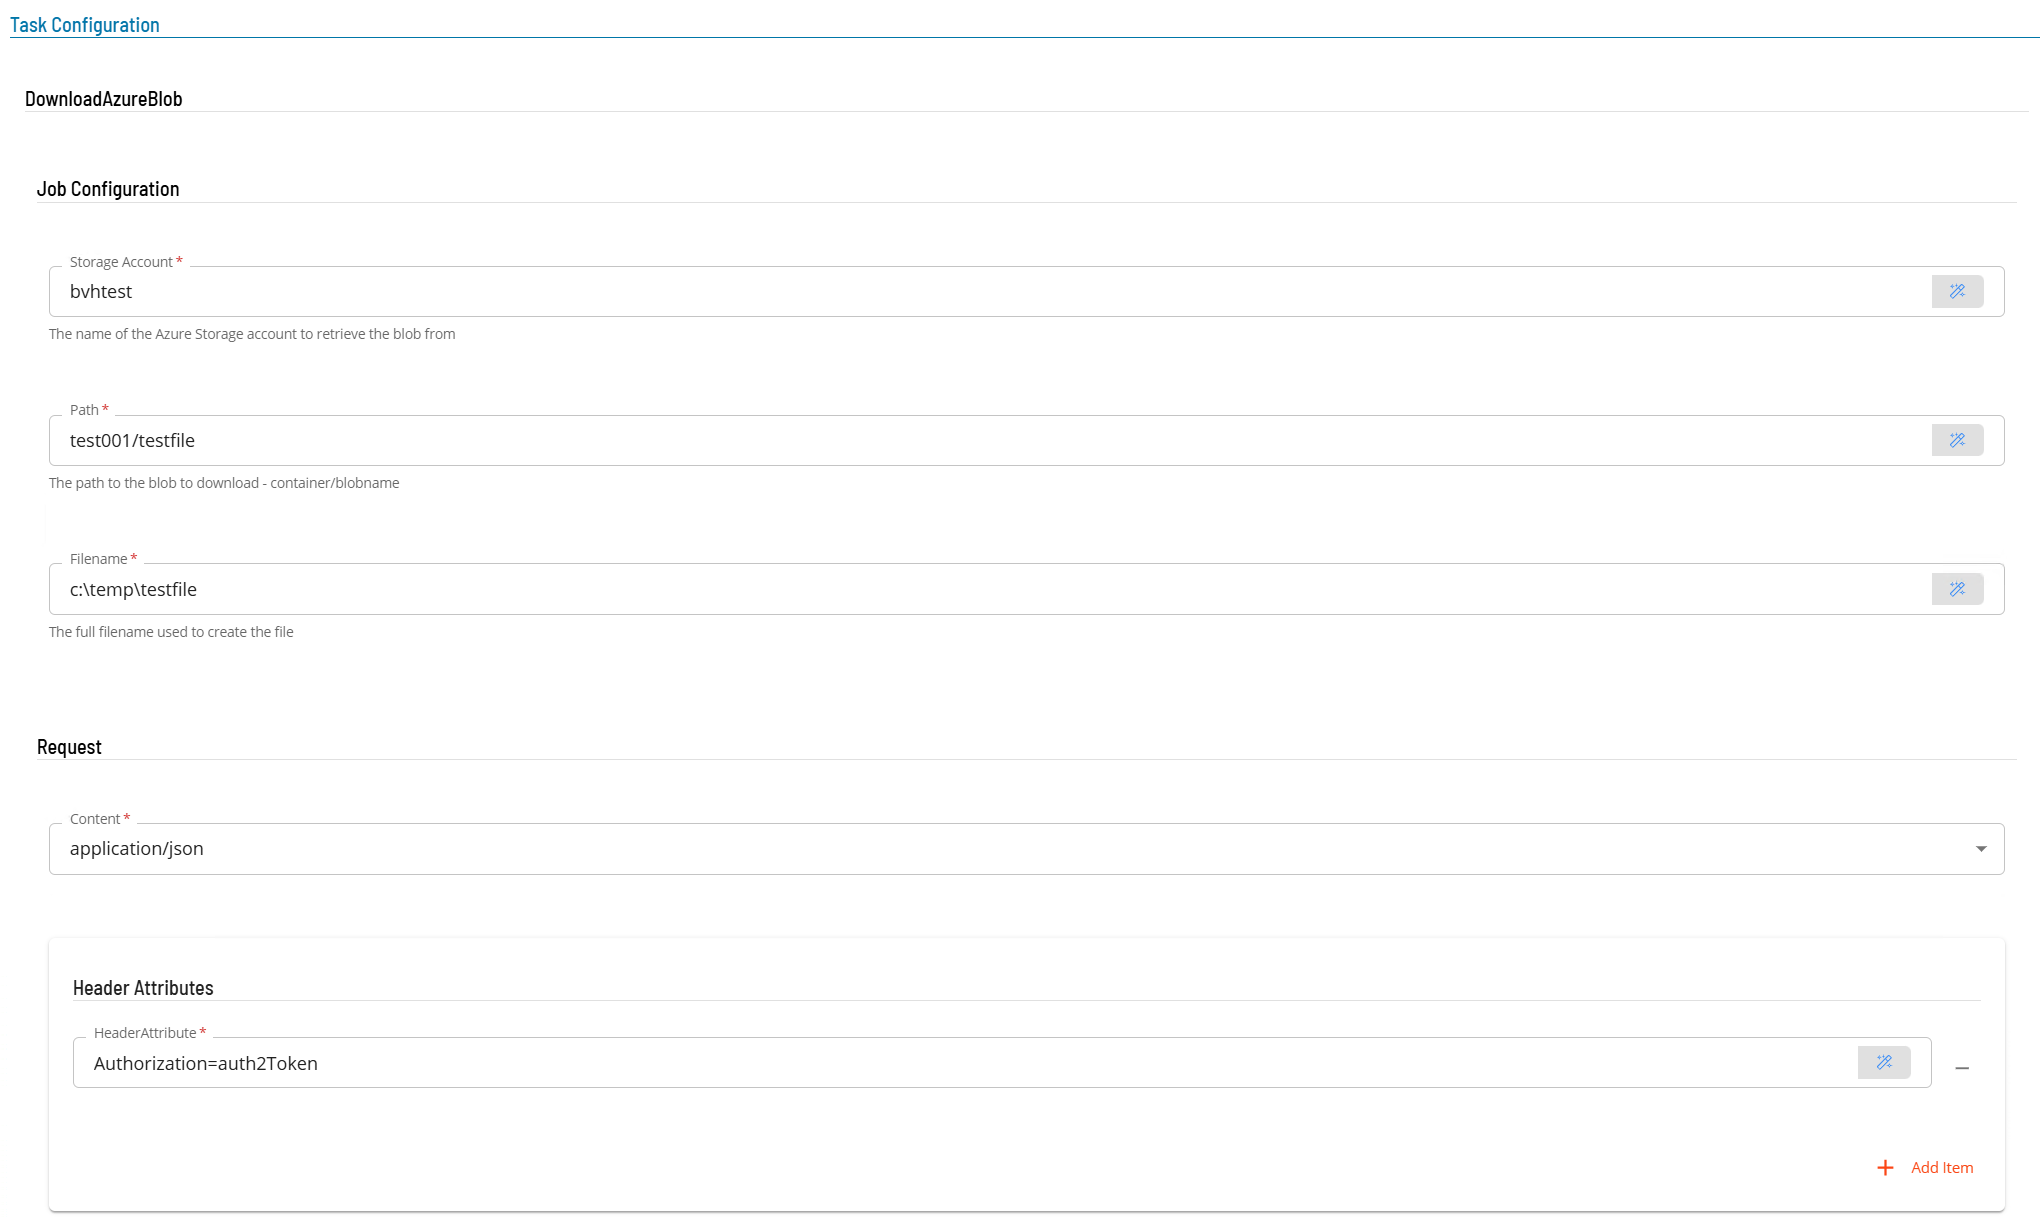
After completing the prerequisite steps and selecting DownloadBlobStorage as the task type:
- In the Integration Selection section, select the ACS AzureWebservices connection.
- In the DownloadAzureBlob section:
- In the Storage Account field, enter the storage account name.
- In the Path field, enter the path of the file in storage using the format
container/filename. - In the Filename field, enter the local path and name of the file to create. The path is relative to the system where the connector is installed.
- In the Request section:
- Select the content type from the Content list.
- In Header Attributes, enter
Authorization=namewherenameis the OpCon property name or response variable name that contains the OAuth2 token.
- Select Save. The DownloadBlobStorage job is added to the schedule.
UploadBlobStorage job
The UploadBlobStorage job uploads a file from the system where the connector is installed to Azure Blob Storage.
Prerequisite: A GetOAuth2Token job must run before this job and set a job dependency from UploadBlobStorage to GetOAuth2Token.

After completing the prerequisite steps and selecting UploadBlobStorage as the task type:
- In the Integration Selection section, select the ACS AzureWebservices connection.
- In the UploadAzureBlob section:
- In the Storage Account field, enter the storage account name.
- In the Path field, enter the destination path in storage using the format
container/filename. - In the Filename field, enter the local path and name of the file to upload. The path is relative to the system where the connector is installed.
- In the Request section:
- Select the content type from the Content list.
- In Header Attributes, enter
Authorization=namewherenameis the OpCon property name or response variable name that contains the OAuth2 token.
- Select Save. The UploadBlobStorage job is added to the schedule.
FAQs
Which authentication job do I need before running a DevOps pipeline? Define a GetPatToken job and set a job dependency from the RunDevOpsPipeline job to the GetPatToken job. The PAT token must be available as a schedule instance property or OpCon property before RunDevOpsPipeline runs.
Which authentication job do I need before running a Data Factory pipeline, accessing Key Vault, or using Blob Storage? Define a GetOAuth2Token job and set a job dependency from the downstream job to the GetOAuth2Token job. The OAuth2 token must be available before the subsequent job runs.
How do I store a token for use across multiple jobs? Enter a property name in the OpCon Property field of the GetOAuth2Token or GetPatToken job to store the token as an OpCon property accessible across schedules. Alternatively, use Response Variable to store it as a schedule instance property scoped to the current schedule run.
What value do I enter in the Azure Url field for a RunDevOpsPipeline job?
Enter dev.azure.com in the Azure Url field.
What is the default value of the Azure URL field in the connection definition?
The default value is azure.status.microsoft/en-us/status. This URL is used as a heartbeat check to verify that the Azure environment is available.
Can I restart a Data Factory pipeline from a specific point if it fails? Yes. In the Pipeline Recovery section of a RunDataFactoryPipeline job, select the Recovery option and enter the restart point in the Start Activity Name field. To restart from the failed activity, select Start From Failure instead.
Glossary
ACS AzureWebservices — An OpCon connector that enables jobs to interact with Microsoft Azure services including Azure DevOps, Azure Data Factory, Azure Key Vault, and Azure Blob Storage.
GetOAuth2Token — A job type that retrieves an OAuth2 token from an Azure OAuth2 endpoint and stores it as a schedule instance property or OpCon property for use by subsequent jobs.
GetPatToken — A job type that encodes a Personal Access Token (PAT) for Azure DevOps and stores it as a schedule instance property or OpCon property for use by subsequent jobs.
GetKeyVaultValue — A job type that retrieves a secret, key, or certificate from an Azure Key Vault and stores the result in an OpCon property.
RunDevOpsPipeline — A job type that starts an Azure DevOps pipeline and monitors it until the pipeline completes.
RunDataFactoryPipeline — A job type that starts a Microsoft Data Factory pipeline and monitors it until the pipeline completes.
DownloadBlobStorage — A job type that downloads a file from Azure Blob Storage to the system where the connector is installed.
UploadBlobStorage — A job type that uploads a file from the system where the connector is installed to Azure Blob Storage.
PAT (Personal Access Token) — An authentication credential created in Azure DevOps that grants access to DevOps resources. Used by the GetPatToken job type.
Schedule instance property — A named value scoped to a single running instance of a schedule. Used to pass data such as authentication tokens between jobs within the same schedule run.
OpCon property — A named value stored in OpCon that can be used across schedules and jobs. Authentication tokens can be stored as OpCon properties for use beyond a single schedule instance.
JPath — A query notation for extracting values from JSON documents. Used in the Response Variables field to target specific attributes in a JSON response.