ACS Webservices operation
Theme: Configure Who is it for? Automation Engineer, System Administrator
What is it?
The ACS Webservices connector enables OpCon jobs to make HTTP requests to remote REST APIs as part of automated schedules. Once the connector is registered with OpCon, you can define an agent connection, configure authentication, and create jobs that perform GET, POST, PUT, PATCH, and DELETE operations against external systems.
- Use this connector when you need to integrate OpCon with external systems that expose a REST API
- Use authentication job types (BASICTOKEN, OPCONTOKEN, OAUTH2TOKEN) to obtain tokens and pass them to subsequent HTTP request jobs within the same schedule
- Use the variable substitution and response variable features to pass data between jobs in a schedule
Defining ACS Webservices batch users
The BASICTOKEN and OPCONTOKEN job types use OpCon batch users to define the user information for authentication. Before creating these job types, ensure that the appropriate batch users are created.
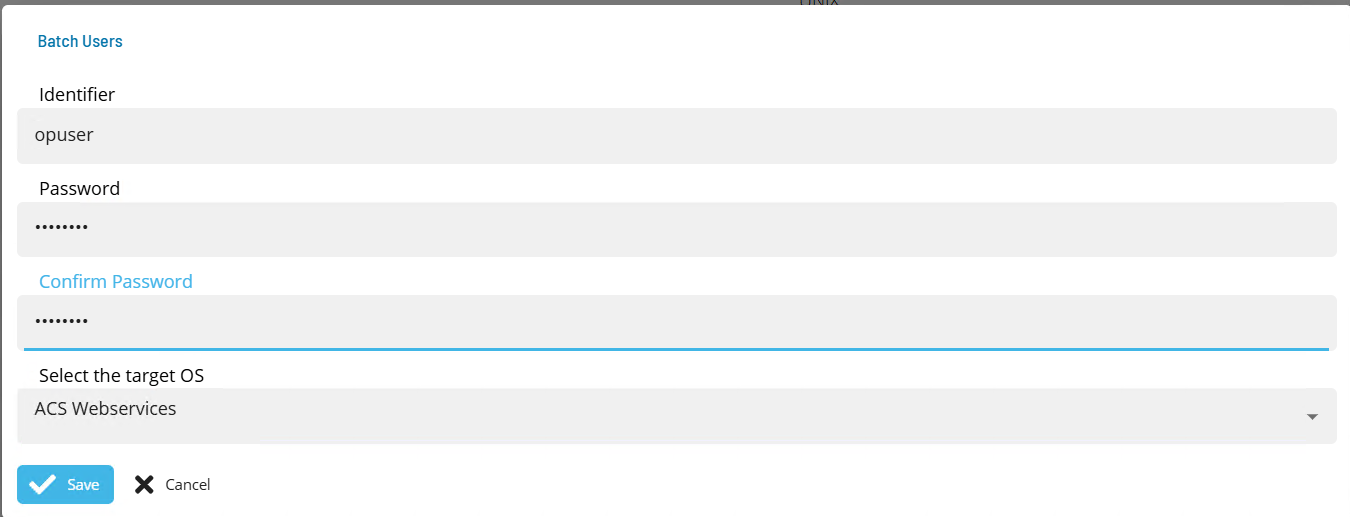
To define an ACS Webservices batch user, complete the following steps:
- Open Solution Manager.
- From the Home page, select Library.
- From the Security menu, select Batch Users.
- Select +Add.
- Select ACS Webservices from the Select the target OS list.
- In the Identifier field, enter the user name that will be used to create the token.
- In the Password and Confirm fields, enter the password of the defined API user.
- Select Save. The batch user is created and available for selection in BASICTOKEN and OPCONTOKEN job definitions.
Defining the ACS Webservices connection
The agent definition is created by adding a new ACS Webservices agent in Solution Manager. Required fields are shown in red.
To define the ACS Webservices connection, complete the following steps:
- Open Solution Manager.
- From the Home page, select Library.
- From the Administration menu, select Agents.
- Select +Add.
- Enter the agent details:
- Enter a unique name for the connection.
- Select ACS Webservices from the Type list.
- Select General Settings.
- In the NetCom field, enter
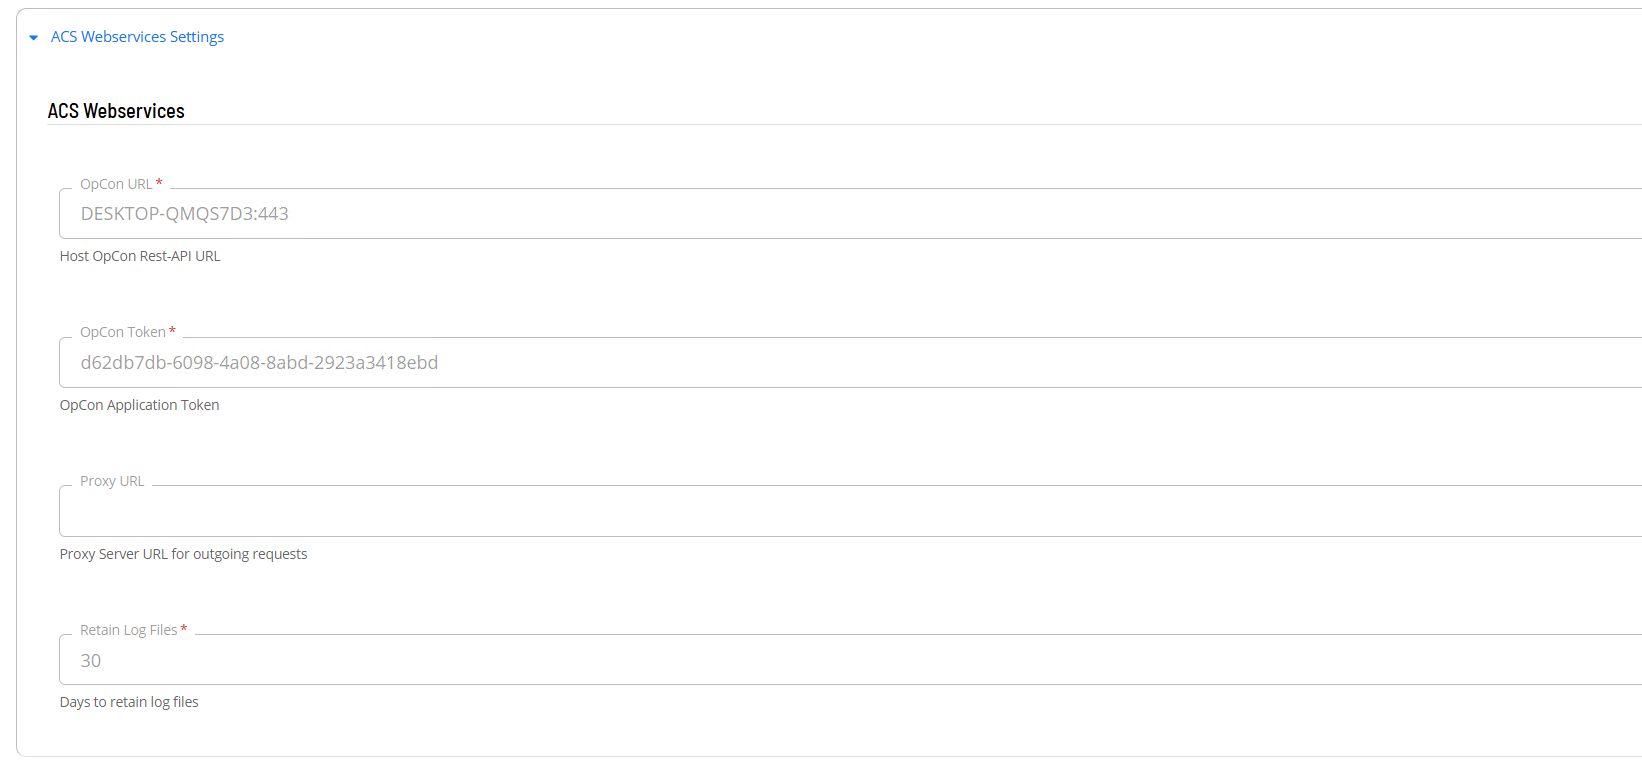
<Default>or a Netcom or Relay name. - Select ACS Webservices Settings.
- In the OpCon URL field, enter the full URL for the associated OpCon REST API server.
- In the OpCon Token field, enter a valid OpCon application token for authenticating internal OpCon REST API requests.
- In the Proxy Url field, enter the full URL of the proxy server if required.
- Select Save.
- Select Communications Settings, set Requires XML Escape Sequences:User-Defined to True, then select Save.
- Select the Change Communication Status button and select Enable Full Comm.
Defining jobs
The ACS Webservices connection supports the following job types:
| Job type | Description |
|---|---|
| BASICTOKEN | Create a basic authentication token |
| OPCONTOKEN | Retrieve an OpCon token from an OpCon system |
| OAUTH2TOKEN | Retrieve an OAuth2 token |
| GET | Perform a GET HTTP request |
| POST | Perform a POST HTTP request |
| PUT | Perform a PUT HTTP request |
| PATCH | Perform a PATCH HTTP request |
| DELETE | Perform a DELETE HTTP request |
Authentication jobs (BASICTOKEN, OPCONTOKEN, or OAUTH2TOKEN) must run before GET, POST, PUT, PATCH, or DELETE jobs if the target API requires authentication. Set a job dependency from the HTTP request job to the authentication job. The authentication job stores the token as a schedule instance property that subsequent jobs can reference.
Data is passed between jobs using schedule instance properties. The ACS environment calls these "scoped properties" and passes them automatically to each job. Define them in the Response Variables field.
Prerequisite steps for all job definitions
Every job type in this connector follows the same steps to open the job definition form. Complete the following steps before configuring the job-type-specific fields described in each section below.
To open the master job definition form, complete the following steps:
- Open Solution Manager.
- From the Home page, select Library.
- From the Administration menu, select Master Jobs.
- Select +Add.
- In the Schedule list, select the schedule.
- In the Name field, enter a unique name for the job.
- In the Job Type list, select ACS Webservices.
- In the Task Type list, select the job type you want to configure.
- Select the Task Details button.
Continue with the job-type-specific steps in the section below.
BASICTOKEN job
The BASICTOKEN job sets a basic token as a schedule instance property for use by subsequent jobs. It uses an ACS Webservices batch user to generate the base64 encoded authentication string.
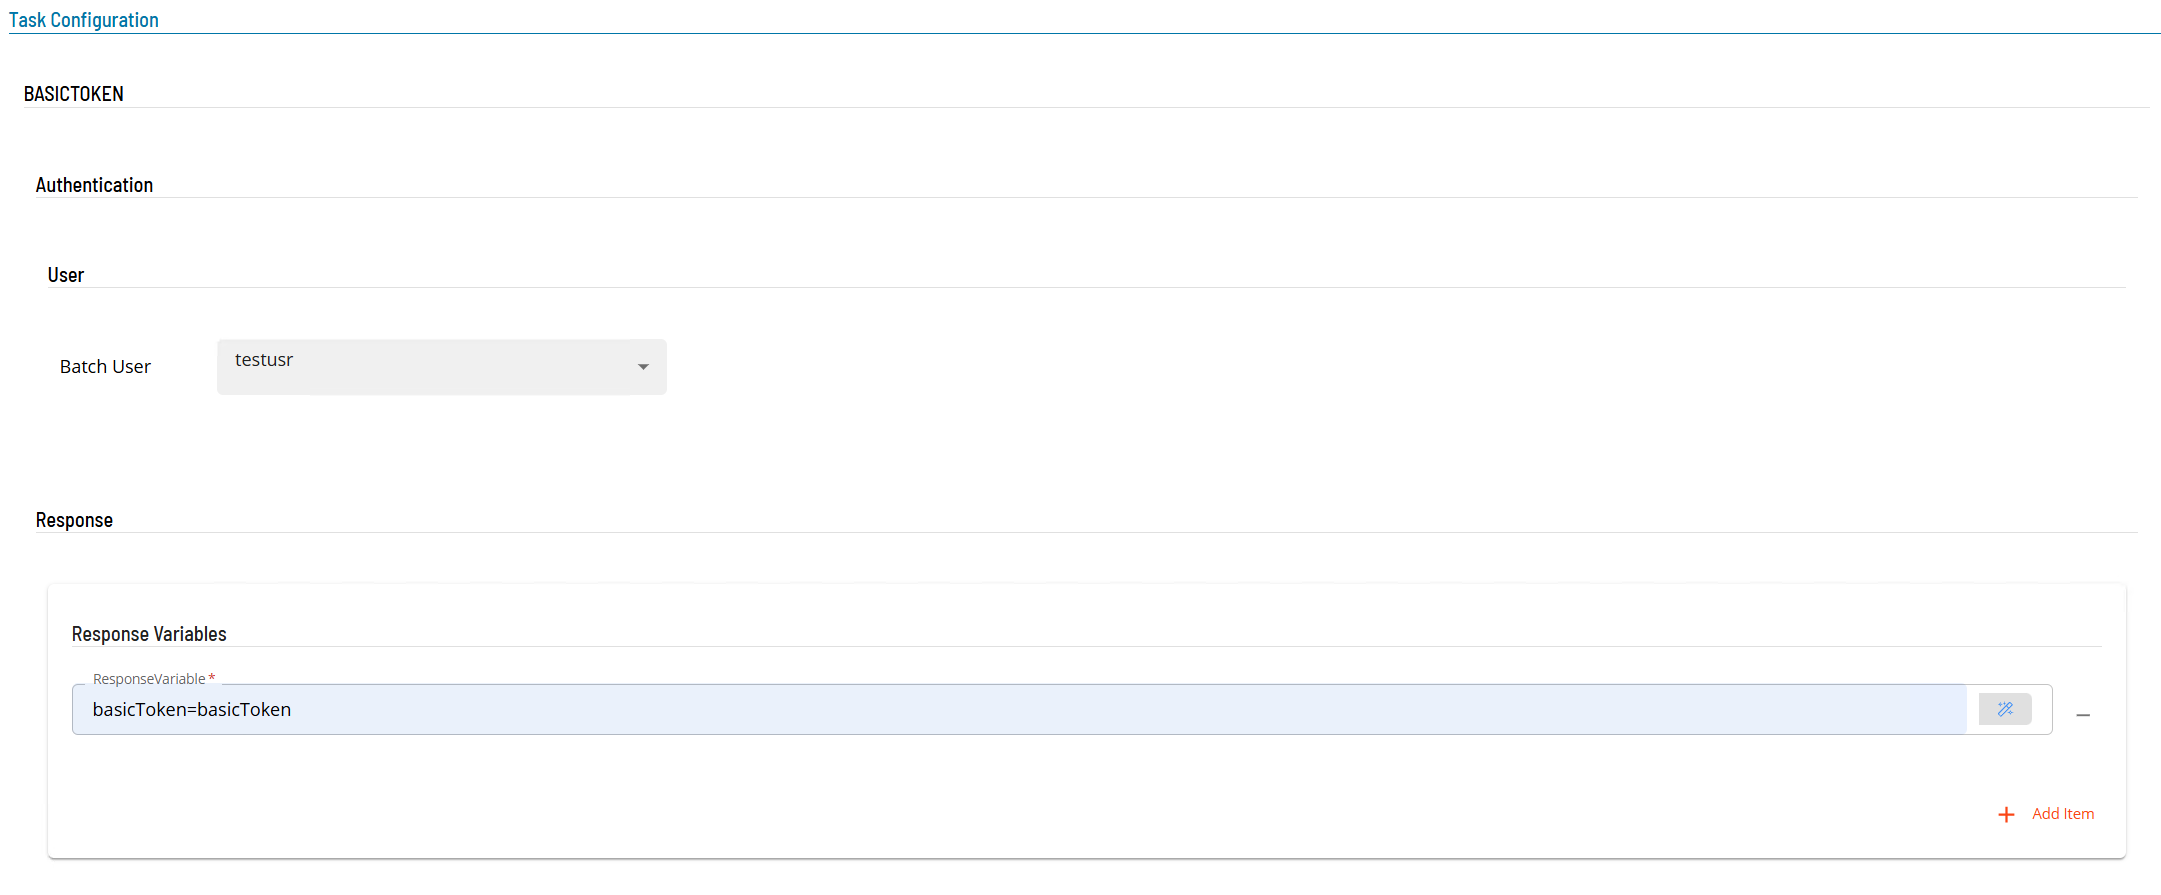
After completing the prerequisite steps and selecting BASICTOKEN as the task type:
- In the Integration Selection section, select the ACS Webservices connection.
- In the Authentication section, select a batch user from the list.
- In the Response Variable section, enter the variable that will contain the token. Use the format
name=valuewherenameis the schedule instance property name (the value is ignored). - Select Save. The BASICTOKEN job is added to the schedule.
OPCONTOKEN job
The OPCONTOKEN job retrieves an OpCon token and sets it as a schedule instance property for use by subsequent jobs.
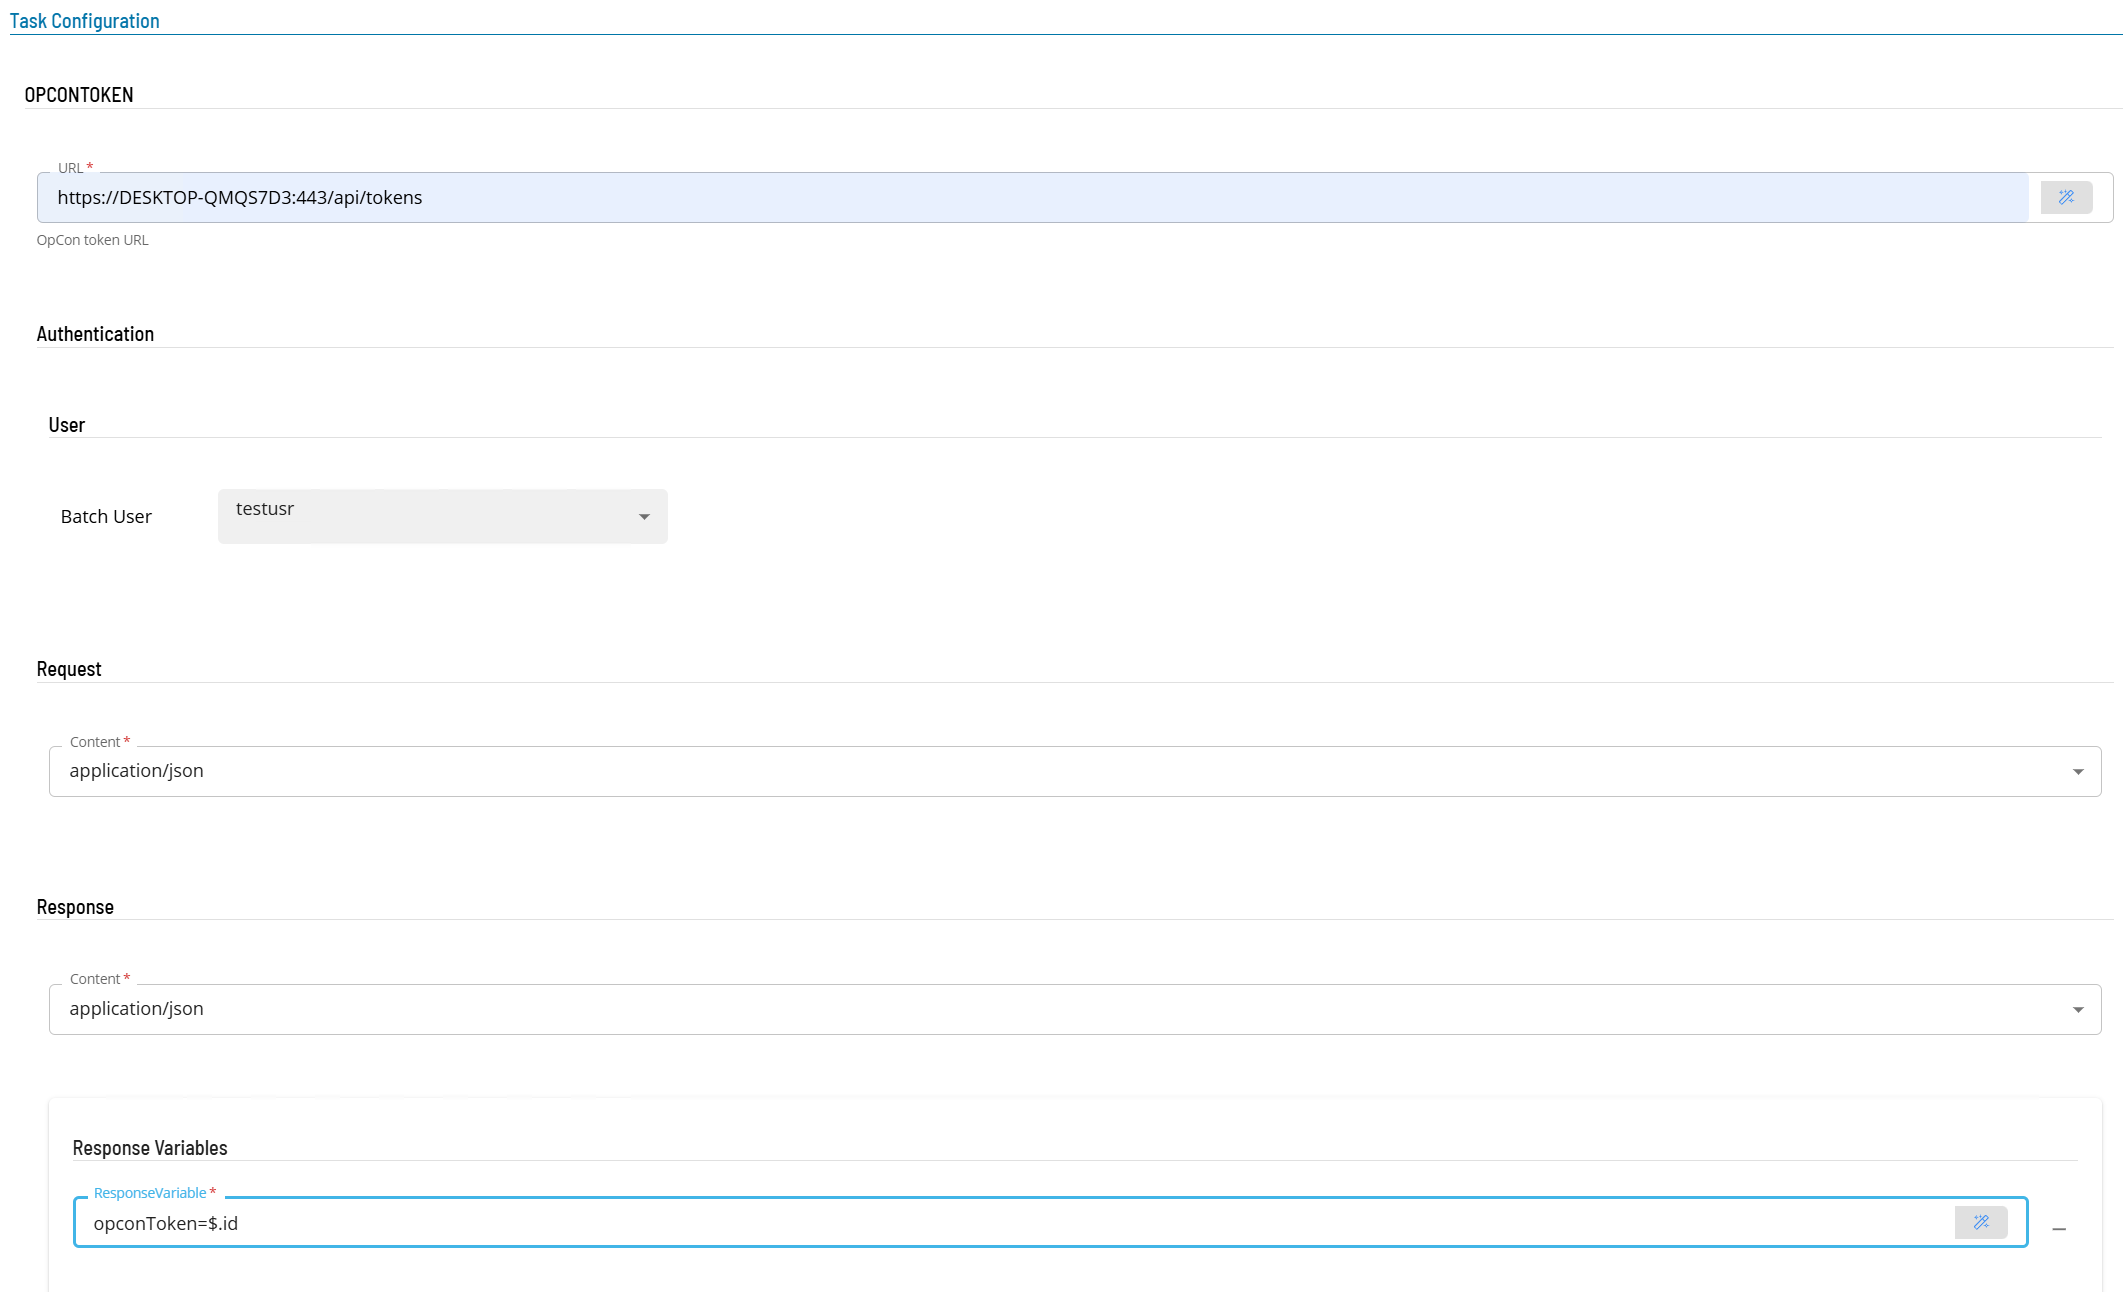
After completing the prerequisite steps and selecting OPCONTOKEN as the task type:
- In the Integration Selection section, select the ACS Webservices connection.
- In the Authentication section:
- In the URL field, enter the full endpoint address (for example,
https://server:port/api/tokens). - Select a batch user from the list.
- In the URL field, enter the full endpoint address (for example,
- In the Request section, select application/json from the Content list.
- In the Response section:
- Select application/json from the Content list.
- In Response Variables, enter a variable in the format
variable-name=jsonpath(for example,opconToken=$.id), wherevariable-namebecomes the schedule instance property name and$.idis the JPath expression to extract the token.
- Select Save. The OPCONTOKEN job is added to the schedule.
OAUTH2TOKEN job
The OAUTH2TOKEN job retrieves an OAuth2 token and sets it as a schedule instance property for use by subsequent jobs.
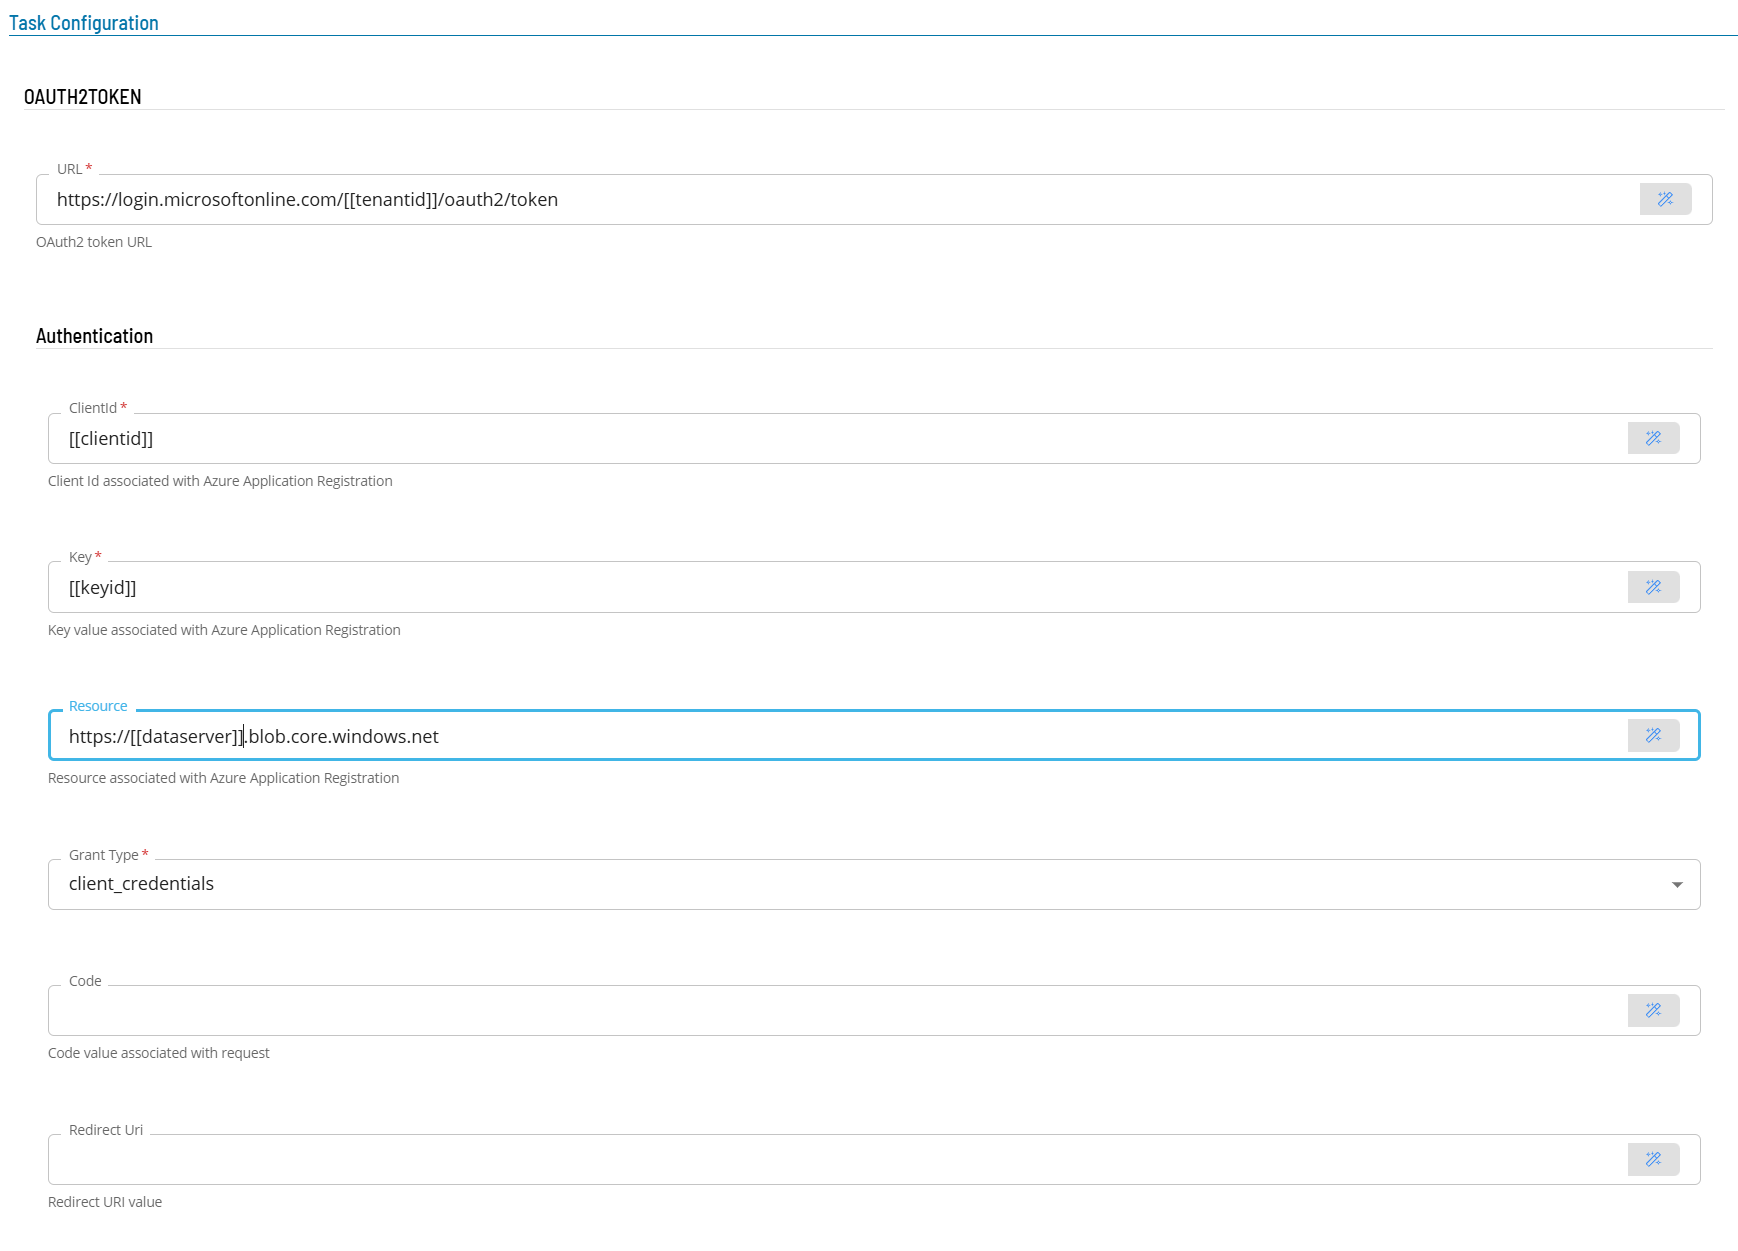
After completing the prerequisite steps and selecting OAUTH2TOKEN as the task type:
-
In the Integration Selection section, select the ACS Webservices connection. In the URL field, enter the full endpoint address using global properties (for example,
https://login.microsoftonline.com/[[tenantid]]/oauth2/token). -
In the Authentication section:
- In the ClientId field, enter the client ID (use an encrypted global property to protect this value).
- In the KeyId field, enter the key (use an encrypted global property to protect this value).
- In the Resource field, enter the authentication resource (for example,
https://[[dataserver]].blob.storage.netfor Azure Storage). - Select client_credentials from the Grant Type list.
-
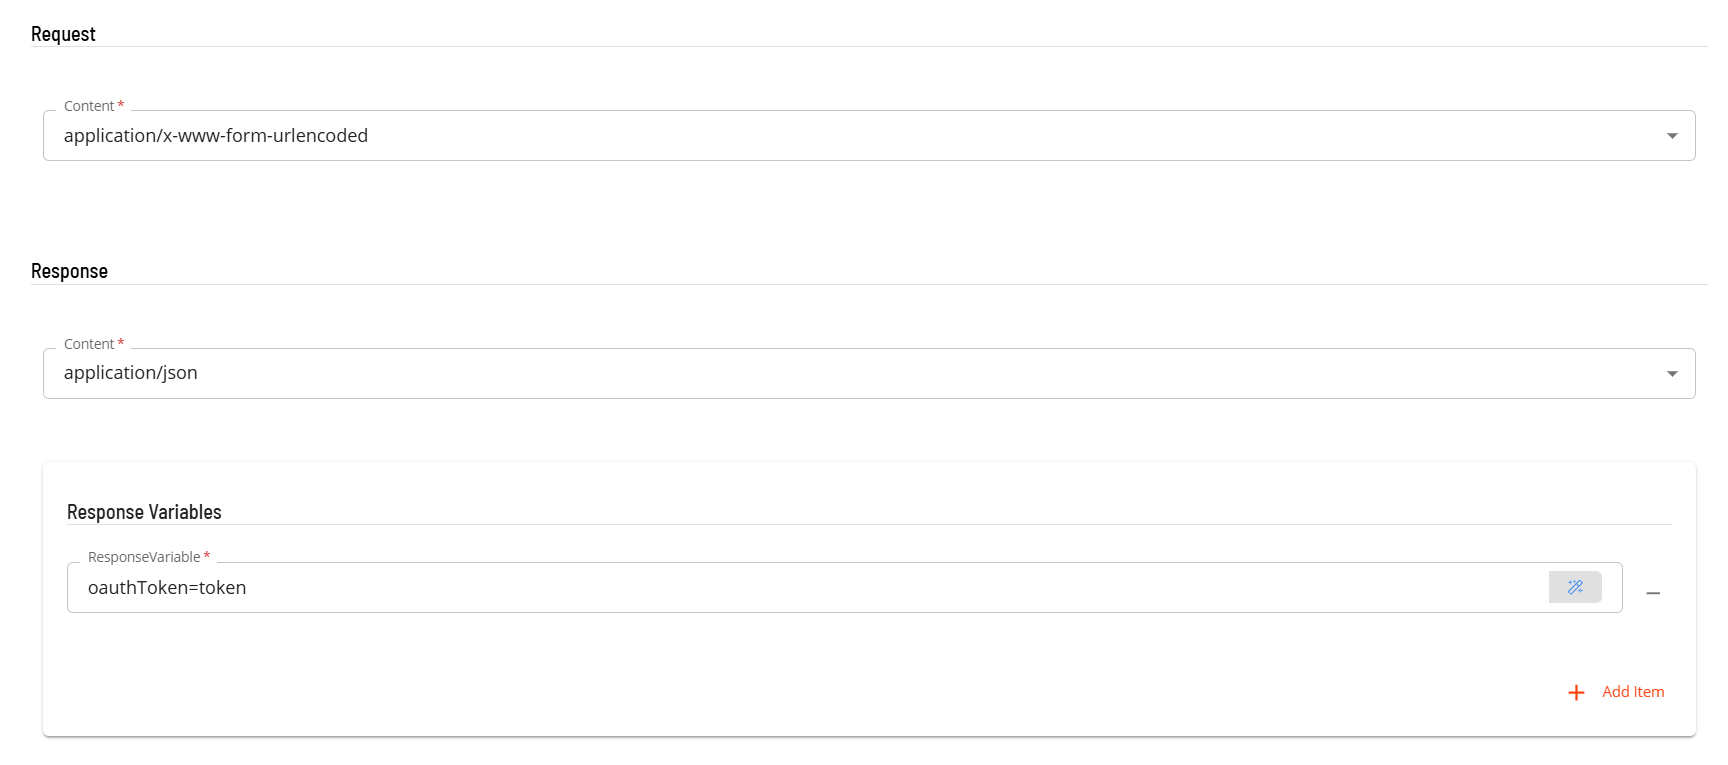
In the Request section, select application/x-wwww-form-urlencoded from the Content list.
-
In the Response section:
- Select application/json from the Content list.
- In Response Variables, enter a variable in the format
variable-name=jsonpath(for example,oauthToken=$.id). The JPath value is ignored — the connector usesaccess_tokenby default.
-
Select Save. The OAUTH2TOKEN job is added to the schedule.
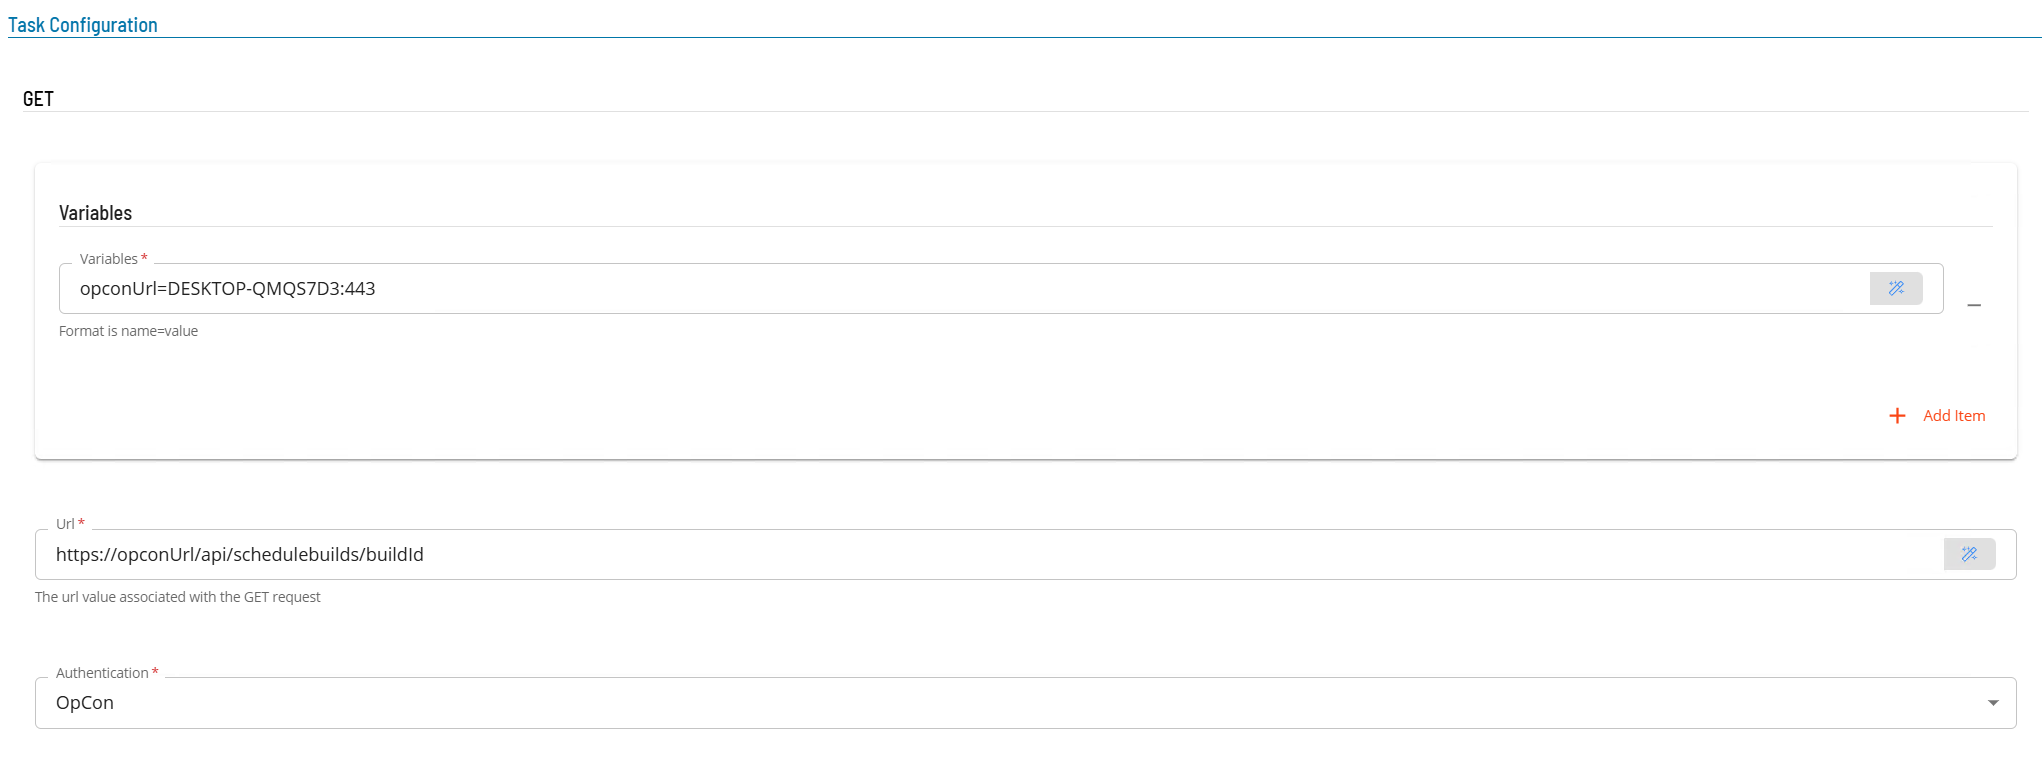
GET job
The GET job retrieves data from a remote REST API. Variables can be defined to substitute values in the URL and message body at run time. For example, defining TestVar=ABC replaces the placeholder TestVar in the URL or message body with ABC.
After completing the prerequisite steps and selecting GET as the task type:
-
In the Integration Selection section, select the ACS Webservices connection.
-
In the Task Configuration section:
- In Variables, define name-value pairs for URL and message body substitution.
- In the Url field, enter the full endpoint address.
- From the Authentication list, select the authentication method (None, Basic, OAuth2, or OpCon).
-
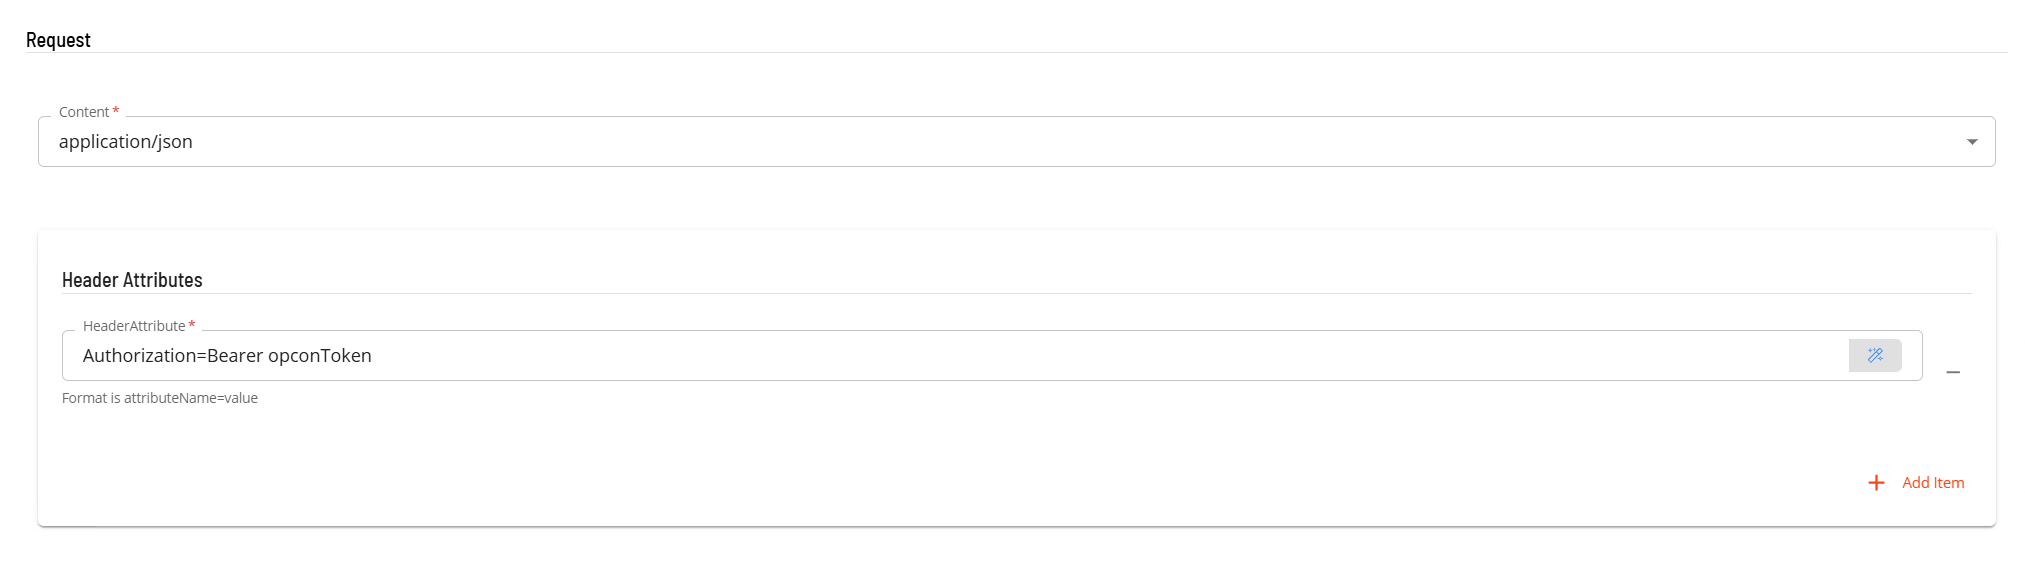
In the Request section:
- Select application/json from the Content list.
- In Header Attributes, enter the authorization header if required (for example,
Authorization=Bearer schedule-instance-property-name).
-
In the Response section, select application/json from the Content list.
-
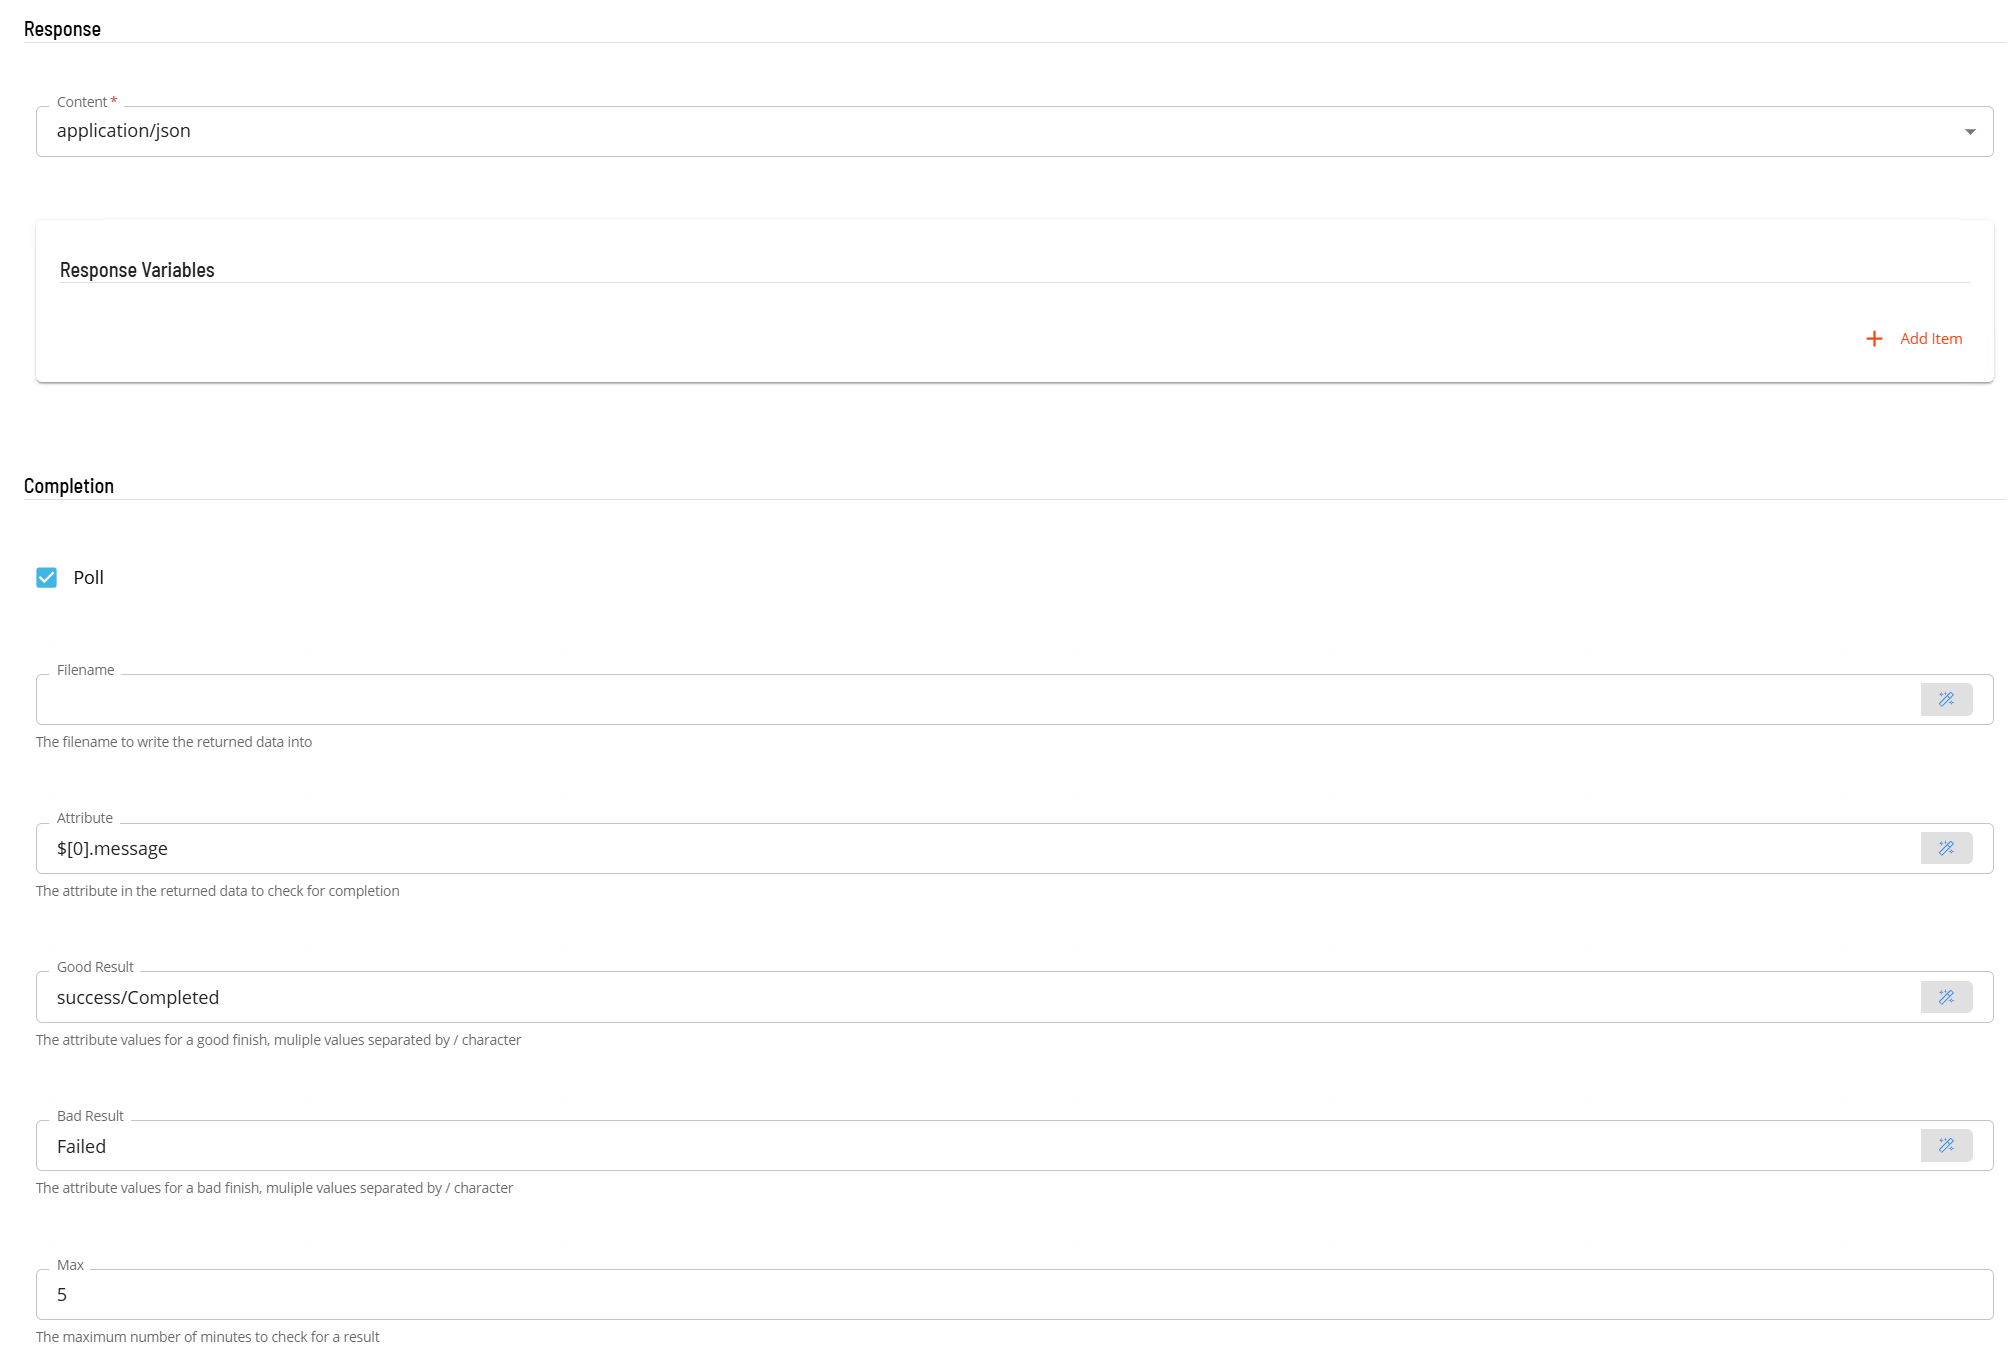
(Optional) In the Completion section, configure how the job determines success or failure:
- Select Poll to check the result repeatedly rather than once.
- In the Attribute field, enter the JPath expression for the attribute to check (for example,
$.result.message). - In Good Result, enter values that indicate success, separated by
/(for example,Success/Complete). - In Bad Result, enter values that indicate failure, separated by
/(for example,Error/Failed). - In Max, enter the maximum polling time in minutes. If left empty, polling continues until a match is found.
-
Select Save. The GET job is added to the schedule.
POST job
The POST job submits data to a remote REST API. It supports the same variable substitution as the GET job.
A special variable JCorrelationId allows a remote system to signal OpCon when a remotely started job has finished. The connector substitutes the OpCon job ID into the POST body. The remote system then calls back to OpCon to set the job status. The OpCon job must be in an On Hold state before the POST request runs.
After completing the prerequisite steps and selecting POST as the task type:
-
In the Integration Selection section, select the ACS Webservices connection.
-
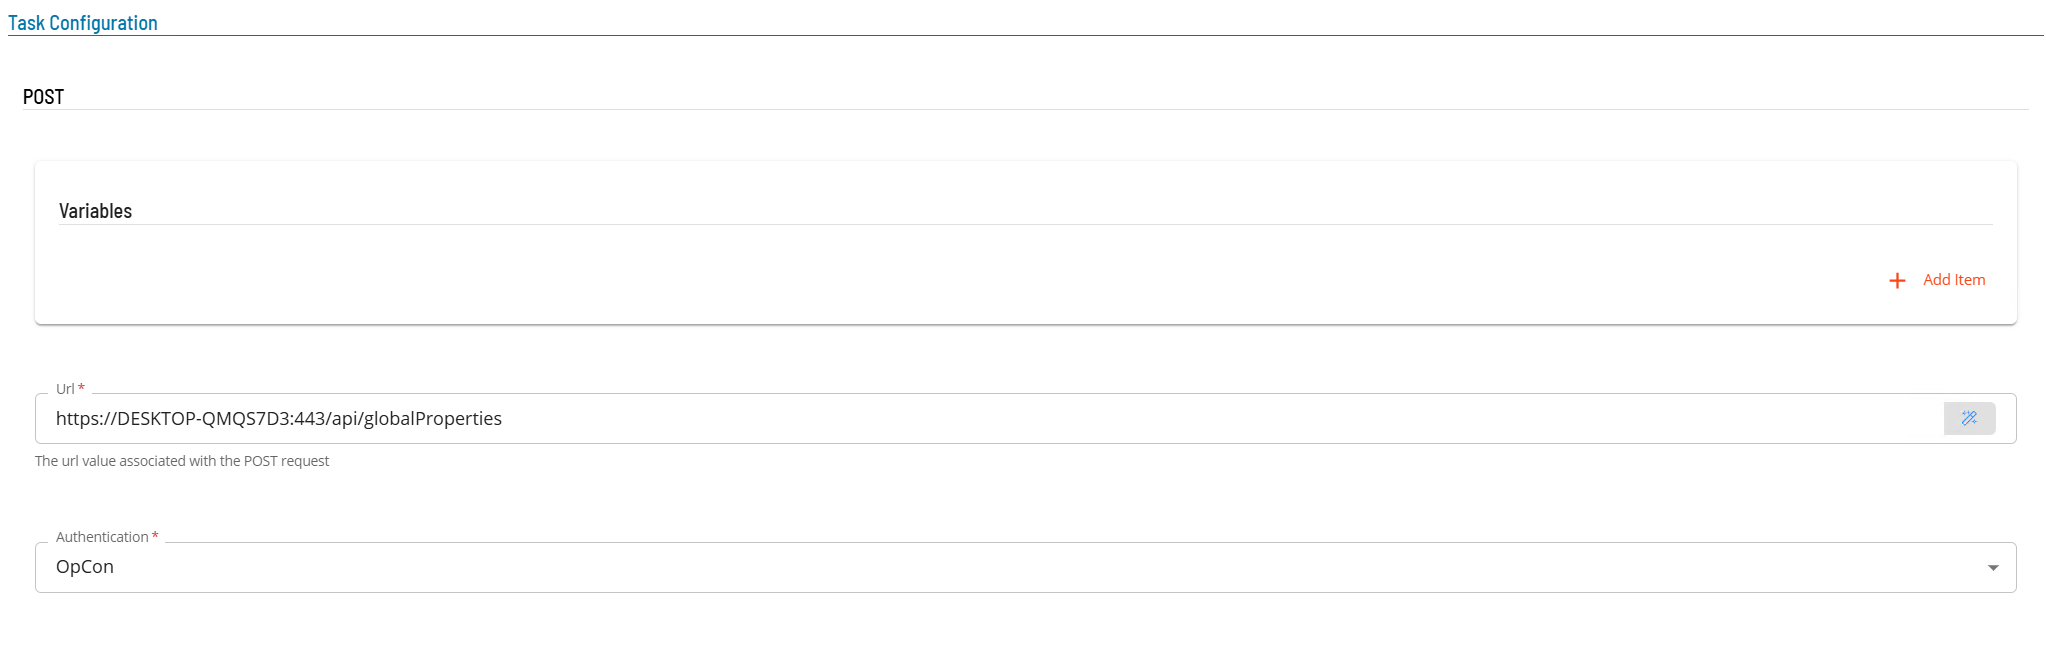
In the Task Configuration section:
- In Variables, define name-value pairs for URL and message body substitution.
- In the Url field, enter the full endpoint address.
- From the Authentication list, select the authentication method.
-
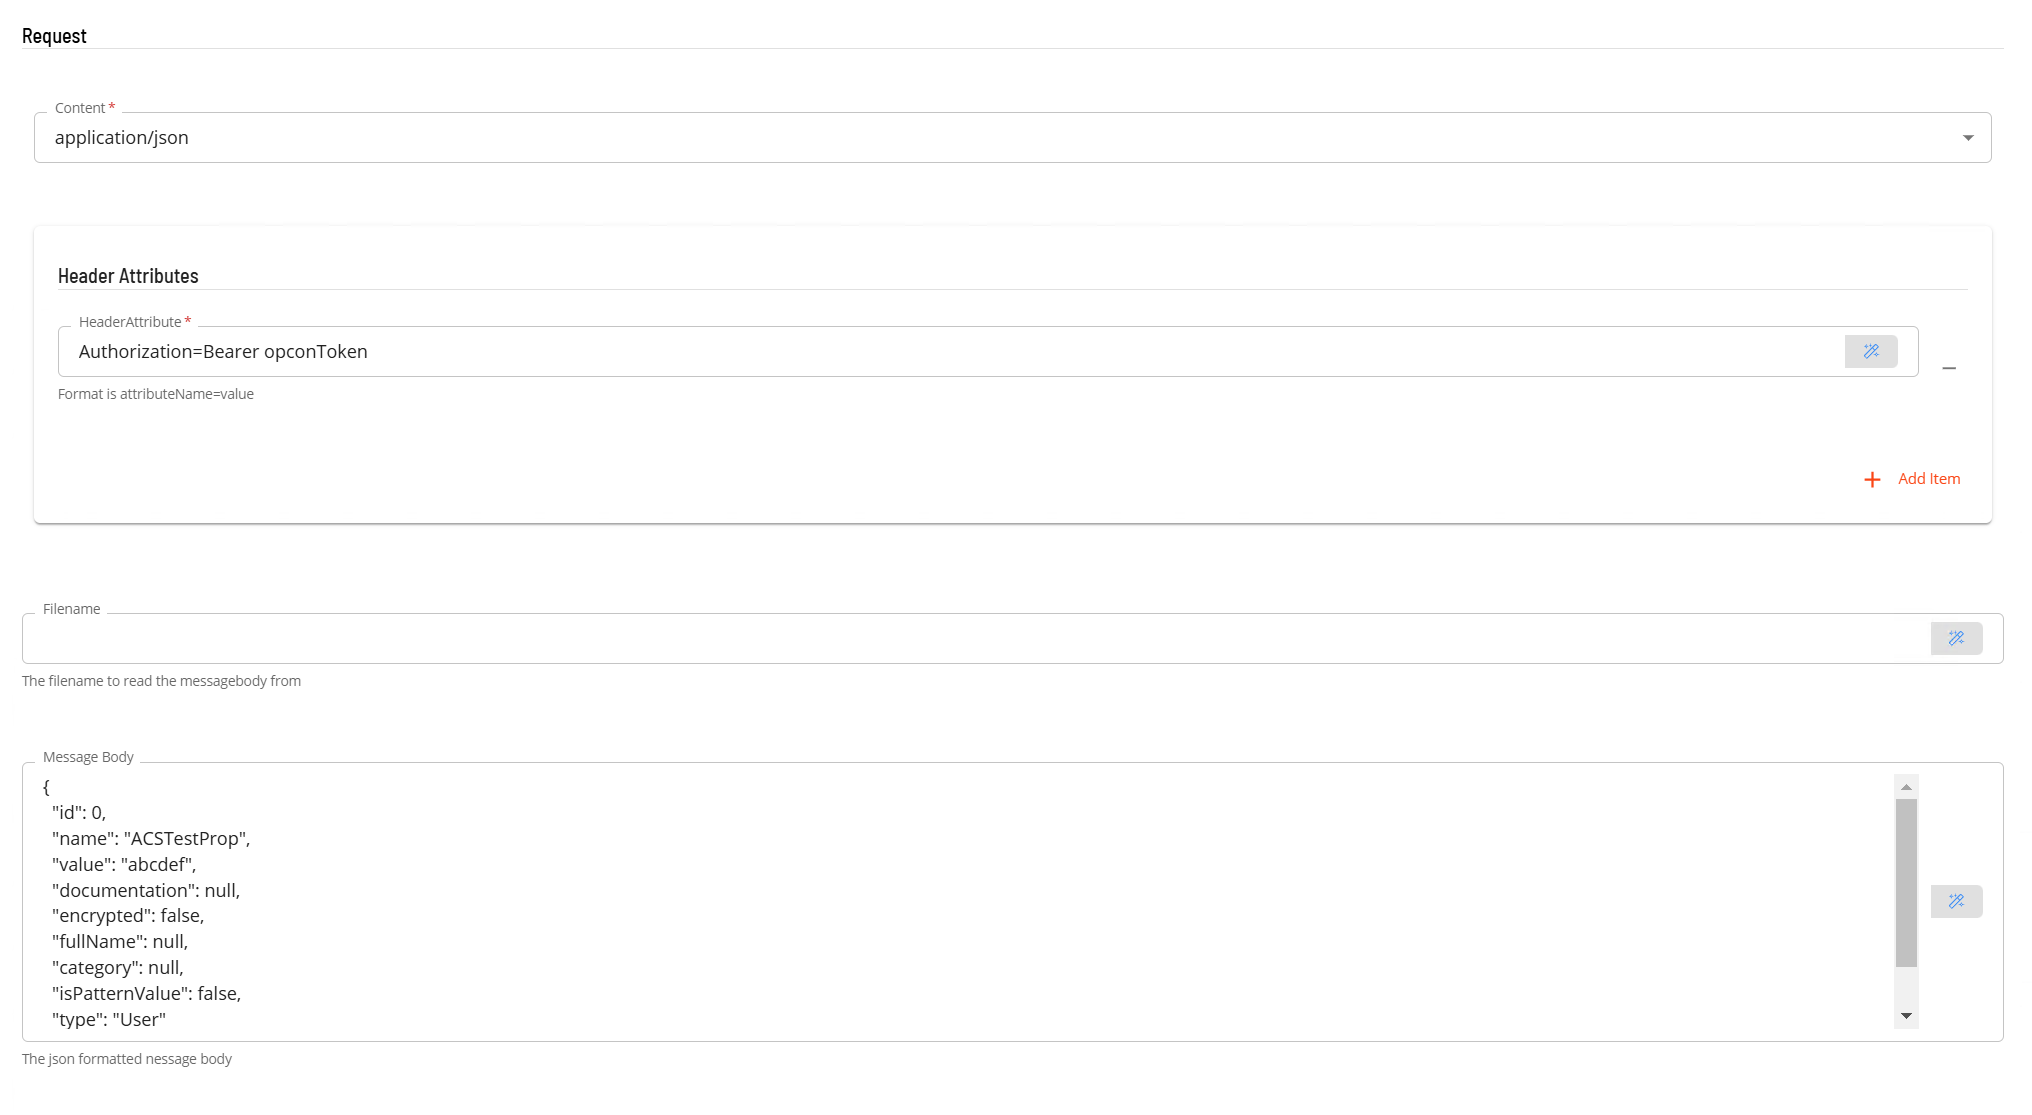
In the Request section:
- Select application/json from the Content list.
- In Header Attributes, enter the authorization header if required.
- In the Filename field, enter the path of a file containing the message body, OR in the Message Body field, enter the message body directly. One of the two is required.
-
In the Response section:
- Select application/json from the Content list.
- (Optional) In Response Variables, enter a variable in the format
variable-name=jsonpathto extract a value from the response and store it as a schedule instance property.
-
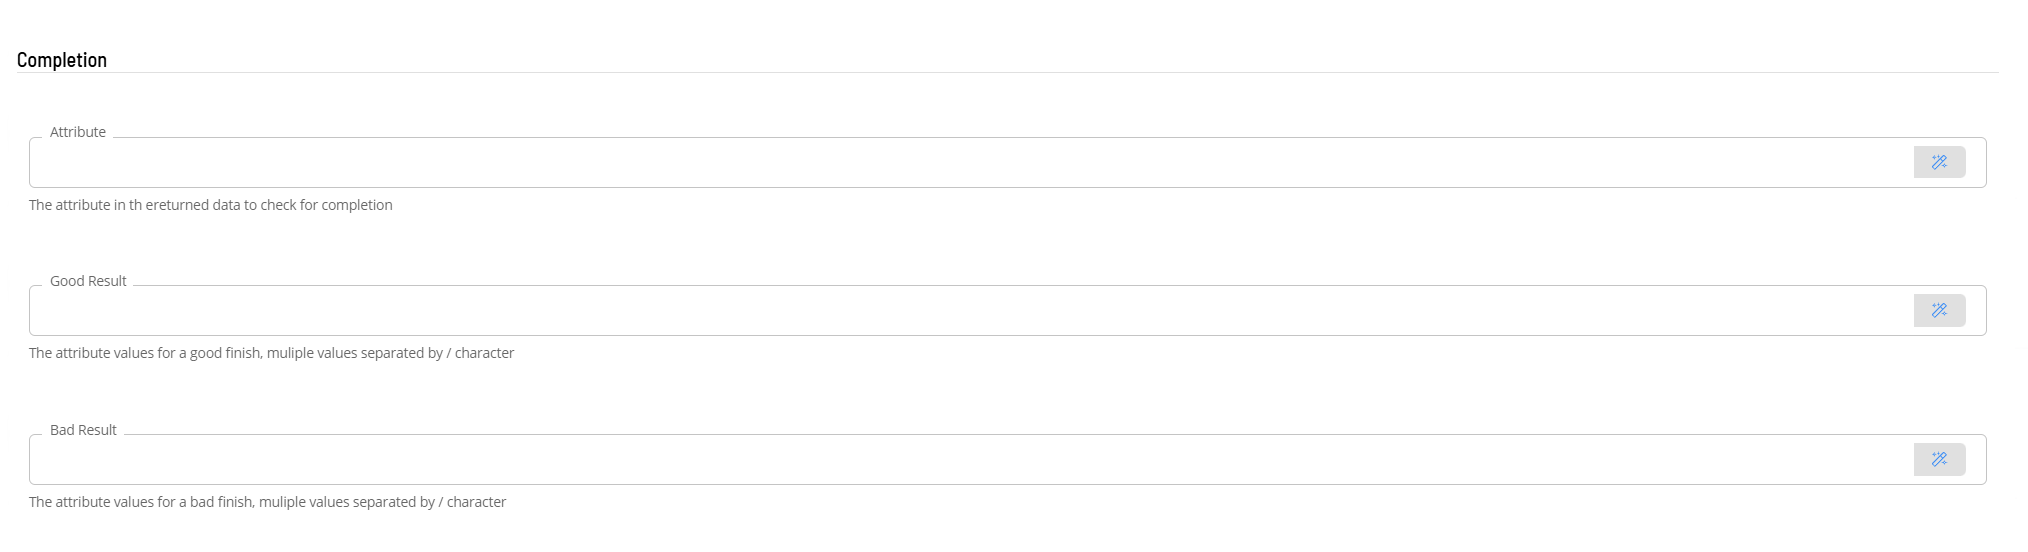
(Optional) In the Completion section, configure the attribute, good result, and bad result values to evaluate job success.
-
Select Save. The POST job is added to the schedule.
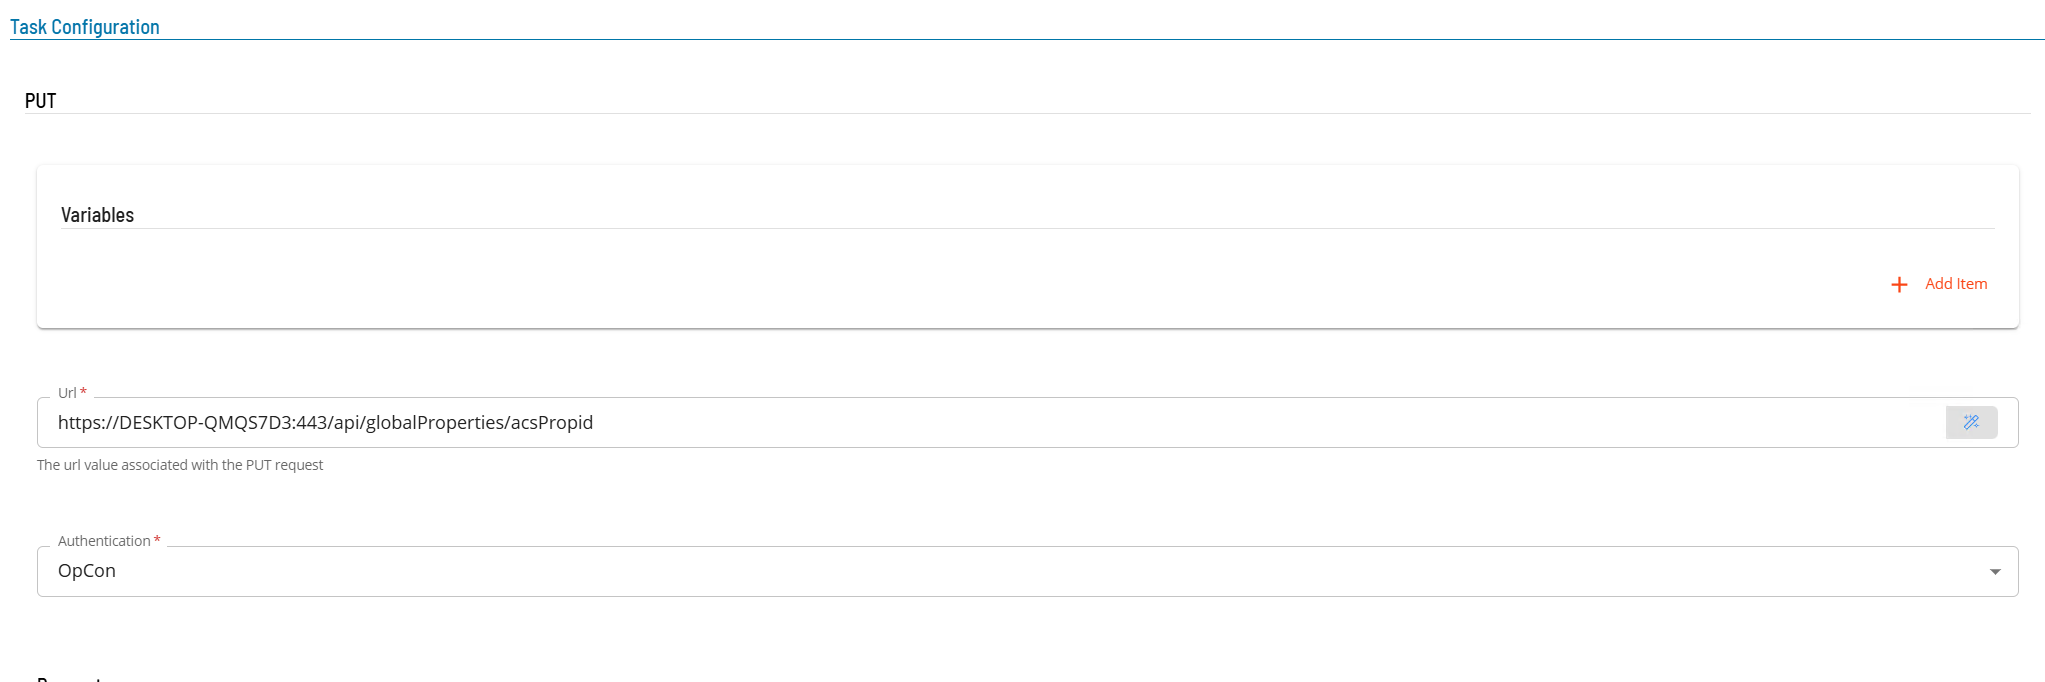
PUT job
The PUT job submits a complete data object to a remote REST API to replace an existing resource. It supports the same variable substitution as the GET job.
After completing the prerequisite steps and selecting PUT as the task type:
-
In the Integration Selection section, select the ACS Webservices connection.
-
In the Task Configuration section:
- In Variables, define name-value pairs for URL and message body substitution.
- In the Url field, enter the full endpoint address.
- From the Authentication list, select the authentication method.
-
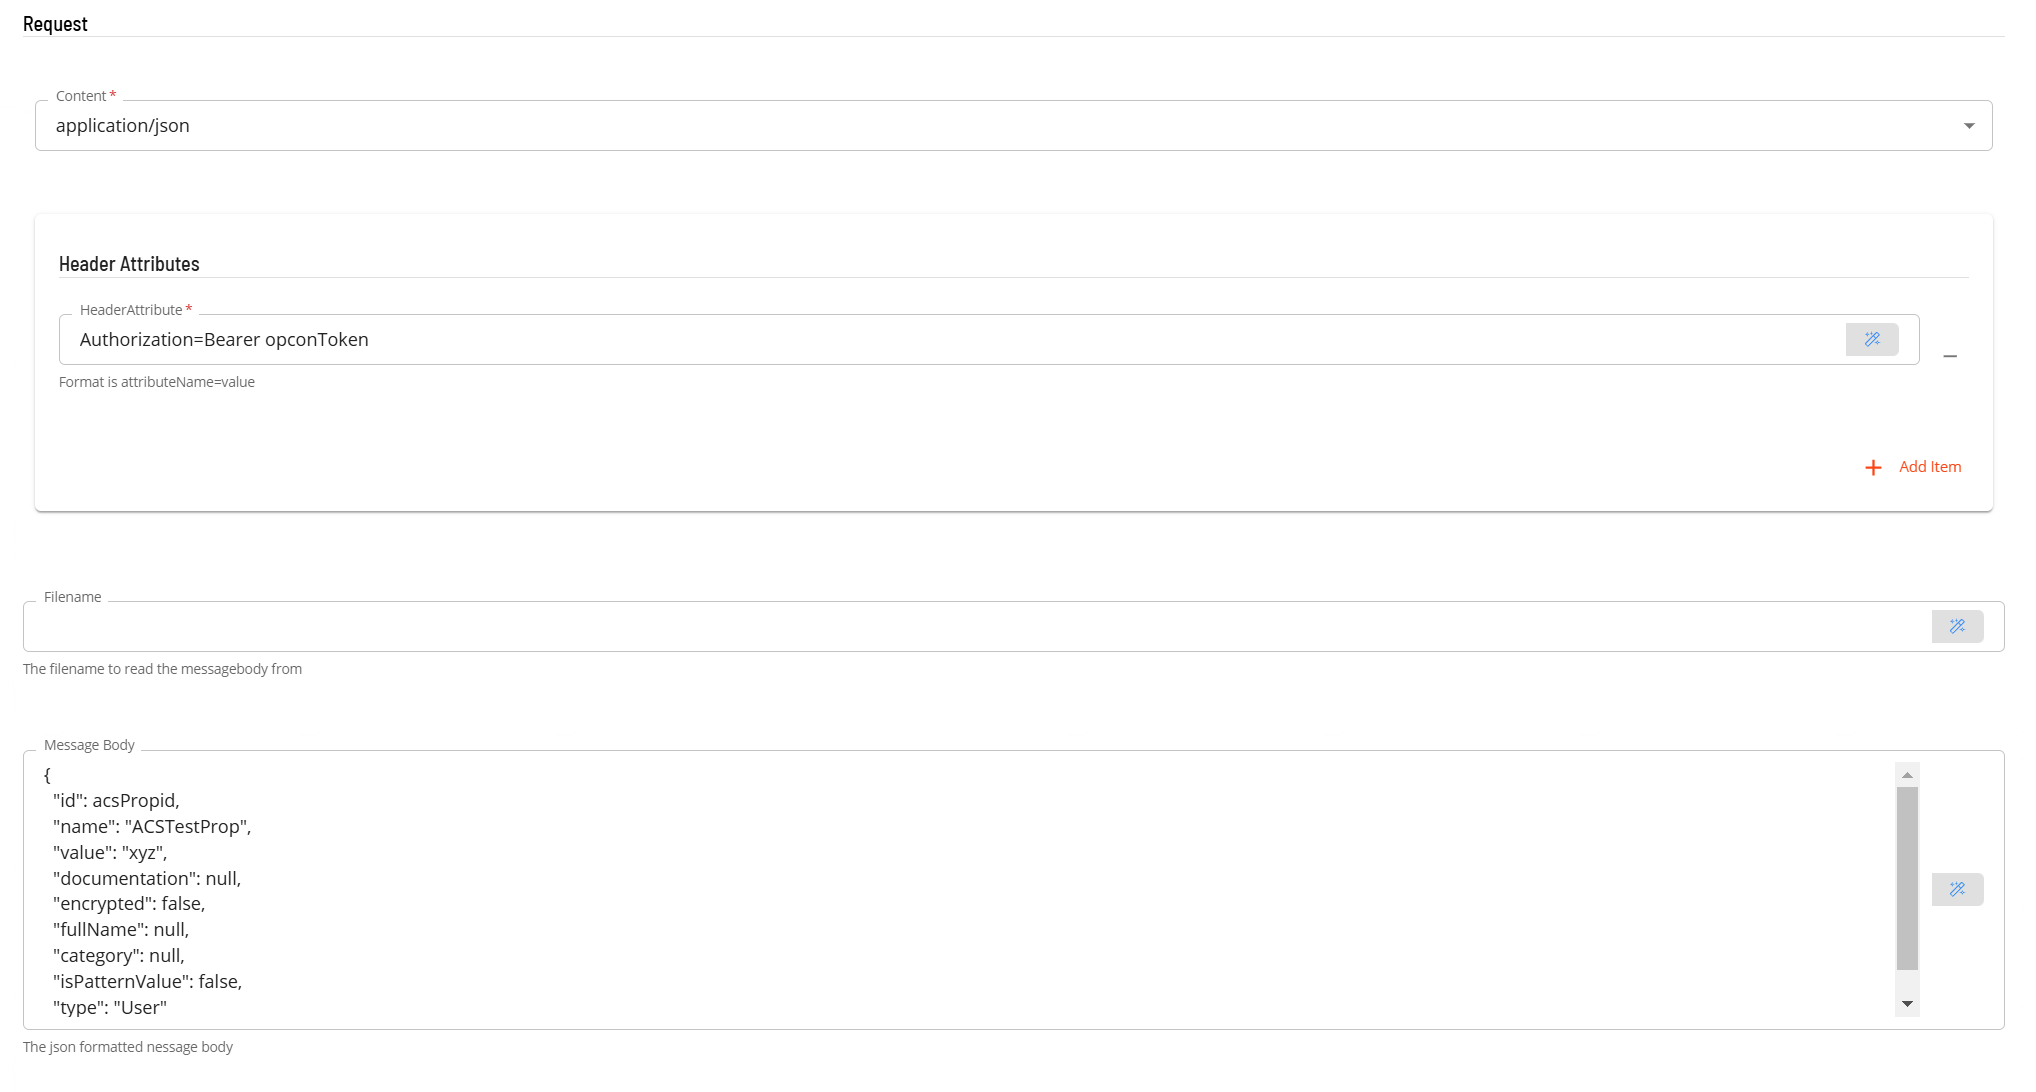
In the Request section:
- Select application/json from the Content list.
- In Header Attributes, enter the authorization header if required.
- In the Filename field, enter the path of a file containing the message body, OR in the Message Body field, enter the message body directly. One of the two is required.
-
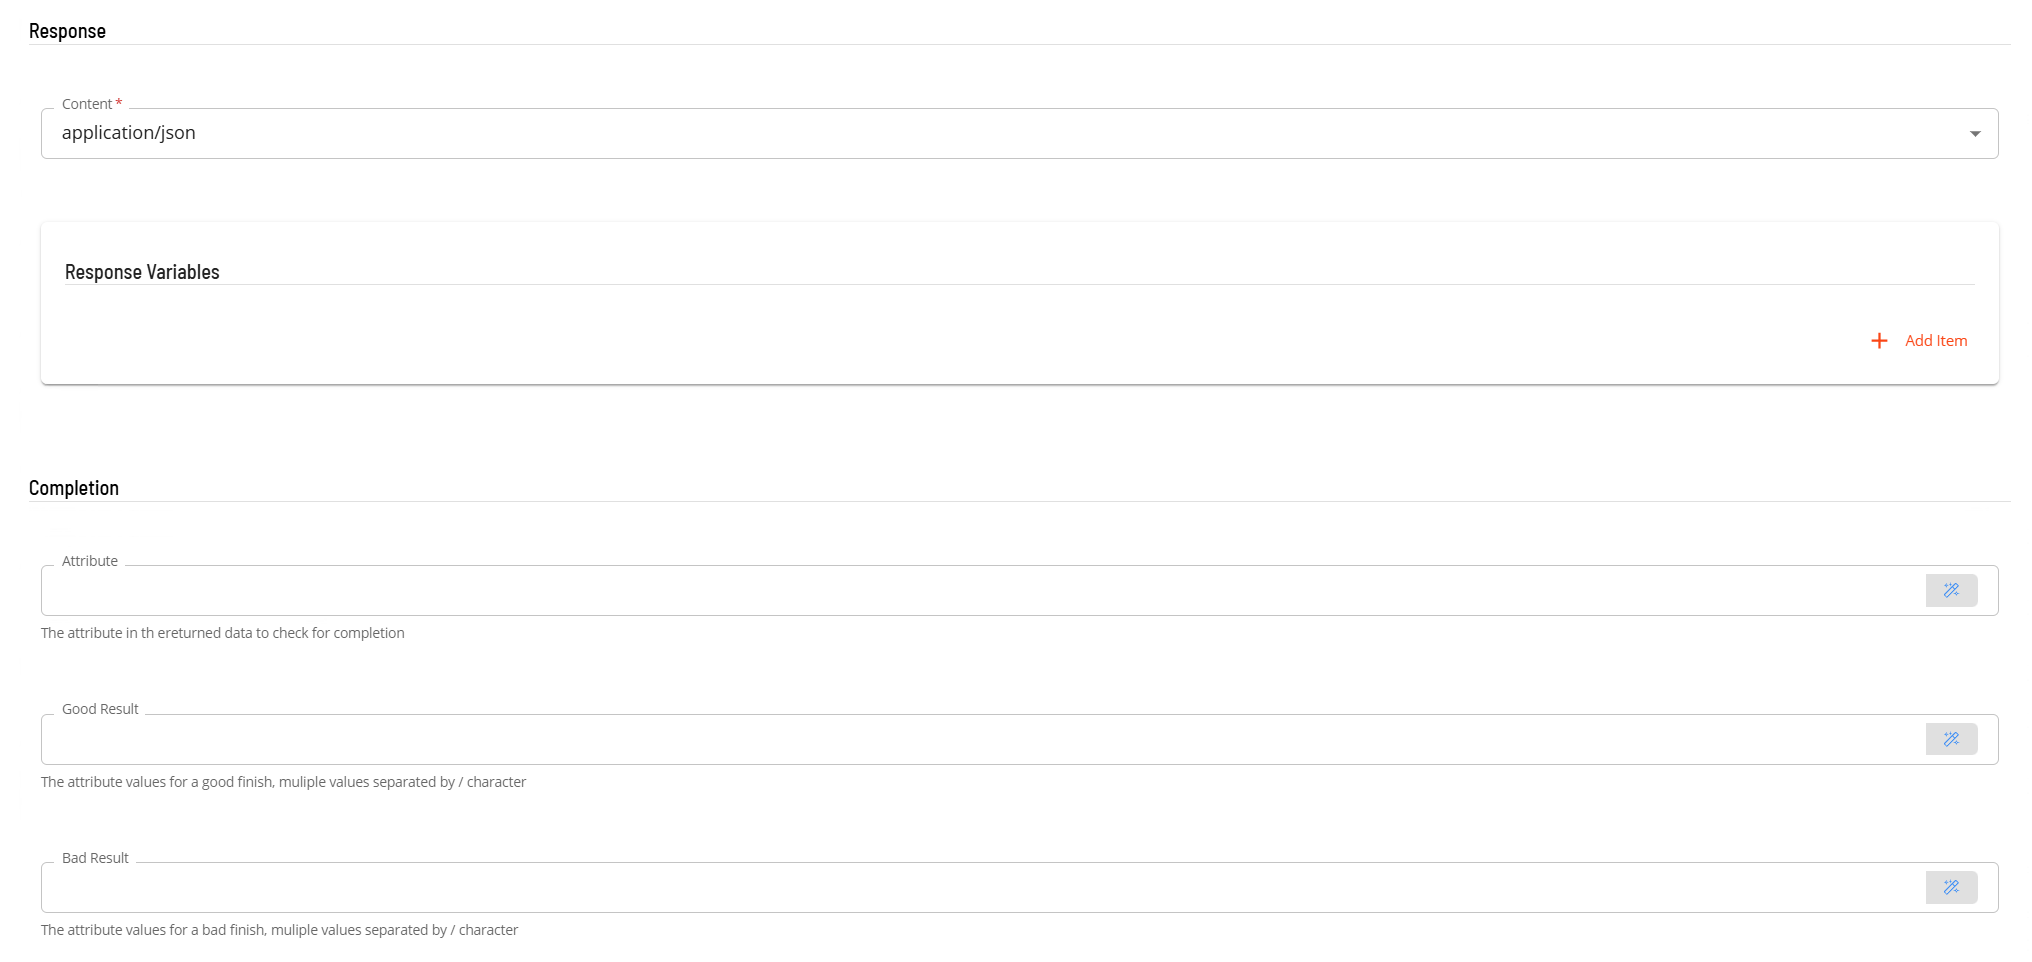
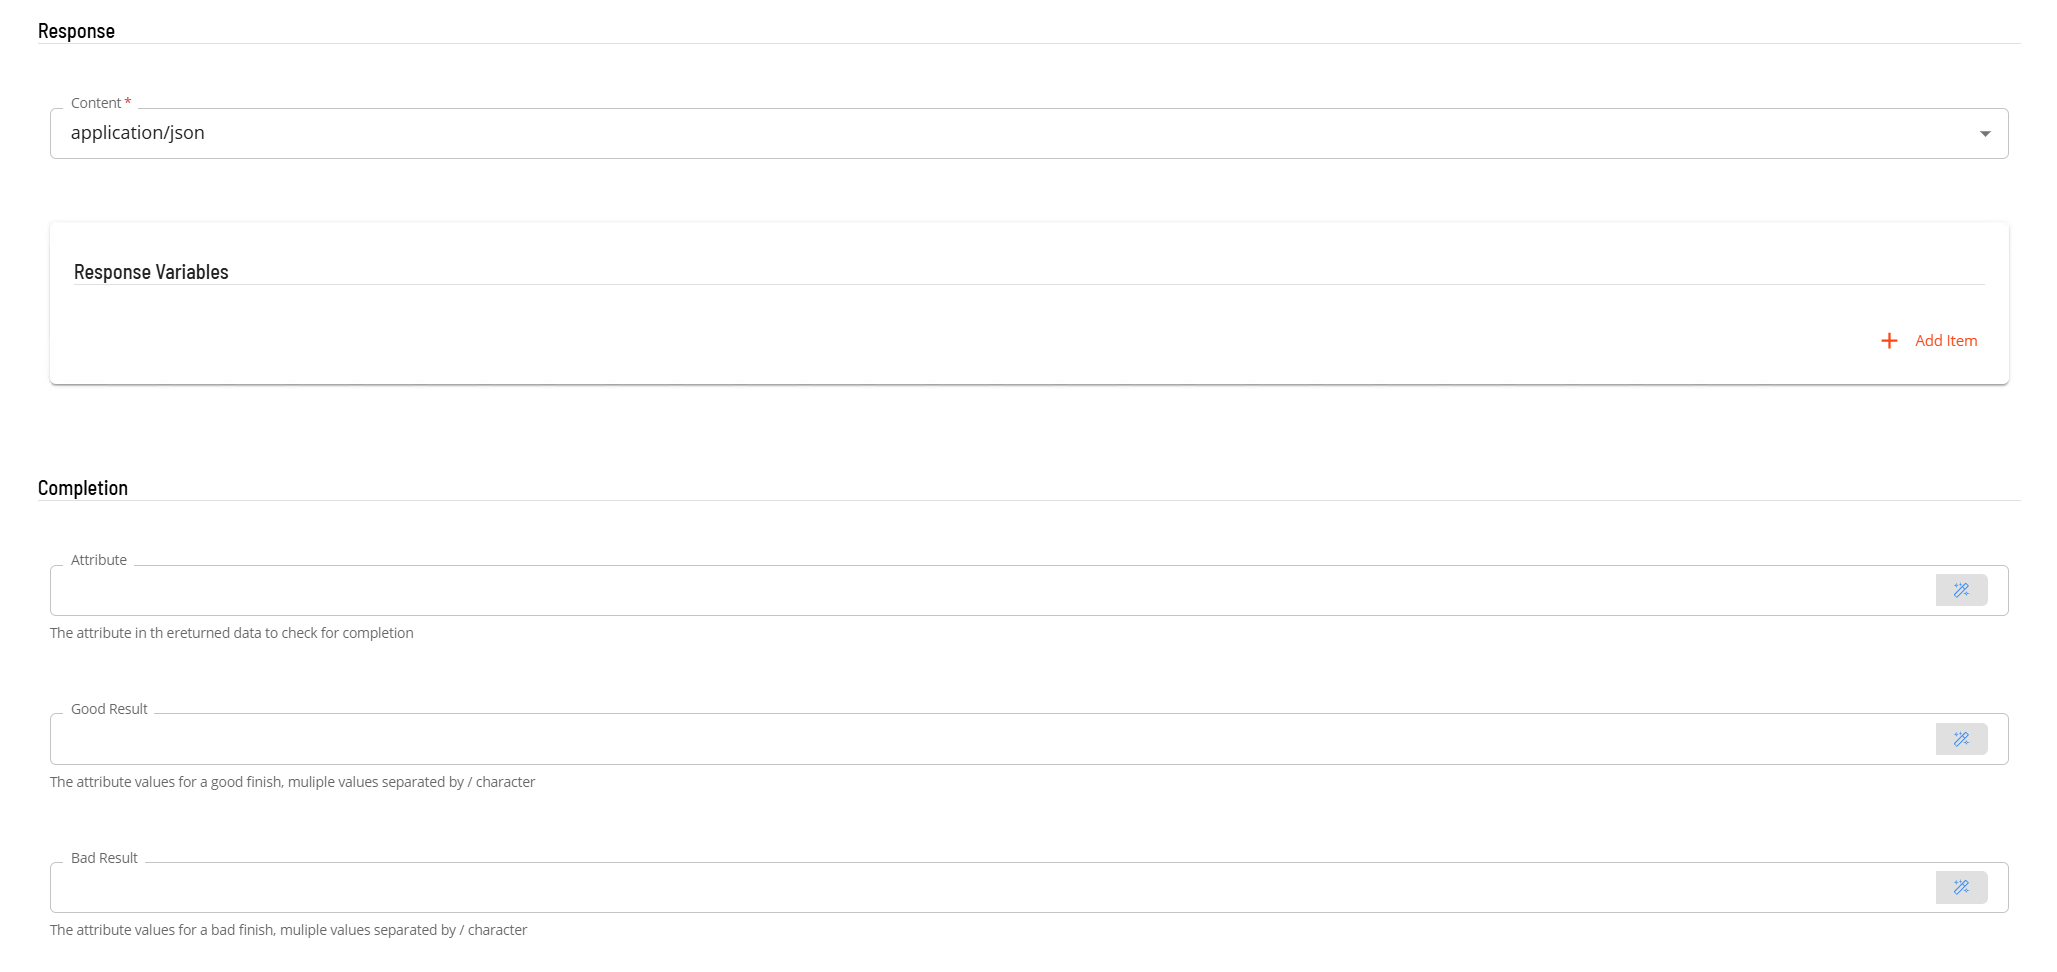
In the Response section:
- Select application/json from the Content list.
- (Optional) In Response Variables, enter a variable in the format
variable-name=jsonpathto extract a value from the response.
-
(Optional) In the Completion section, configure the attribute, good result, and bad result values.
-
Select Save. The PUT job is added to the schedule.
PATCH job
The PATCH job submits only the changed fields to a remote REST API, unlike PUT which requires the complete object. It supports the same variable substitution as the GET job.
After completing the prerequisite steps and selecting PATCH as the task type:

-
In the Integration Selection section, select the ACS Webservices connection.
-
In the Task Configuration section:
- In Variables, define name-value pairs for URL and message body substitution.
- In the Url field, enter the full endpoint address.
- From the Authentication list, select the authentication method.

-
In the Request section:
- Select application/json-patch+json from the Content list.
- In Header Attributes, enter the authorization header if required.
- In the Message Body field, enter the partial data to submit.
-
In the Response section:
- Select application/json from the Content list.
- (Optional) In Response Variables, enter a variable in the format
variable-name=jsonpathto extract a value from the response.
-
(Optional) In the Completion section, configure the attribute, good result, and bad result values.
-
Select Save. The PATCH job is added to the schedule.
DELETE job
The DELETE job submits a delete request to a remote REST API.
After completing the prerequisite steps and selecting DELETE as the task type:
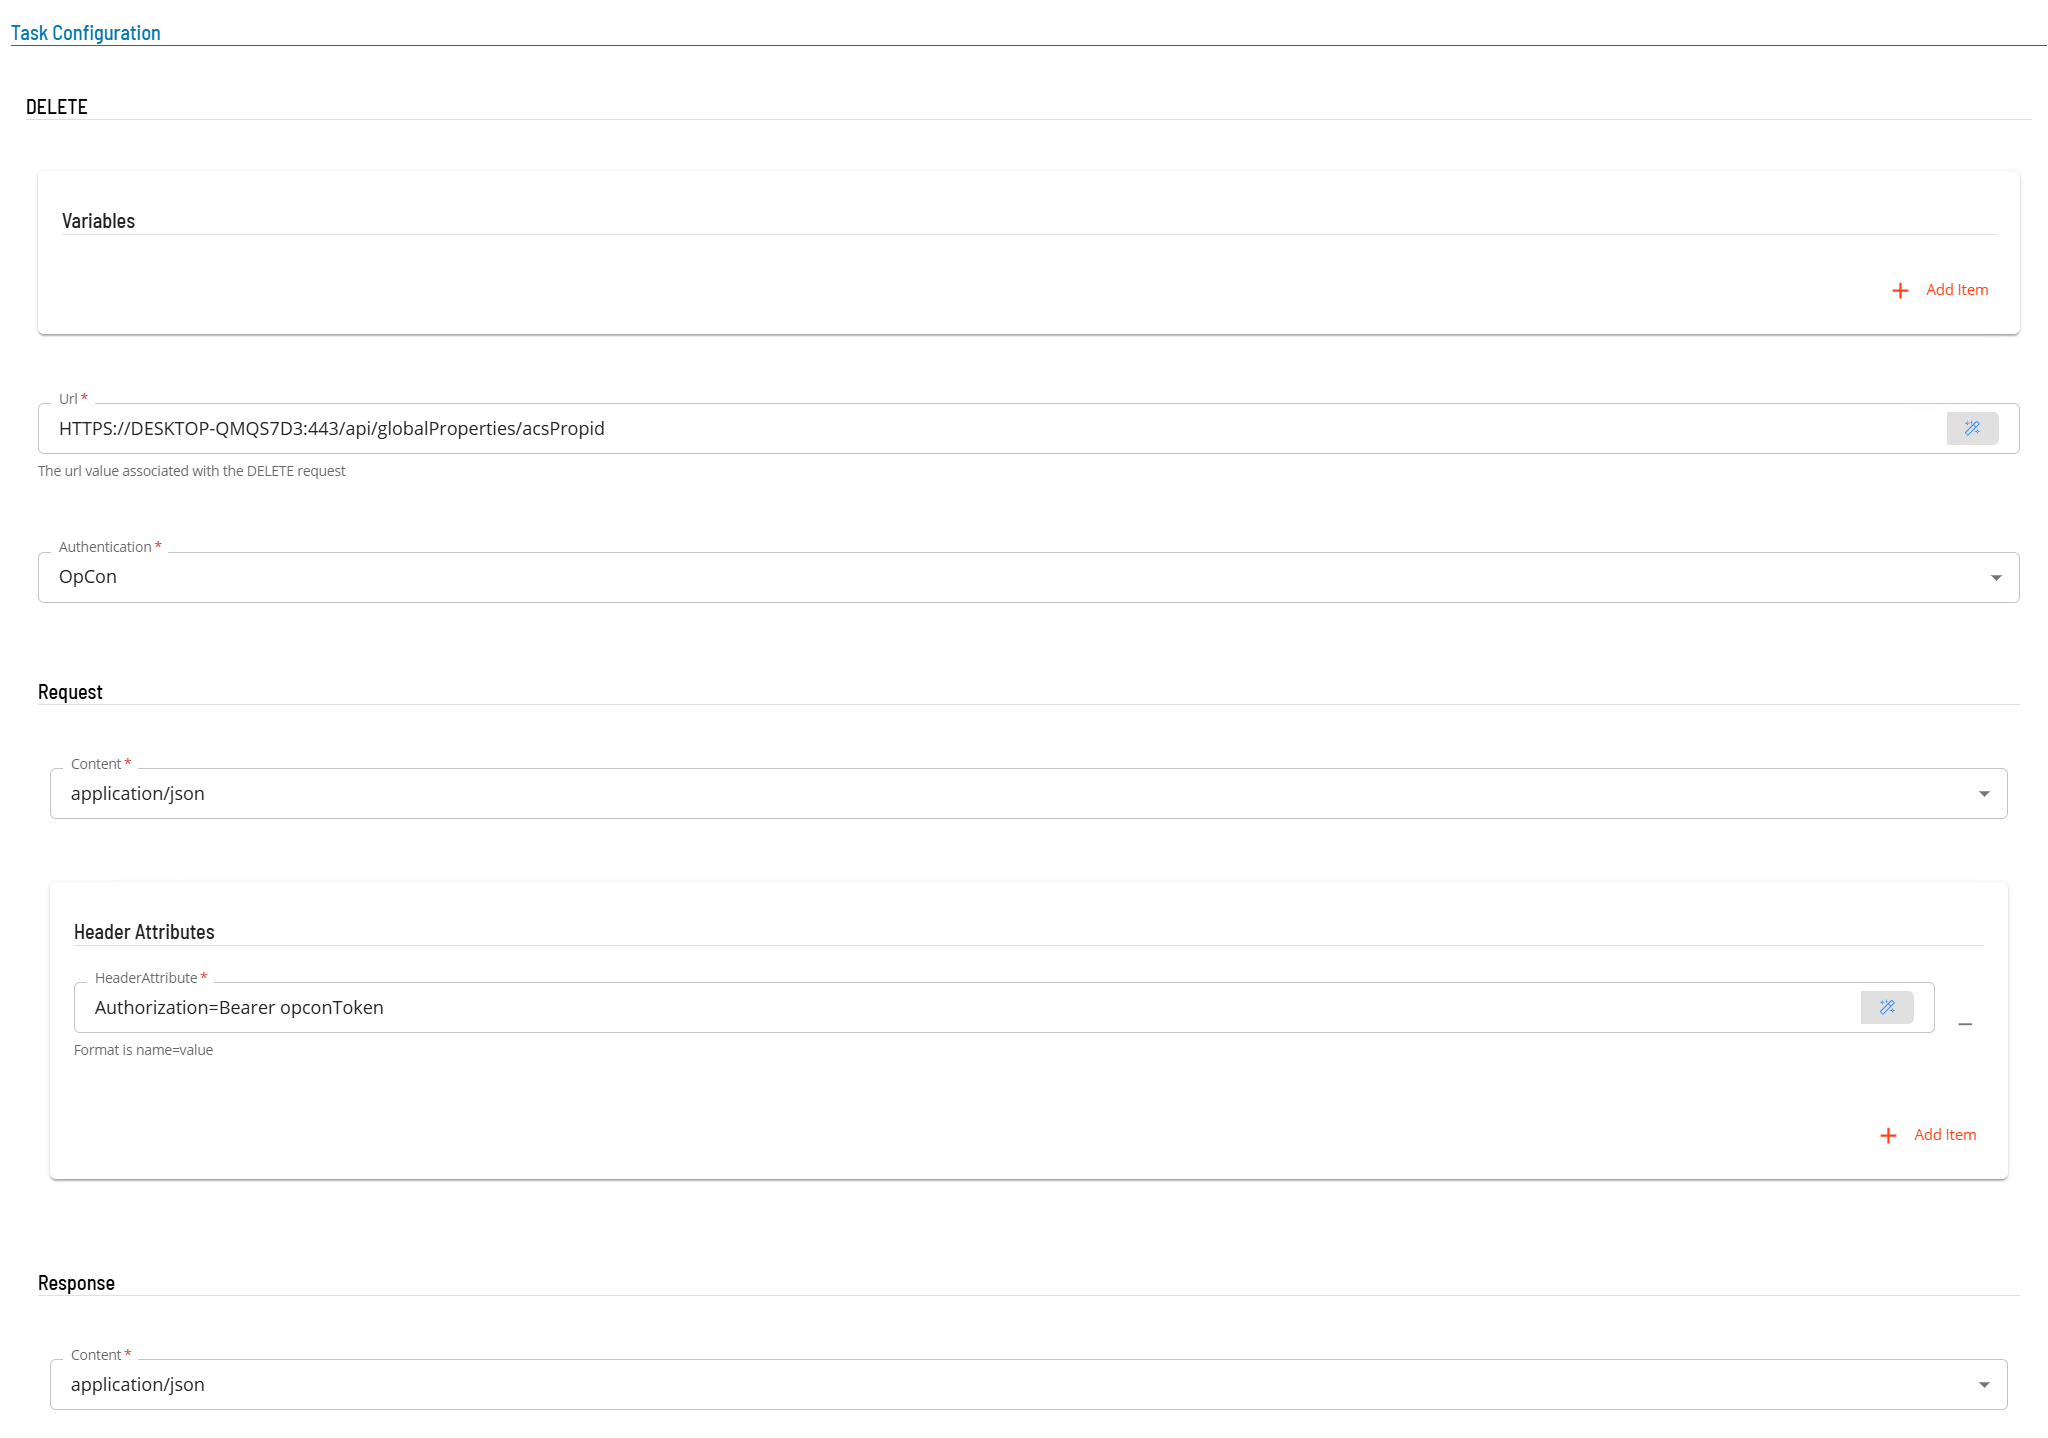
- In the Integration Selection section, select the ACS Webservices connection.
- In the Task Configuration section:
- In Variables, define name-value pairs for substitution. For example,
SERVER=DESKTOPAreplacesSERVERin the URL withDESKTOPA. - In the Url field, enter the full endpoint address. You can reference a response variable from a previous job (for example,
https://server:port/api/globalProperties/acsPropidwhereacsPropidwas saved in a previous job). - From the Authentication list, select the authentication method.
- In Variables, define name-value pairs for substitution. For example,
- In the Request section:
- Select application/json from the Content list.
- In Header Attributes, enter the authorization header if required.
- In the Response section, select application/json from the Content list.
- Select Save. The DELETE job is added to the schedule.
FAQs
Do I need to define an authentication job before creating an HTTP request job? Yes, if the target REST API requires authentication. Define a BASICTOKEN, OPCONTOKEN, or OAUTH2TOKEN job first and set a job dependency from the HTTP request job to the authentication job. This ensures the token is available as a schedule instance property when the HTTP request job runs.
How do I pass data between jobs in a schedule? Use the Response Variables field to extract values from a job's JSON response and store them as schedule instance properties. Subsequent jobs in the same schedule can reference these properties by name. The ACS environment passes these properties automatically as scoped properties to each job.
What is the difference between PUT and PATCH? A PUT request requires the complete data object in the message body. A PATCH request only requires the changed fields. Use PATCH when you need to update a subset of fields in a remote resource.
Can I poll a remote system until a job completes? Yes. In the Completion section of a GET job, select the Poll option and configure the Attribute, Good Result, Bad Result, and optional Max fields. The connector checks the attribute value repeatedly until a match is found or the maximum time is reached.
What is JCorrelationId used for?
The JCorrelationId variable in a POST job allows a remote system to signal OpCon when a remotely started job has finished. The connector substitutes the OpCon job ID into the POST body before sending the request. The remote system then uses that ID to call back to OpCon and set the job status.
Where do I find the ACS Webservices connection I need to select in Integration Selection? The connection must already be defined as an agent in Solution Manager before you can select it in a job definition. See Defining the ACS Webservices connection for instructions.
Glossary
ACS Webservices — An OpCon connector that enables jobs to make HTTP requests to remote REST APIs from within an OpCon schedule.
Batch user — An OpCon user account that provides authentication credentials for job execution. The BASICTOKEN and OPCONTOKEN job types use batch users to generate encoded authentication strings.
BASICTOKEN — A job type that generates a base64 encoded authentication token from an ACS Webservices batch user and stores it as a schedule instance property.
OPCONTOKEN — A job type that retrieves an OpCon authentication token from an OpCon system and stores it as a schedule instance property.
OAUTH2TOKEN — A job type that retrieves an OAuth2 token from an OAuth2-compatible endpoint and stores it as a schedule instance property.
Schedule instance property — A named value scoped to a single running instance of a schedule. Used to pass data between jobs within the same schedule run.
Response Variables — A field in a job definition that maps a JSON attribute from a job's response to a schedule instance property name, using JPath notation.
JCorrelationId — A special variable in POST jobs that carries the OpCon job ID in the request body, allowing a remote system to call back to OpCon and update the job status when the remote operation completes.
JPath — A query notation for extracting values from JSON documents. Used in the Attribute and Response Variables fields to target specific fields in a JSON response.
Scoped properties — The ACS environment's term for schedule instance properties that are automatically passed to each job within the same schedule run.