Custom Reports
Introduction
This topic is intended to serve as a guide on how to create an environment that allows users to edit the BIRT reports supplied by SMA Technologies or create their own.
Install the Environment
Create a BIRT directory to hold the environment. This should be a complete, standalone directory structure containing everything needed for report modification.
Create a projects directory under the BIRT directory.
Locate the jtds-1.2.5.jar file and copy it to the BIRT directory.
Download BIRT for the correct environment from http://archive.eclipse.org/birt/downloads/build.php?build=R-R1-3_7_1-201109131734.
Move the downloaded file to the BIRT directory.
Extract the zip file to the BIRT directory. The directory structure should look similar to the following:
Navigate to the eclipse sub-directory and double-click the eclipse.exe file to run the program.
Browse to the projects directory created earlier.
Select the Use this as the default and do not ask again checkbox.
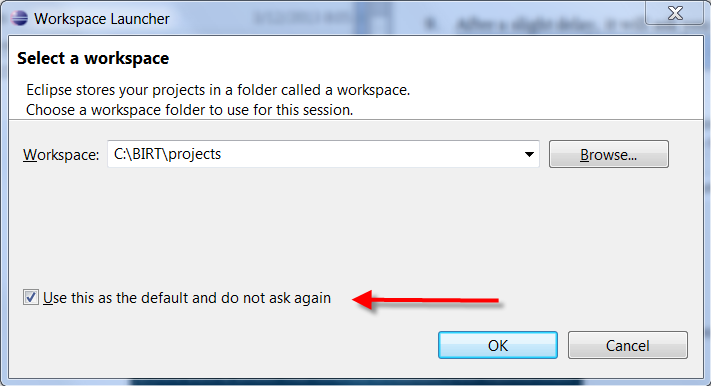
Launch after setting the workspace.
Use menu path File> New > Project to create the OpCon_Reports project. A wizard will display allowing you to select the project type.
Expand the Business Intelligence and Reporting Tools folder.
Select Report Project.
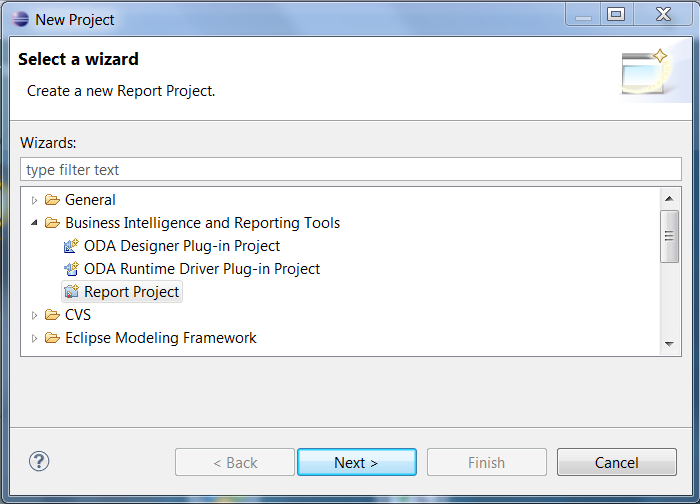
Click Next.
Enter OpCon_Reports in the Project name field. Leave Use default location selected.
Click Finish.
Select Remember my decision when asked if you want to open the Report Designer perspective.
Click Yes.
Click on the x to the right of the Welcome tab to close the Welcome screen (if displayed).
The resulting screen should look similar to the following:
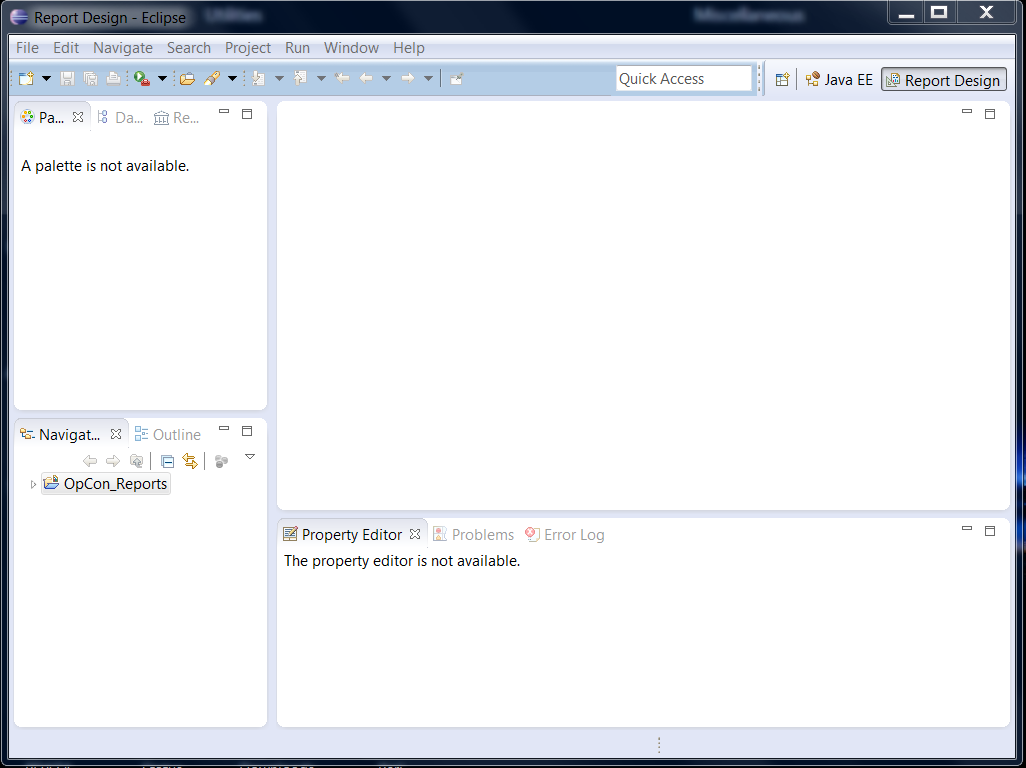
Install the SMA Reports
- Use menu path: File > Import.... The Import wizard will start.
- Expand the General folder.
- Select File System.
- Click Next.
- Browse to the reports sub-directory under the Enterprise Manager directory.
- Select the reports folder to include all of the sub-directories.
- Click OK.
- Select the reports folder checkbox.
- Enter OpCon_Reports in the Into folder field (if empty).
- Click Finish.
Now you can edit SMA Reports or create your own.
Create a New Report
Right-click on OpConXPS_Reports.
Use menu path: New > Report.
Enter a file name.
Click Finish.
Navigate to the OpConXPS_Libraries folder.
Use path: opconxps_library.rptlibrary > data sources > opconxps.
Resource Explorer
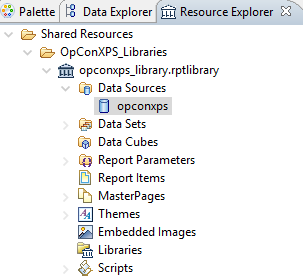
Right-click on opconxps and add it to the report.
Navigate to the Data Explorer tab.
Double-click on opconxps under Data Sources.
Enter net.sourceforge.jtds.jdbs.Driver(v1.2) in the Driver Class field to connect to BIRT.
Edit Data Source
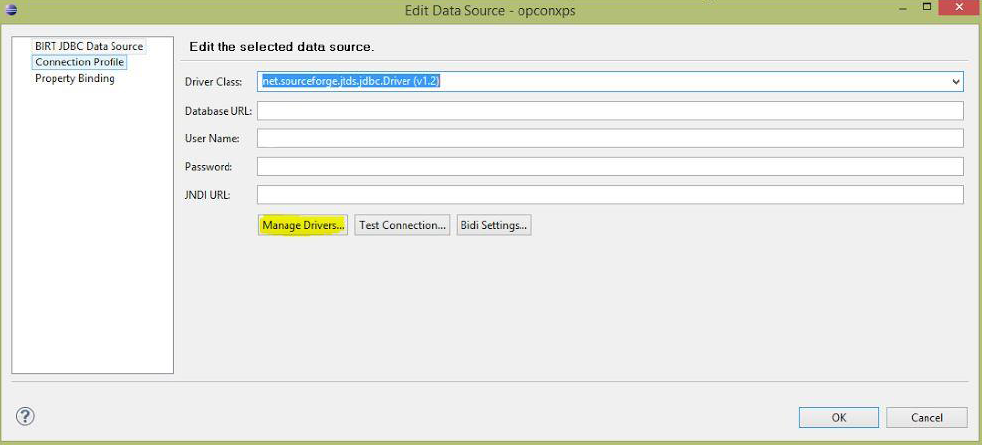
Click Manage Drivers.
Click the Add... button.
Navigate to the BIRT directory to add the jtds-1.2.5.jar file.
Click OK.
Import the Database Connection Parameters
You need to be connected to the database to receive the data. Use the following steps to import the following two parameters:
- Parameter Group -- Data_Source_Connection: This parameter is a database connection.
- User_Id: To add the privileges access to the report, you can grant access with this parameter and filter it in the query.
- Use path: Shared Resources > OpConXPS_Libraries > opconxps_library.rptlibrary > Report Parameters.
- Expand the Report Parameters folder.
- Right-click on Parameter Group - Data_Source_Connection and select Add to report.
- Right-click on User-Id and select Add to report.
In the workplace section, you should see the following:
Report Parameters
You can modify the parameters to connect the report to your own database.
Driver_Class: The default value should always be the following: net.sourceforge.jtds.jdbc.Driver.
Driver_URL: Enter the URL for the database using the format the driver requires.
The format for a MySQL database is the following:
jdbc:mysql://<host>:<port>/<database>
- Enter the database path for you environment in the database URL. From the former example, "jdbc:jtds:sqlserver://" is the connection with the database. Change the server name and the port number to match your environment, e.g., jdbc:jtds:sqlserver://server name/database name
- If you have a SQL instance, please add ";instance=< instance name>" at the end of the database URL.
Database: This parameter defines the database name, which is "opconxps" by default.
User_Name and User_Password: Enter the login for the database for these parameters.
After editing the report, copy the report from the OpConXPS_Reports folder, e.g., C:\BIRT\projects\OpCon_Reports\OpConXPS_Reports, to the reports sub-directory under the Enterprise Manager directory, e.g., C:\Program Files\OpConxps\EnterpriseManager x64\reports\OpConXPS_Reports.
Schedule the New Reports
- Add the report(s) to the path: <OpCon Install Folder>\SAM\BIRT\ReportEngine\OpConXPS_Reports.
- Create or use an existing Schedule in the Enterprise Manager.
- Create a Windows job with the report name as the job name.
- Select the Windows Primary Machine.
- Select Run Program in the Job Action drop-down menu.
- Select Use Service Account in the User Id drop-down menu.
- Enter [[SMAOpConPath]]\Utilities\BIRTRptGen.exe followed by the report name as -rReportName in the Command Line field.
- (Optional) Add parameters after the report name using the following format: -pParameterName=ParameterValue.
- Enter [[SMAOpConPath]]\Utilities\ in the Working Directory field.
- Enter a frequency.
- Build the job.