Creating Service Requests
To create a new service request and its definition:
Click the Create button.
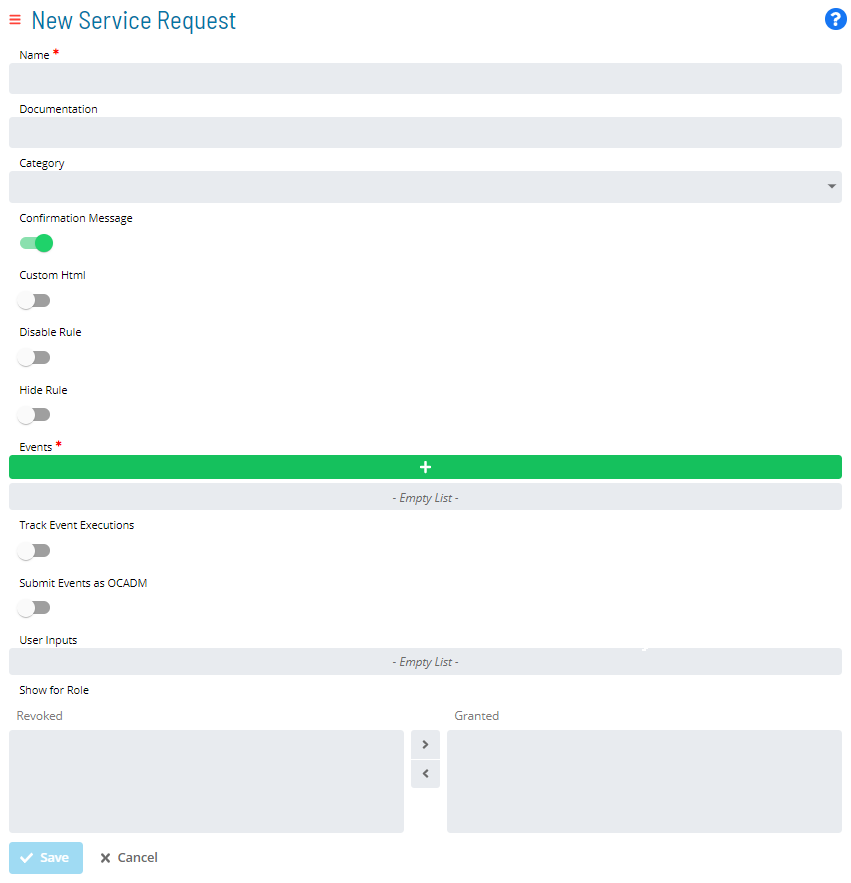
The New Service Request page will display, as shown in the example graphic.

Enter in the Name field the Service Request Name to specify the name to display on the Service Request button.
(Optional) Enter in the Documentation field the instructions about what the Service Request does when users click the button. This text appears as a tooltip on the button.
(Optional) Select a Category with which to associate the Service Request. Refer to the Creating Categories section for instructions on how to create categories.
(Optional) Toggle the Confirmation Message switch to show the «Documentation» as part of confirmation page when users click the Service Request button. This allows users to cancel the request.
(Optional) Toggle the Custom Html switch to embed custom HTML code to personalize the Service Request button display. Refer to the Stylizing Service Request Buttons section for more detail.
(Optional) Toggle the Disable Rule switch to define a rule for disabling the Service Request button. Refer to the Disabling or Hiding Service Request Buttons section for instructions on how to define rules.
(Optional) Toggle the Hide Rule switch to define a rule for hiding the Service Request button. Refer to the Disabling or Hiding Service Request Buttons section for instructions on how to define rules.
Click the green add button in the Events frame to manage the OpCon Events that will be sent to OpCon when users click this Service Request button. Refer to the Setting up OpCon Events section for more detail.
(Optional) Toggle the Track Event Executions switch to monitor execution on any job dynamically added as part of the Service Request. If the Service Request is defined with any $JOB:ADD events, this option will track the added jobs so that users can see if they finished successfully.
- If you select this option, the Service Request will be completed only when all added jobs are finished. If a job fails, then the Service Request will fail as well.
(Optional) Toggle the Submit Events as OCADM switch if you are in the ocadm role to send OpCon Events using «ocadm».
- If you select this option, events will always proceed without any privilege issues.
- If you do not select this option, SAM will check the privileges for the OpCon user who clicks the button before processing the events.
(Optional) Use the User Inputs field, as needed. If you define variables in the OpCon Events, they are automatically picked up and used as User Inputs. These User Input fields are displayed when users click the button for the Service Request. This provides a way for users to provide values that are going to replace the variables in the OpCon Events. Refer to the Setting up User Inputs section for more detail.
Use the Show for Role option to assign the Service Request to one or more OpCon Roles. Only users under the granted Role(s) will be able to see and trigger the Service Request. Refer to the Setting up Privileges section for more detail.
Click Save. The new Service Request should now display.