Performing Bulk Job Status Updates (Date Level)
The Operations module has made performing mass action on job status updates at the date level easier. For example, with a few simple steps, you can update a job's status for a selected date to Mark Finished OK when the job's current state is in Waiting, Held.
To perform bulk job status updates:
Click on the Processes button at the top-right of the Operations Summary page. The Processes page will display.
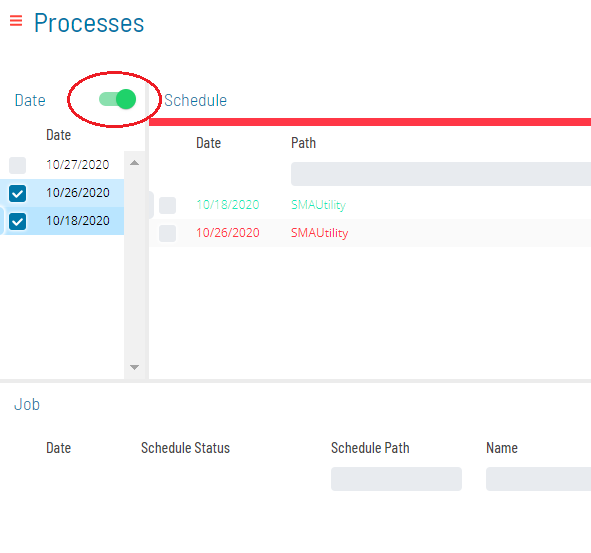
Ensure that the Date toggle switch is enabled so that you can make your date selection. The switch will appear green when enabled.

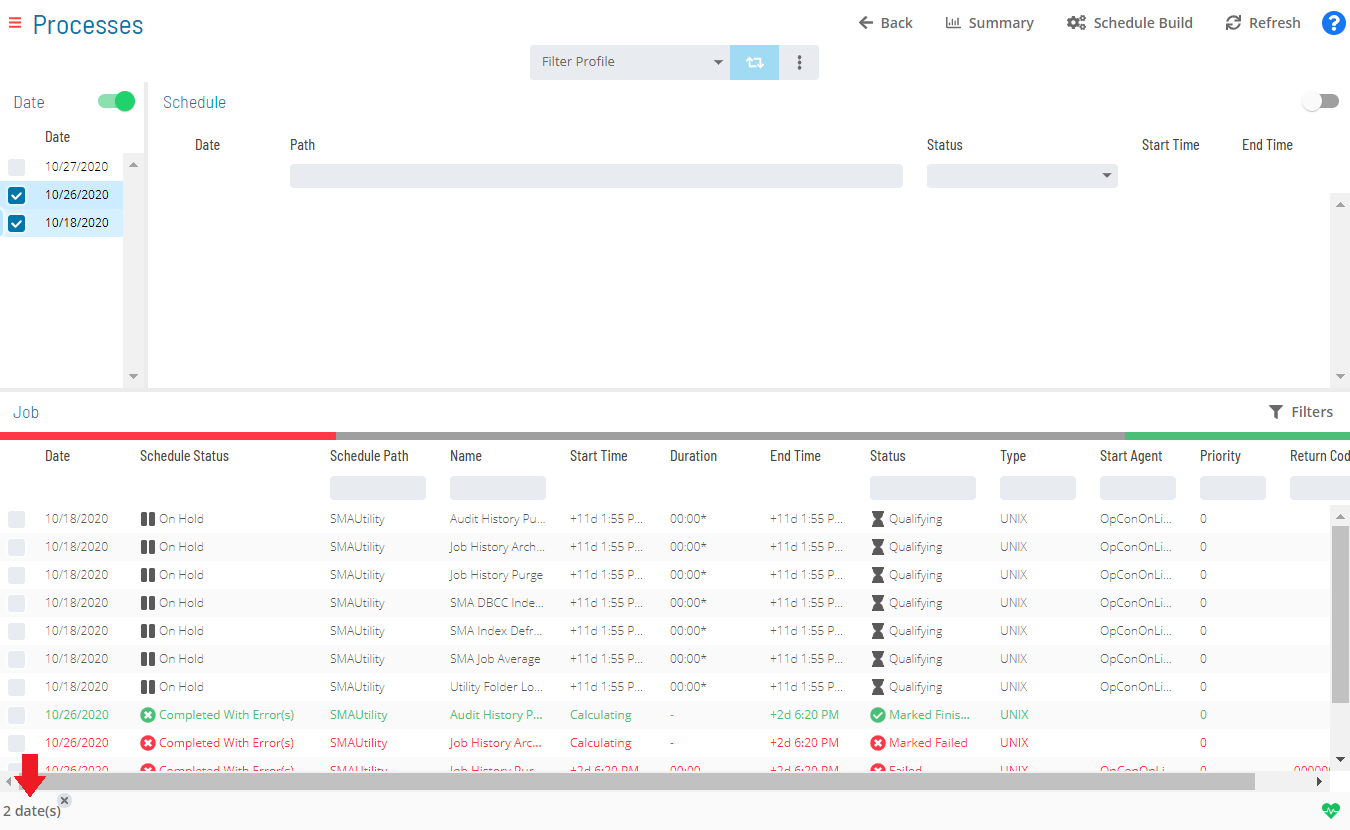
Select the desired date(s) in the list. A record of your selection(s) will display in the status bar at the bottom of the page in the form of a breadcrumb trail.

Click on the date record (e.g., 3 date(s)) in the status bar to display the Selection panel with the Bulk Job Status Update tab in focus.
As an alternative, you can right-click on any date selected in the list to display the Selection panel.

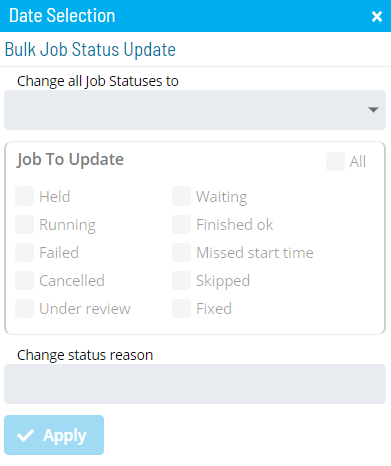
Select one of the following options in the Change all Job Statuses to drop-down list:
Cancel: This option allows you to cancel all jobs for the selected date(s), based on a filter. Any jobs dependent on cancelled jobs do not have those dependencies met.
Hold: This option allows you to suspend the processing of ALL jobs associated with the selected date(s), based on a filter.
Mark Failed: This option allows you to mark all jobs on the selected date(s) as Failed, based on a filter. Mark Finished OK: This option allows you to mark all jobs on the selected date(s) as Finished OK, based on a filter. Mark Fixed: This option allows you to mark all jobs on the selected date(s) as Fixed, based on a filter. Mark Under Review: This option allows you to mark all jobs on the selected date(s) as Under Review, based on a filter.
Release: This option allows you to place all held jobs on the selected date(s) back into a Qualifying state, based on a filter. Jobs start as soon as all dependencies are met.
Restart: This option allows you to place all jobs on the selected date(s) back in a Qualifying state, based on a filter. Jobs are started as soon as all dependencies are met.
For Container jobs, additional options are available to perform bulk Restart operations:
- Restart: Restarts the Container job and the subschedule jobs. This process will only impact the objects that are one level deep, which means that if the subschedule has another Container job, then the subschedule jobs associated with that Container job will not be restarted.
- Rebuild: Restarts the Container job and deletes the subschedule associated with it. SAM will then rebuild the subschedule and restart all the jobs in it.
- None: Applies no action on the subschedule. The subschedule remains untouched (neither restarted nor deleted). The Container job restarts but closes immediately since there is no action taking place on the subschedule.
Keep the following scenarios in mind for performing bulk Restart operations on Container jobs:
Scenario 1: If a single date is selected and that date contains a single Container job and Restart is selected from the Change all Job Statuses to drop-down, then do the following next:
a. Select the checkbox(es) in the Job To Update frame for the current job status(es) that will undergo the status change---any selection will serve as a status filter. b. Select one of the three [action] buttons that is available for the Container job: Restart, Rebuild, or None. c. Enter or select the change status reason and click Apply.
Scenario 2: If a single date is selected and that date contains multiple Container jobs and Restart is selected from the Change all Job Statuses to drop-down, then do the following next:
Select the checkbox(es) in the Job To Update frame for the current job status(es) that will undergo the status change---any selection will serve as a status filter.
Follow either Option 1 or Option 2:
- (Option 1) Click on one of the three [action] buttons---Restart, Rebuild, or None---in the Job Containers Action frame to apply that action to all Container jobs associated with that date.
- (Option 2) Click on the Custom button in the Job Containers Action frame to choose which action to perform on the Container jobs individually. Clicking Custom displays every Container job associated with the selected date, each with the Restart, Rebuild, and None options. You can then select one of the three options for each Container job.
Enter or select the change status reason and click Apply.
Scenario 3: If multiple dates are selected and the dates contain multiple Container jobs and Restart is selected from the Change all Job Statuses to drop-down, then follow steps a - c of Scenario 2. Keep in mind that clicking the Custom button in this scenario will display each selected date along the Container job(s) associated with each date.
To hide the associated Container jobs in the Job Containers Action frame, simply click on any of the other three Job Container Actions (Restart, Rebuild, or None).
Restart on Hold: This option allows you to place all jobs on the selected date(s) in an On Hold state on restart, based on a filter.
Skip: This option allows you to place all jobs on the selected date(s) in a Job to be Skipped state until they qualify to start. When the jobs qualify, the jobs are skipped and the job dependencies of all subsequent jobs will be met.
For more information about job status changes, refer to Schedule and Job Status Change Commands in the Concepts online help.
Select the checkbox(es) for the current job status(es) that will undergo the status change. Any selection made in the Jobs To Update frame will serve as a status filter.
For more information about job statuses and allowed changes, refer to Schedule and Job Status Descriptions and Allowed Status Changes in the Concepts online help.
(Optional) Enter or select a change status reason.
Depending on application configuration, the Change Status Reason drop-down list may store a number of the previous reasons entered for Job or Schedule status updates.
Click Apply to apply the job status change.
Close the Selection panel when done.
Related Topics