MFT Server installation
What is it?
The MFT Server installation procedure configures the OpCon MFT Server to receive and route incoming files, and registers it with the OpCon CloudEvents webhook for trigger-based automation.
- Use this when setting up the OpCon MFT Server component for the first time
- The OpCon MFT Server must be installed after the OpCon MFT Agent is configured and communicating with OpCon
- After installation, server users must be configured before any external parties can deposit or retrieve files
The OpCon MFT Server is installed automatically as part of the OpCon MFT Agent.
An updated license key containing the OpCon MFT Server license must be applied to the OpCon environment before starting the installation. Webhook registration requires this license to be active.
The OpCon MFT Agent must be configured and communicating with the OpCon environment before installing the OpCon MFT Server.
The installation process consists of the following steps:
- Webhook registration
- Configure and start the OpCon MFT Server
- Define OpCon MFT Server users
Webhook registration
The OpCon MFT Server submits all trigger events to the OpCon environment through an OpCon CloudEvents webhook. For this to work, the server must be registered as an authenticated webhook user. The registration process submits a request to the OpCon MFT Agent Rest-API to initialize the connection between the OpCon MFT Server and the OpCon CloudEvents webhook.
To register the webhook, complete the following steps:
-
In Solution Manager, select the OpCon MFT Agent that supports the required OpCon MFT Server. The agent must already be authenticated.
-
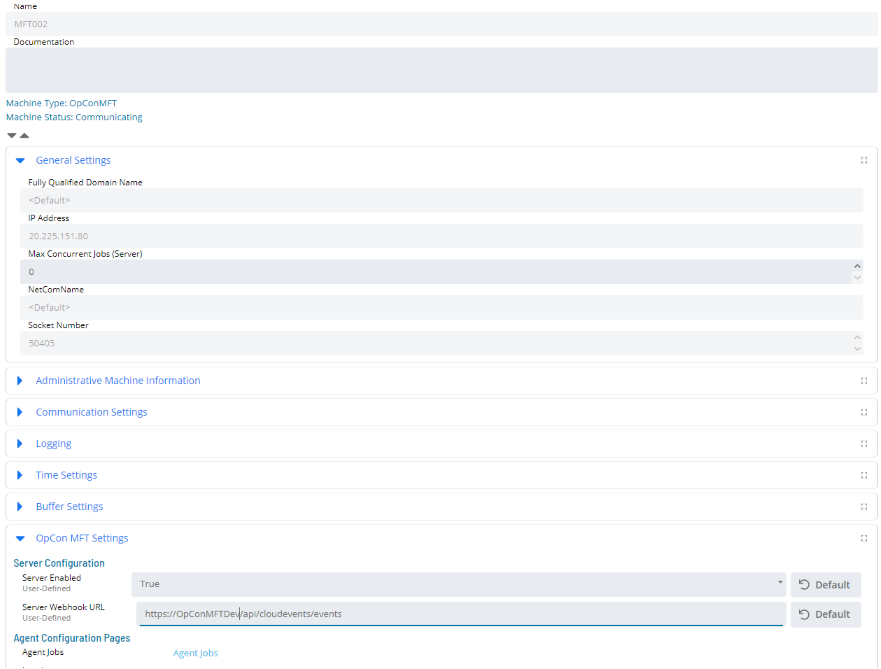
Select the OpCon MFT Settings tab.
-
Set the Server Enabled field to True.
-
In the Server WebHook URL field, enter
https://(OpCon Server)/api/cloudevents/events. This is the URL of the OpCon webhook. SSL is used for this connection, so the server name in the URL must match the name on the OpCon server certificate. If OpCon and OpCon MFT are installed on the same server, uselocalhost. -
Select the Save button. The OpCon environment submits a registration request to the OpCon MFT Agent.
The following two messages are displayed when registration succeeds:
- Configuration saved
- Webhook Registered Successfully
Configure and start the OpCon MFT Server
To configure and start the OpCon MFT Server, complete the following steps:
-
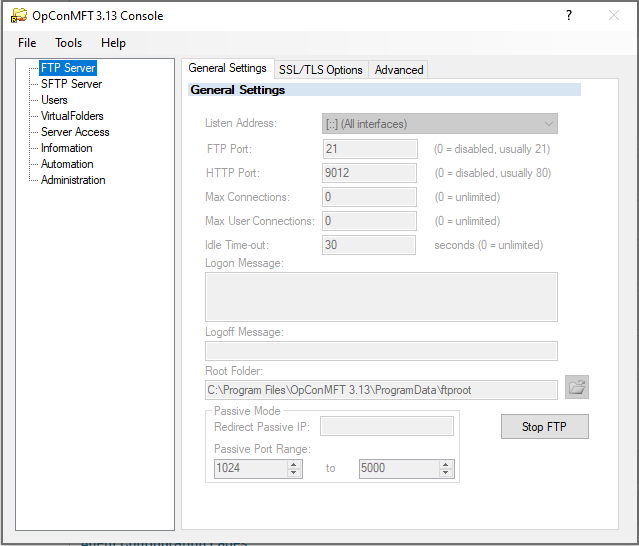
Select the Server Console in the OpConMFT n.nn application menu. The OpCon MFT Server Console opens.
-
Select the FTP Server menu item.
-
To enable web file sharing, enter a port number for the HTTP port value. Use a specific port number instead of the default port (80).
-
Select the Start FTP button to start the FTP server.
For additional information on FTP and SFTP server configuration fields, open the help file by selecting Server Help File in the OpConMFT n.nn application menu.
Define OpCon MFT Server users
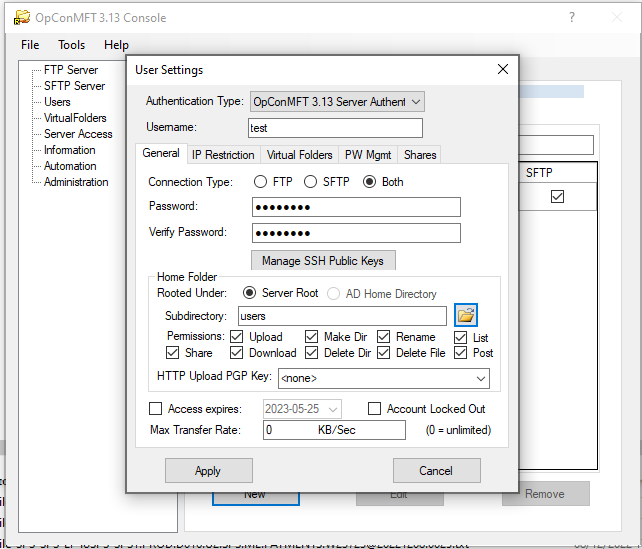
All users who will retrieve or deposit files on the OpCon MFT Server must be configured directly within the server. To manage server users, complete the following steps:
-
Select the Server Console in the OpConMFT n.nn application menu. The OpCon MFT Server Console opens.
-
Select the Users menu item.
-
Select one of the following options:
Action Description New Creates a new server user Edit Modifies the selected user definition Remove Deletes the selected user
For additional information on user definition fields, open the help file by selecting Server Help File in the OpConMFT n.nn application menu, then select Server Console > Users.
Related topics: