Updating File Transfer Job Details
In Admin mode, Windows job type properties can be updated or defined. For conceptual information, refer to File Transfer Job Details in the Concepts online help.
Only those with the appropriate permissions will have access to the Lock button and can update job properties. For details about privileges, refer to Required Privileges in the Accessing Daily Job Definition topic.
If you do not have the Machine Privilege, then you will not be able to edit the daily job definition.
Changes made to the job properties in the Daily Job Definition will take place immediately. If the job has already run, the changes will take effect the next time the job runs.
Updating File Transfer Job Details
To perform this procedure:
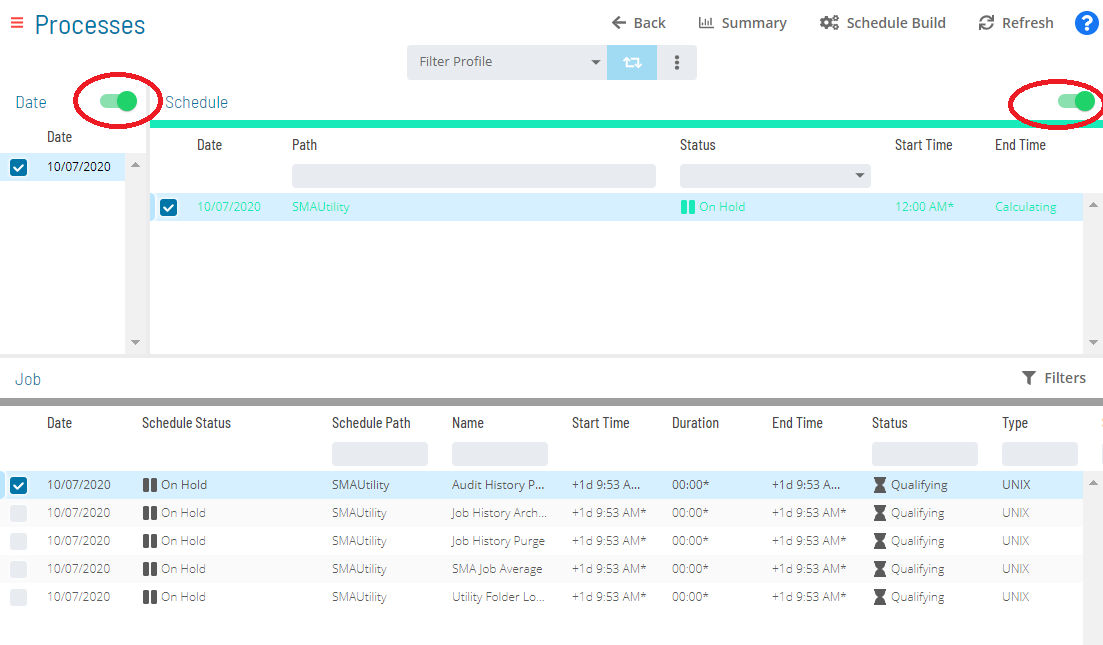
Click on the Processes button at the top-right of the Operations Summary page. The Processes page will display.
Ensure that both the Date and Schedule toggle switches are enabled so that you can make your date and schedule selection, respectively. Each switch will appear green when enabled.

Select the desired date(s) to display the associated schedule(s).
Select one or more schedule(s) in the list.
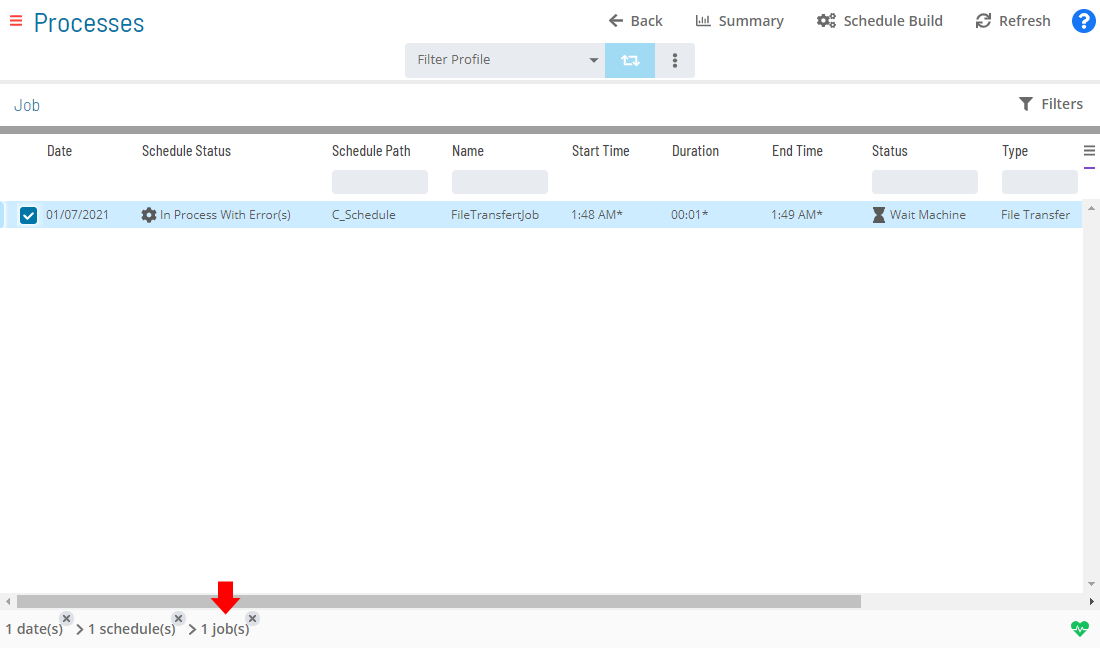
Select one job in the list. A record of your selection will display in the status bar at the bottom of the page in the form of a breadcrumb trail.

Click on the job record (e.g., 1 job(s)) in the status bar to display the Selection panel.
As an alternative, you can right-click on the job selected in the list to display the Selection panel.
-a08280fb260704d662b129adb576a7c8.png)
Click the Daily Job Definition button
at the top-left corner of the panel to access the Daily Job
Definition page. By default, this page will be in Read-only mode.
Click the Lock button
at the top-right corner to place the page in Admin mode. The button
will switch to display a white lock unlocked on a green background
when enabled.
The Lock button will not be visible to users who do not have the appropriate permissions.
Expand the Task Details panel to expose its content.
All required fields are designated by a red asterisk.
In the Source frame:
The Source frame is used to define the information for the source file.
\
Select the machine with the source file to transfer.
The source machine must be Windows or UNIX.
Select the user with access to the file on the Source machine.
Enter the full path and file name for the file to transfer.
Select the data type of the file on the source machine:
If anything other than Binary is defined as the Source Data Type, the integrity of the file is maintained but the file structure will likely be altered. This is done in an effort to present the transferred file in a user-friendly structure for the given platform.
- Text: Indicates that the SMA File Transfer Agent and Server should use the default text data type for the platform when working with the file.
- ASCII: Indicates the file is a simple text file in ASCII format.
- Binary: Indicates the file's structure should be left intact during the transfer process.
In the Destination frame:
The Destination frame is used to define the information for the destination file.
\
Select the machine that will receive the file.
The destination machine must be Windows or UNIX.
Select the user with access to the location on the Destination machine that will receive the file.
Enter the full path and file name for the destination file.
Select the final data type of the file that will be transferred to the destination machine:
- Text: Indicates that the SMA File Transfer Agent and Server should use the default text data type for the platform when working with the file.
- ASCII: Indicates the file should be written to the Destination Machine as a simple text file in ASCII format.
- Binary: Indicates the file's structure should be left intact during the transfer process.
In the Options frame:
The Options frame is used to define the additional information for the file transfer
\
Select the If File Exists option to determine how the SMA File Transfer (SMAFT) Agent behaves when a target file exists:
- Do Not Overwrite: Indicates the SMAFT Agent checks for the existence of the file on the destination machine before starting the transfer.
- Overwrite: Indicates the SMAFT Agent transfers the file while overwriting any existing file on the destination machine.
- Backup Then Overwrite: Indicates the SMAFT Agent checks for the existence of the file on the destination machine before starting transfer.
- Append: Indicates the SMAFT Agent will append the source file to the destination file.
- Backup Then Append: Indicates the SMAFT Agent checks for existence of the file on the destination machine before starting transfer.
Select the Delete Source File option to determine if the deletion of the Source File is disabled, required, or preferred (only the Windows agent supports this feature at this time (other platforms will follow)):
- No: Indicates the Source File will not be deleted upon successful completion of the file transfer.
- Required: Indicates the SMAFT job will fail if the Source file is not deleted upon successful completion of the file transfer.
- Preferred: Indicates the deletion of the Source File is attempted upon successful completion of the file transfer.
Select the Start Transfer On option to determine where the job will start.
- The valid options include:
- Source: Choose this option to start the job on the Source machine.
- Destination: Choose this option to start the job on the Destination machine.
Select the Maximum Transfer Rate (kbits/s) option to define the transfer rate for the job. Valid values include 64, 128, 256, 512, 1024, 2048, and >2048 kbits/second.
Select the Compression option to determine if compression is disabled, required, or preferred. Supported compression types are tar, gzip, and zip:
- None: Indicates the transfer does not use compression.
- Required: Indicates the transfer job fails if compression does not occur.
- Preferred: Indicates compression is attempted during the transfer.
Both the agent and the server must both support the same compression type for compression to succeed.
Select the Encryption option to determine if encryption is disabled, required, or preferred. Supported encryption types are 3DES, AES, and DES:
- None: Indicates the transfer does not use encryption.
- Required: Indicates the job fails if encryption does not occur.
- Preferred: Indicates encryption is attempted during the transfer.
Both the agent and the server must both support the same encryption type for the encryption to succeed.
Select the TLS Security Override option to determine if TLS Security for file transfers is disabled, required, or preferred:
- None: Indicates that TLS Security should not be used by the SMAFT Agent when connecting to the SMAFT Server.
- Required: Indicates that the SMAFT Agent must use TLS Security; otherwise, the job will be failed.
- Preferred (Default): Indicates that the OpCon job request assembly routine uses the SMAFT Server Port numbers and the SMAFT Server/Agent TLS Capability flags to decide what value to send in the TLS Security Mode field.
In the Failure Criteria frame:
The Failure Criteria frame is used to define the criteria for OpCon to determine the final status of the primary job.
\
Select the Fails if preferred settings not satisfied checkbox to determine if the job should fail when the file transfer itself succeeds, but the transfer did not comply with the preferred settings for Delete Source File, Compression, and Encryption.
Click the Save button.